
installation


8E
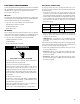
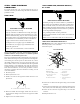
4-WIRE CONNECTION (UNGROUNDED NEUTRAL) -
U.S.A. AND CANADA
4-WIRE CABLE FROM HOME POWER SUPPLY
IMPORTANT: Use the 4-wire cable from home power supply in
the U.S. where local codes do not allow grounding through neutral,
New Branch circuit installations (1996 NEC), mobile homes and
recreational vehicles, new construction and in Canada.
1 Disconnect power.
I
A. Junction Box
B. Black Wires
C. Red Wires
D. Cable from Oven
E. UL listed or CSA
Approved Conduit
Connector
F. Ground (Green or
Bare) Wires
G. UL Listed Wire
Connector
H. Neutral (White) Wires
I. House Electrical
Supply
Ungrounded Neutral
B
C
D
G
F
E
H
A
2 Connect the 2 black wires B together using a UL listed wire
connector.
3 Connect the 2 red wires C together using a UL listed wire
connector.
4 Untwist white wire from green (or bare) ground wire coming
from the oven.
5 Connect the 2 neutral (white) wires H together using a UL listed
wire connector.
6 Connect the ground (green or bare) wire FA from the oven cable
to the ground (green or bare) wire (in the junction box) using a
UL listed wire connector.
7 Install junction box cover.
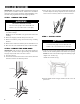
STEP 5 - MOUNT THE OVEN
1 Slide the oven completely into the cabinet until the back surface
of the front frame touches the front wall of the cabinet. Center
the oven within the cabinet cutout.
NOTE: Push against seal area of the oven front frame when push-
ing the oven into the cabinet. Do not push against the outside edges.
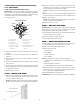
Mounting Frame
Mounting Frame Hole
2 There are two holes, one on each side of the front frame that sur-
rounds the oven cavity. Drill 1/8" (3.18 mm) pilot holes through
the holes, and into the front wall of the cabinet.
NOTE: The double oven has four mounting holes, two on each
side.
3 Insert the # 8–14 x 1" screws (provided) through the pilot holes to
securely fasten the oven to the cabinet. Do not overtighten screws.
4 Replace the oven racks.
NOTE: Ensure all plastic and foam packaging are removed from
the oven racks before reinserting them.
5 Reconnect power to the oven.
STEP 6 - REPLACE THE DOOR
IMPORTANT: The oven door is heavy and fragile, and the door
front is glass. To avoid oven door glass breakage, use both hands,
and grasp only the sides of the oven door to remove.
1 Verify that the door hinge latches are forward, and then insert the
oven door hinges into the openings.
2 Lower the oven door to engage the hinges.
3 Press the hinge latches down to lock.
STEP 7 - COMPLETE INSTALLATION
1 Check that all parts are now installed. If there is an extra part, go
back through the steps to see which step was skipped.
2 Dispose of/recycle all packaging materials.
3 Check Operation of Oven.
• Turn on power.
• Press BROIL.
• Set the temperature.
• Pr e ss STA RT.
NOTE: If oven(s) does not operate, check the following:
• Household fuse is intact and tight; or circuit breaker has not
tripped.
• Electrical supply is connected.
• See “Troubleshooting” section in the Operation Manual.
4 When oven has been on for 5 minutes, feel for heat. If you do not
feel heat or if an error message appears in the display, turn off
the oven and contact a qualied technician.
5 Press STOP/CLEAR to turn off the oven.
IMPORTANT: For oven use and cleaning, read the User Manual.