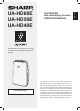
Operation Manual UA-HD60E, UA-HD50E, UA-HD40E Air Purifier with Humidifying Function EN DE ES PT FR PL NL
UA-HD60E UA-HD50E UA-HD40E AIR PURIFIER with Humidifying Function OPERATION MANUAL “Plasmacluster” and “Device of a cluster of grapes” are trademarks of Sharp Corporation. Free standing type * The number in this technology mark indicates an approximate number of ions supplied into air of 1 cm3, which is measured around the center of a room with the “high-density Plasmacluster 7000” applicable floor area (at 1.
Please read before operating your new Air Purifier The air purifier draws in room air from the air intake, passes the air through a PreFilter, a Deodorizing Filter and a HEPA Filter inside of the unit, then discharges the air through the air outlet. The HEPA Filter can remove 99.97% of dust particles as small as 0.3 microns that pass through the filter and also helps absorb odours. The Deodorizing Filter gradually absorbs odours as they pass through the filter.
FEATURES Unique Combination of Air Treatment Technologies Triple Filtration System + Plasmacluster + Humidification TRAPS DUST* Pre-Filter traps dust and other large airborne particles. DECREASES ODOURS Deodorizing Filter absorbs many common household odours. REDUCES POLLEN & MOLD* HEPA Filter traps 99.97% of particles as small as 0.3 microns. FRESHENS Plasmacluster treats the air similar to the way nature cleans the environment by emitting a balance of positive and negative ions.
IMPORTANT SAFETY INSTRUCTIONS When using electrical appliances, basic safety precautions should be followed, including the following: WARNING – To reduce the risk of electrical shock, fire or injury to persons: • Read all instructions before using the unit. • Use only a 220-240 volt outlet. • Do not use the unit if the power cord or plug is damaged or the connection to the wall outlet is loosened. • Periodically remove dust from the plug.
If this air purifier should cause interference to radio or television reception, try to correct the interference by one or more of the following measures: • Reorient or relocate the receiving antenna. • Increase the separation distance between the unit and radio/TV receiver. • Connect the equipment into an outlet on a circuit different from that to which the receiver is connected. • Consult the dealer or an experienced radio/TV technician for help.
IMPORTANT SAFETY INSTRUCTIONS • Use only fresh tap water. Use of other water sources may promote the growth of mold, fungus and/or bacteria. • Do not shake the Water Tank when with holding the carrying handle. • Do not remove the Humidifying Filter from a Filter Frame. • Avoid spilling water when removing or cleaning the Humidifying Tray. • Do not remove the Float and the Roller. Refer to E-18 if the Float and/or Roller comes off. • Do not use the detergents for maintenance of the Humidifying Tray and Cover.
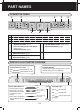
ENGLISH PART NAMES FRONT / BACK 1 2 3 1 2 3 4 5 6 Air Outlet (Front) Operation panel (Ref. E-6) Display (Ref. E-6) Main Unit Stopper (2 Locations) Caster (4 Locations) 4 5 6 8 1 2 9 3 10 4 11 5 12 6 7 13 (Plug shape varies by country.
PART NAMES OPERATION PANEL 3 2 1 a 1 a b c 2 3 4 4 b 5 6 c POWER ON Button CLEAN AIR MODE Button / INDICATOR LIGHT (green) CLEAN AIR HUMIDIFY MODE Button / INDICATOR LIGHT (green) CLEAN ION SHOWER MODE Button / INDICATOR LIGHT (green) • FAN SPEED Button / 5 • LIGHT CONTROL Button INDICATOR LIGHT (green) • FILTER RESET Button (Press 3 sec.) / • Plasmacluster Ion ON / OFF Button INDICATOR LIGHT (orange) (Press 3 sec.
PREPARATION ENGLISH Be sure to remove the power plug from the wall outlet. FILTER INSTALLATION (2 Locations) 1 2 HEPA Filter (White) Remove the Back Panel. Deodorizing Filter (Black) 3 Remove the filters from the plastic bag. Install the filters in the correct order as shown. Tag HEPA Filter (White) 4 Deodorizing Filter (Black) Install the Back Panel. Click 5 Fill in the usage start date on the Date Label.
PREPARATION Be sure to remove the power plug from the wall outlet. REFILLING THE WATER TANK When using the Clean Air Humidify Mode, or the Clean Ion Shower Mode. 1 ② Remove the Water Tank by pushing the handle down and pulling it forward. ③ ① 2 Fill the Water Tank with tap Water. MAX CAUTION • Check to see that there is no water leaking. • Be sure to wipe off any excess water on the outside of the Water Tank.
ENGLISH OPERATION CLEAN AIR HUMIDIFY Using to quickly clean the air, reduce odours and to humidify. START STOP • The louver opens and the unit starts the operation automatically. • Select the desired fan speed. (Ref. E-10) • Unless the power cord has been unplugged, the operations starts in the previous mode it was operated in. NOTE • Fill the Water Tank. (Ref. E-8) • When the Water Tank is empty, the unit will operate in “CLEAN AIR MODE” and is flashing (red).
OPERATION FAN SPEED Select the desired fan speed. AUTO ADVANCED POLLEN LOW AUTO MED MAX NOTE AUTO The fan speed is automatically switched (between HIGH and LOW) depending on the amount of impurities in the air. The sensors detect impurities for efficient air purification. ADVANCED AUTO The unit will automatically operate at higher level than the normal with the intensities of releasing high-density Plasmacluster ions and catching dust.
ENGLISH USEFUL FUNCTIONS LIGHT CONTROL Use this function to select the desired brightness. brighter darker turn off ON TIMER Select the length of time you want. The unit automatically starts once the selected time is reached. 2hour 4hour 6hour 8hour 10hour 12hour 14hour CANCELLATION (with the unit OFF) OFF TIMER Select the length of time you want, with the unit on. The unit automatically stops once the selected time is reached.
CARE AND MAINTENANCE FILTER INDICATOR In case operating at the “MEDIUM” wind volume, the Indicator Light will turn on after approximately 720 hours. (30days×24hours=720) (The lighting time will vary between approximately 360-1080 hours depending on the wind volume.) Reminder to perform maintenance of parts below. After performing maintenance, reset the Filter Indicator. (Ref. E-13) more than 3 sec. CARE INDEX • Notice an unpleasant odour from the air outlet.
WATER TANK Rinse the inside with a small amount of water. CAUTION • Do not shake the Water Tank with holding the carrying handle. • Do not put down the Water Tank with the Tank Cap on the bottom side. (The water may leak.) NOTE for stubborn dirt... Clean inside of the water tank with a soft sponge and the tank cap with a cotton swab or a toothbrush. Tank cap Toothbrush HUMIDIFYING FILTER Rinse with plenty of water. CAUTION • Do not remove the Humidifying Filter from a Filter Frame.
CARE AND MAINTENANCE HUMIDIFYING TRAY AND COVER Rinse the inside of the Humidifying Tray with a toothbrush. CAUTION • Do not remove the Float and the Roller. • If the Float and / or the Roller comes off. (Ref. E-18) Float Roller BACK PANEL Sensor NOTE for stubborn dirt... 1. Fill the tray half way with water. 2. Add a small amount of kitchen detergent. 3. Soak for 30 minutes. 4. Remove the kitchen detergent with clean water. TRAY Gently remove dust with a vacuum cleaner attachment or similar tool.
ENGLISH Be sure to remove the power plug from the wall outlet. HEPA FILTER / DEODORIZING FILTER Tag Remove the dust on the HEPA FILTER and DEODORIZING FILTER. CAUTION HEPA Filter (White) Do not WASH in water and DRY in the sun. • HEPA FILTER Apply the maintenance only the side with the tag on. Do not clean the opposite side. The filter is fragile, so be careful not to apply too much pressure. Deodorizing Filter (Black) UNIT • DEODORIZING FILTER The maintenance can be applied to the both sides.
CARE AND MAINTENANCE Be sure to remove the power plug from the wall outlet. FILTER REPLACEMENT Replacement timing Filter life will vary depending on the room environment, usage, and location of the unit. If dust or odour persists, replace the filter.
Before calling for service, please review the Troubleshooting chart below, since the problem may not be a unit malfunction. SYMPTOM REMEDY (not a malfunction) Odours and smoke are not removed. • Clean or replace the filters if they appear to be heavily soiled. (Ref. E-12,E-13,E-15) The Dust/Odour Monitor illuminates green even when the air is impure. • The air could be impure at the time the unit was plugged in. Unplug the unit, wait one minute, and plug the unit in again.
TROUBLESHOOTING SYMPTOM REMEDY (not a malfunction) When the Roller / Float / Tray partition was removed. • Install the Roller / Float / Tray partition in order below. Tray partition Click Humidifying tray FLOAT ROLLER Fix the roller in the tray from side way. Float 1. Insert the float under this tab. 2. Inner the tab of float into the hole. Tab 3. Insert the tab on the other side of the float into the hole.
DIGITAL INDICATION If error occurs again, contact the Sharp Service Centre. ERROR DETAILS Abnormal Humidity Filter. REMEDY Verify if the Humidifying Filter, Humidifying Tray and Roller are properly installed and then turn power ON again. Abnormal fan motor. Abnormal temperaturehumidity sensor. Unplug the unit, wait one minute, and plug the unit in again.
0 26 45 480 366 70 54 660 Noise Level (dBA) Fan Speed (m3/hour) Rated Power (W) Noise Level (dBA) Humidification (mL/hour)*1 600 54 49 288 55 54 306 2.5 ~28 ~38 460 43 20 186 43 17 186 190 23 7 60 23 5 60 E-20 *4 *3 *2 *1 8.6 7.9 2.5 ~21 ~26 370 37 14 144 37 12 144 MED 190 23 7 60 23 5 60 LOW 7.
1. In the European Union Attention: Your product is marked with this symbol. It means that used electrical and electronic products should not be mixed with general household waste. There is a separate collection system for these products. IF YOU WISH TO DISPOSE OF THIS EQUIPMENT, DO NOT USE THE ORDINARY WASTE BIN, AND DO NOT PUT THEM INTO A FIREPLACE! Used electrical and electronic equipment should always be collected and treated SEPARATELY in accordance with local law.
R LUFTREINIGER mit Befeuchtungsfunktion Bedienungsanleitung DEUTSCH UA-HD60E UA-HD50E UA-HD40E „Plasmacluster“ und „Device of a cluster of grapes“ sind Marken der Sharp Corporation.
Bitte lesen, bevor Sie Ihren neuen Luftreiniger benutzen Der Luftreiniger saugt Raumluft durch den Lufteinzug ein, lässt diese durch einen Vorfilter, einen Deo-Filter und einen HEPA-Filter im Gerät strömen und gibt sie dann durch den Luftauslass wieder in den Raum ab. Der HEPA-Filter kann 99,97 % der Staubpartikel mit einer Mindestgröße von 0,3 Mikron, die den Filter passieren, entfernen und trägt dazu bei, Gerüche zu absorbieren.
DEUTSCH Eine einzigartige Kombination aus Luftaufbereitungstechnologie Dreifach-Filtersystem + Plasmacluster + Befeuchtung FÄNGT STAUB AUF* Der Vorfilter fängt Staub und andere große Partikel aus der Luft auf. VERRINGERT GERÜCHE Der Deofilter absorbiert viele gewöhnliche Haushaltsgerüche REDUZIERT POLLEN & SCHIMMEL* Der HEPA-Filter fängt 99,97% der Partikel mit einer Mindestgröße von 0,3 Mikronen auf.
WICHTIGE SICHERHEITSANWEISUNGEN B e i d e r Ve r w e n d u n g v o n E l e k t r o g e r ä t e n s o l l t e n g r u n d l e g e n d e Sicherheitsvorkehrungen befolgt werden, einschließlich der folgenden: WARNUNG - Um das Risiko von Elektroschocks, Feuer oder Verletzungen zu vermeiden: • Bitte lesen Sie alle Anweisungen sorgfältig durch, bevor Sie das Gerät benutzen. • Bitte nur an eine 220-240 Volt-Steckdose anschließen.
Wenn dieser Luftreiniger Interferenzen mit Radio- oder Fernsehempfang auslöst, versuchen Sie dies folgendermaßen zu beheben: • Richten Sie die Antenne neu aus oder bringen Sie sie an einen anderen Ort. • Erhöhen Sie den Abstand zwischen dem Gerät und dem Radio, TV oder Funkuhr. • Schließen Sie das Gerät an einen anderen Stromkreis als den Empfänger an. • Bitten Sie den Händler oder einen erfahrenen Rundfunktechniker um Hilfe.
WICHTIGE SICHERHEITSANWEISUNGEN • Verwenden Sie nur frisches Leitungswasser. Die Verwendung von anderen Wasserquellen kann das Entstehen von Schimmel, Pilzen und/oder Bakterien fördern. • Schütteln Sie Wassertank nicht, wenn Sie ihn am Tragegriff festhalten. • Den Befeuchtungsfilter nicht aus dem Filterrahmen herausnehmen. • Verschütten Sie kein Wasser, wenn Sie das Befeuchtungsfach entnehmen oder reinigen. • Nicht den Schwimmer und den Roller entfernen.
Bezeichnung der Bauteile 2 3 4 5 6 3 Luftauslass (Vorderseite) Bedienfeld (Vgl. D-6) Anzeige (Vgl. D-6) Hauptgerät Stopper (2 Orte) Rollfuß (4 Orte) DEUTSCH VORDERSEITE/RÜCKSEITE 1 1 2 4 5 6 8 1 2 9 3 10 4 11 5 12 6 7 13 (Steckerform unterscheidet sich je nach Land.
Bezeichnung der Bauteile BEDIENFELD 3 2 1 a 1 a b c 2 3 4 4 b 5 6 c Einschalt-Taste LUFTREINIGUNGSMODUS-Taste/ANZEIGELEUCHTE (grün) LUFTREINIGUNGS-/BEFEUCHTUNGS-MODUS-Taste/ANZEIGE-LEUCHTE (grün) IONENDUSCHEREINIGUNGS-MODUS-Taste / ANZEIGELEUCHTE (grün) • VENTILATORGESCHWINDIG5 • LICHTSTEUERUNGS-Taste KEITS-Taste / • FILTER RESET-Knopf (3 Sek. drücken) / ANZEIGELEUCHTE (grün) ANZEIGELEUCHTE (orange) • Plasmacluster Ion-AN /AUS-Taste (3 Sek.
VORBEREITUNG Stellen Sie sicher, dass der Stecker aus der Steckdose gezogen ist. (2 Orte) 1 2 HEPA-Filter (weiß) Hintere Abdeckung entfernen. Deofilter (schwarz) Filter aus dem Plastikbeutel entnehmen. 3 Die Filter in der richtigen Reihenfolge, wie gezeigt, einsetzen. Etikett Deofilter (schwarz) HEPA-Filter (weiß) 4 Einsetzen der hinteren Abdeckung. Klicken 5 Füllen Sie das Datum des Nutzungsbeginns in das Datumschild ein.
VORBEREITUNG Stellen Sie sicher, dass der Stecker aus der Steckdose gezogen ist. DEN WASSERTANK NACHFÜLLEN Wenn Sie den Luftreinigungs-/Befeuchtungsmodus oder Ionenduschenreinigungs-Modus verwenden, 1 ② Entfernen Sie den Wassertank, indem Sie den Griff nach unten drücken und ihn nach vorne ziehen. ③ ① 2 Wassertank mit Leitungswasser befüllen. MAX VORSICHT • Überprüfen Sie, ob kein Wasser ausläuft. • Stellen Sie sicher, dass sich kein Wasser außerhalb des Wassertanks befindet.
BETRIEB (BEDIENUNG) LUFTREINIGUNG/BEFEUCHTUNG START STOPP • Der Lüftungsschlitz öffnet sich und das Gerät startet automatisch. • Wählen Sie die gewünschte Lüftergeschwindigkeit aus. (Vgl. D-10) • Solange das Stromkabel nicht herausgezogen wurde, beginnt der Betrieb in dem vorherigen Betriebsmodus. HINWEIS • Wassertank auffüllen. (Vgl. D-8) • Wenn der Wassertank leer ist, wird das Gerät im „LUFTREINIGUNGSMODUS“ betrieben und blinkt (rot). leuchtet (grün) während des Befeuchtungsbetriebs.
BETRIEB (BEDIENUNG) LÜFTERGESCHWINDIGKEIT Wählen Sie die gewünschte Lüftergeschwindigkeit aus. AUTOMATIK FORTGESCHRIT- POLLEN LOW TEN AUTO (NIEDRIG) MED (MITTEL) MAX HINWEIS AUTOMATIK Die Lüftergeschwindikgeit wird in Abhängigkeit der Stärke der Luftunreinheit automatisch umgeschalten (zwischen HOCH und NIEDRIG). Der Sensor ermittelt Luftunreinheiten für eine effiziente Luftreinigung.
NÜTZLICHE FUNKTIONEN LICHTSTEUERUNG heller dunkler abschalten DEN TIMER EINSCHALTEN Wählen Sie die gewünschte Zeitspanne aus. Das Gerät startet automatisch, sobald die ausgewählte Zeit erreicht ist. 2 Stunden 4 Stunden 6 Stunden 8 Stunden 10 Stunden 12 Stunden14 Stunden ABBRUCH (Bei AUSGESCHALTETEM GERÄT) AUSSCHALT-ZEITSCHALTER Wählen Sie die gewünschte Zeitspanne aus, während das Gerät angeschalten ist. Das Gerät stoppt automatisch, sobald die ausgewählte Zeit erreicht ist.
PFLEGE UND WARTUNG FILTERANZEIGE Im Falle eines Betriebs auf der „MEDIUM“-Windstärke, schaltet sich die Anzeigeleuchte nach ca. 720 Stunden an (30 Tage x 24 Stunden = 720) (Die Leuchtzeit varriiert zwischen ca 360 und 1080 Stunden, je nach Windstärke.) Erinnerung, folgende Teile zu warten. Nach der Wartung die Filteranzeige zurücksetzen. (Vgl. D-13) mehr als 3 Sek. PFLEGEINDEX • Es wird ein unangenehmer Geruch aus dem Luftauslass wahrgenommen.
Stellen Sie sicher, dass der Stecker aus der Steckdose gezogen ist. WASSERTANK VORSICHT • Den Wassertank nicht schütteln, wenn Sie ihn am Tragegriff festhalten. • Den Wassertank nicht mit dem Tankdeckel nach unten hinstellen. (Wasser kann auslaufen) HINWEIS Für hartnäckigen Schmutz... Die Innenseite des Wassertanks mit einem weichen Schwamm reinigen und den Tankdeckel mit einem Baumwolllappen oder einer Zahnbürste putzen. Tankdeckel Zahnbürste BEFEUCHTUNGSFILTER Mit viel Wasser ausspülen.
PFLEGE UND WARTUNG BEFEUCHTUNGSFACH UND ABDECKUNG Die Innenseite des Befeuchtungsfachs mit einer Zahnbürste reinigen. VORSICHT • Nicht den Schwimmer und den Roller entfernen. • Wenn der Schwimmer und/oder der Roller sich lösen. (Vgl. D-18) Schwimmer Roller HINWEIS Für hartnäckigen Schmutz... 1. Das Fach zur Hälfte mit Wasser füllen. 2. Füllen Sie ein wenig Küchenreiniger 3. 30 Minuten einwirken lassen. 4. Mit frischem Wasser ausspülen.
Stellen Sie sicher, dass der Stecker aus der Steckdose gezogen ist. Etikett Den Staub im HEPA- und DEOFILTER entfernen. VORSICHT HEPA-Filter (weiß) Nicht mit Wasser WASCHEN und in der Sonne TROCKNEN • HEPA-FILTER Reinigen Sie lediglich diejenige Seite, auf welcher das Schild angebracht ist. Reinigen Sie die Rückseite nicht. Der Filter ist zerbrechlich, achten Sie darauf, nicht zu viel Druck auszuüben. Deofilter (schwarz) ANLAGE • DEODORISIERUNGSFILTER Die Reinigung kann an beiden Seiten erfolgen.
PFLEGE UND WARTUNG Stellen Sie sicher, dass der Stecker aus der Steckdose gezogen ist. FILTERWECHSEL Zeitpunkt zum Wechseln des Filters Die Lebenszeit des Filters hängt von der Raumumgebung, der Verwendung und dem Aufstellungsort des Geräts ab. Wenn Staub oder Gerüche weiterbestehen, ersetzen Sie den Filter.
FEHLERBEHEBUNG Bevor Sie den Kundendienst anrufen, lesen Sie sich bitte zuerst die Tabelle "Fehlerbehebung" durch, da das Problem möglicherweise keine Gerätefehlfunktion ist. BEHEBEN (keine Fehlfunktion) Gerüche und Rauch werden nicht entfernt • Filter reinigen oder ersetzen, da sie womöglich schwer verschmutzt sind. (Vgl. D-12, D-13, D-15) Der Staub-/Geruchsmonitor leuchtet grün, selbst wenn die Luft unrein ist. • Die Luft war womöglich zu dem Zeitpunkt unrein, als das Gerät eingesteckt wurde.
FEHLERBEHEBUNG PROBLEM BEHEBEN (keine Fehlfunktion) Wenn das Roller-/Schwimmer-/ Fachteil entfernt wurde. • Bauen Sie das Roller-/Schwimmer-/Fachteil in der folgenden Reihenfolge ein. Fachteil Klicken Befeuchtungsfach SCHWIMMER ROLLER Befestigen Sie den Roller seitlich am Fach. Schwimmer 1. Den Schwimmer unter diesem Hahn einführen. 2. Führen Sie den Schwimmerhahn in den Loch. Hahn 3. Führen Sie den Hahn auf der anderen Seite des Schwimmers in das Loch ein.
DIGITAL INDIKATION Wenn der Fehler noch einmal auftritt, kontaktieren Sie das Sharp-Service-Center. FEHLERDETAILS Abnormaler Befeuchtungsfilter LÖSUNG Überprüfen, ob Befeuchtungsfilter, Befeuchtungsfach und Roller richtig eingebaut sind und dann schalten Sie das Gerät wieder ein. Abnormaler Lüftermotor Abnormaler TemperaturFeuchtigkeitssensor Gerät ausstecken, eine Minute warten und wieder einstecken.
D-20 (m2)*3 *4 190 23 7 60 23 5 60 MAX 440 43 19 180 47 25 216 2,5 ~21 ~26 370 37 14 144 37 12 144 190 23 7 60 23 5 60 MED (MITTEL) LOW (NIEDRIG) UA-HD40E 7,9 399 (B) × 230 (T) × 615 (H) Standby-Leistung Um die Stromkreise zu betreiben, während der Stecker in die Wandsteckdose eingesteckt ist, verbraucht dieses Produkt etwa 0,9 W Standby-Leistung. Um Energie zu sparen, ziehen Sie das Kabel heraus, wenn das Gerät nicht betrieben wird.
A. Entsorgungsinformationen (für Haushalte) Achtung: Ihr Produkt ist mit diesem Symbol gekennzeichnet. Dies bedeutet, dass Elektro-Altgeräte nicht mit dem allgemeinen Hausmüll vermischt werden dürfen. Es gibt ein separates Sammelsystem für diese Produkte. WENN SIE DAS GERÄT ENTSORGEN MÖCHTEN, WERFEN SIE DAS GERÄT WEDER IN DEN HAUSMÜLL NOCH IN EIN FEUER! Benutzte Elektrogeräte und Elektronikgeräte sollten immer GETRENNT entsorgt und wiederaufbereitet werden, gemäß den örtlichen Gesetzen.
R PURIFICADOR DE AIRE con función de humidificación MANUAL DE USO ESPAÑOL UA-HD60E UA-HD50E UA-HD40E "Plasmacluster" y "Device of a cluster of grapes" son marcas comerciales de Sharp Corporation.
Lea estas instrucciones antes de utilizar su nuevo purificador de aire El purificador de aire capta el aire de la habitación desde la entrada de aire, lleva el aire a través de un filtro previo, un filtro desodorante y un filtro HEPA en el interior de la unidad, y luego descarga el aire a través de la salida de aire. El filtro HEPA puede eliminar el 99,97 % de las partículas de polvo que atraviesan el filtro, de un tamaño mínimo de 0,3 micras, y también ayuda a absorber los olores.
ESPAÑOL Combinación exclusiva de tecnologías de tratamiento del aire Sistema de triple filtrado + Plasmacluster + Humidificación ATRAPA EL POLVO* El prefiltro atrapa el polvo y otras partículas de gran tamaño suspendidas en el aire. REDUCE LOS OLORES El filtro desodorante absorbe muchos de los olores domésticos habituales. REDUCE EL POLEN Y EL MOHO* El filtro HEPA atrapa el 99,97 % de las partículas, de un tamaño mínimo de 0,3 micras.
INSTRUCCIONES IMPORTANTES DE SEGURIDAD Cuando se utilizan electrodomésticos, se deben respetar una serie de precauciones básicas de seguridad, incluidas las siguientes: ADVERTENCIA : o lesiones personales: Para reducir el riesgo de descarga eléctrica, incendios • Lea todas las instrucciones antes de utilizar la unidad. • Utilice únicamente una toma de 220-240 voltios. • No utilice la unidad si el cable de alimentación o el enchufe están dañados, o si la conexión con la toma de pared está floja.
Si este purificador de aire provoca interferencias en la recepción de señales de radio o televisión, intente corregir las interferencias mediante una o varias de las siguientes medidas: • Reoriente o reubique la antena de recepción. • Aumente la distancia de separación entre la unidad y el receptor de radio o televisión. • Conecte el equipo a una toma distinta a la que esté conectado el aparato. • Consulte al distribuidor o a un técnico de radio y televisión con experiencia para obtener ayuda.
INSTRUCCIONES IMPORTANTES DE SEGURIDAD • Utilice solo agua del grifo. El uso de agua de otro origen puede fomentar la aparición de moho, hongos o bacterias. • No agite el depósito de agua mientras sujeta el asa. • No extraiga el filtro de humidificación del bastidor del filtro. • Evite derramar agua al extraer o limpiar la bandeja de humidificación. • No extraiga el flotador y el rodillo. Consulte ES-18 si el flotador o el rodillo se desprenden.
DELANTE/DETRÁS 1 2 1 2 3 4 5 6 3 Salida de aire (delante) Panel de control (consulte ES-6) Pantalla (consulte ES-6) Unidad principal Tope (2 ubicaciones) Rueda (4 ubicaciones) 4 5 6 8 1 2 9 3 10 4 11 5 12 6 7 13 (La forma del enchufe varía según el país.
NOMBRE DE LAS PIEZAS PANEL DE CONTROL 3 2 1 a 1 a b c 2 3 4 4 b 5 6 c Botón de encendido Botón MODO AIRE LIMPIO/LUZ INDICADORA (verde) Botón MODO HUMIDIFICAR AIRE LIMPIO/LUZ INDICADORA (verde) Botón MODO DUCHA DE IONES LIMPIOS/LUZ INDICADORA (verde) • Botón VELOCIDAD DEL VENTILADOR / 5 • Botón CONTROL DE LUZ LUZ INDICADORA (verde) • Botón RESTABLECER FILTRO (pulse durante 3 segundos) / • Botón encendido/apagado ión Plasmacluster (pulse durante 3 segundos) / LUZ INDICADORA (naranja) LUZ INDICADORA (
PREPARACIÓN Asegúrese de quitar el enchufe de la toma de pared. INSTALACIÓN DE LOS FILTROS (2 ubicaciones) 2 Filtro HEPA (blanco) Filtro desodorante (negro) 3 Extraiga los filtros de la bolsa de plástico. Instale los filtros en el orden correcto, tal como se indica. Etiqueta Filtro HEPA (blanco) 4 Filtro desodorante (negro) Instale el panel trasero. Clic 5 Indique la fecha de inicio de uso en la etiqueta de la fecha. ES-7 ESPAÑOL 1 Retire el panel trasero.
PREPARACIÓN Asegúrese de quitar el enchufe de la toma de pared. LLENADO DEL DEPÓSITO DE AGUA Cuando utilice el modo de humidificación de aire limpio o el modo de ducha de iones limpios. 1 ② Extraiga el depósito de agua presionando el asa hacia abajo y tirando hacia delante. ③ ① 2 Llene el depósito de agua con agua del grifo. MAX PRECAUCIÓN • Compruebe que no haya fugas de agua. • Asegúrese de limpiar todo exceso de agua en el exterior del depósito de agua.
FUNCIONAMIENTO HUMIDIFICACIÓN DE AIRE LIMPIO Se utiliza para limpiar rápidamente el aire, reducir los olores y humidificar. PARADA • El deflector se abre y la unidad empieza a funcionar automáticamente. • Seleccione la velocidad del ventilador que desee (consulte ES-10). • A menos que el cable de alimentación se haya desconectado, la operación se pone en marcha en el último modo utilizado. NOTA • Llene el depósito de agua (consulte ES-8).
FUNCIONAMIENTO VELOCIDAD DEL VENTILADOR Seleccione la velocidad del ventilador que desee. AUTO- AVANZADA POLEN MÁTICA AUTOMÁTICA BAJA MED MAX NOTA AUTOMÁTICA La velocidad del ventilador cambia automáticamente (entre ALTA y BAJA) según la cantidad de impurezas que haya en el aire. Los sensores detectan las impurezas para depurar el aire eficazmente.
FUNCIONES ÚTILES CONTROL DE LUCES Utilice esta función para seleccionar el brillo deseado. más brillo más oscuro TEMPORIZADOR ENCENDIDO Seleccione el tiempo que desee. La unidad se pondrá en marcha automáticamente en cuanto transcurra el tiempo seleccionado. 2 horas 4 horas 6 horas 8 horas 10 horas 12 horas 14 horas CANCELACIÓN (con la unidad apagada) TEMPORIZADOR DE APAGADO Seleccione el tiempo que desee, con la unidad encendida.
LIMPIEZA Y MANTENIMIENTO INDICADOR DEL FILTRO Si se utiliza con un volumen de viento "MEDIO", la luz indicadora se encenderá cuando hayan transcurrido aproximadamente 720 horas (30 días x 24 horas = 720). (El tiempo de encendido variará entre 360 y 1080 horas, según el volumen de viento.) Recuerde llevar a cabo el mantenimiento de las piezas que se indican a continuación. Una vez realizado el mantenimiento, restablezca el indicador del filtro (consulte ES-13).
Asegúrese de quitar el enchufe de la toma de pared. DEPÓSITO DE AGUA Enjuague el interior con un poco de agua. PRECAUCIÓN NOTA Para suciedad resistente… Limpie el interior del depósito de agua con una esponja suave y el tapón del depósito con un bastoncillo de algodón o un cepillo de dientes. Tapón del depósito Cepillo de dientes FILTRO DE HUMIDIFICACIÓN Enjuague con agua abundante. PRECAUCIÓN • No extraiga el filtro de humidificación del bastidor del filtro.
LIMPIEZA Y MANTENIMIENTO BANDEJA DE HUMIDIFICACIÓN Y TAPA Enjuague el interior de la bandeja de humidificación con un cepillo de dientes. PRECAUCIÓN • No extraiga el flotador y el rodillo. • Si el flotador o el rodillo se desprenden, consulte ES-18. Flotador Rodillo PANEL TRASERO Sensor NOTA Para suciedad resistente… BANDEJA 1. Llene la mitad de la bandeja con agua. 2. Añada un poco de detergente de cocina. 3. Sumérjala durante 30 minutos. 4. Elimine el detergente de cocina con agua limpia.
Asegúrese de quitar el enchufe de la toma de pared. FILTRO HEPA/ FILTRO DESODORANTE Etiqueta PRECAUCIÓN Filtro HEPA (blanco) No LAVE con agua y déjelo SECAR al sol. • FILTRO HEPA Lleve a cabo el mantenimiento solamente en el lado de la etiqueta. No limpie el lado opuesto. El filtro es frágil, por lo tanto, tenga cuidado y no ejerza demasiada presión. Filtro desodorante (negro) UNIDAD • FILTRO DESODORANTE El mantenimiento se puede realizar en los dos lados.
LIMPIEZA Y MANTENIMIENTO Asegúrese de quitar el enchufe de la toma de pared. CAMBIO DE FILTRO Intervalos de cambio La vida útil de los filtros variará según el entorno de la habitación, el uso y la ubicación de la unidad. Si el polvo o el olor persisten, cambie el filtro. (Consulte el apartado "Lea estas instrucciones antes de utilizar su nuevo purificador de aire".
RESOLUCIÓN DE PROBLEMAS Antes de avisar al servicio técnico, consulte la tabla de resolución de problemas siguiente, ya que es posible que el problema no sea una avería de la unidad. REMEDIO (no se trata de una avería) Los olores y el humo no se eliminan. • Limpie o cambie los filtros si parecen estar muy sucios. (Véanse ES-12, ES-13 y ES-15) La luz del Control de polvo/ olores sigue verde aunque el aire es impuro. • El aire podría ser impuro en el momento de enchufar la unidad.
RESOLUCIÓN DE PROBLEMAS SÍNTOMA REMEDIO (no se trata de una avería) Cuando se ha extraído el rodillo/el flotador/ la división de bandeja. • Instale el rodillo/el flotador/la división de bandeja en el orden indicado. División de bandeja Clic Bandeja de humidificación FLOTADOR RODILLO Flotador 1. Introduzca el flotador debajo de esta pestaña. Coloque el rodillo en la bandeja, desde el lado. 2. Introduzca la pestaña del flotador en el orificio. Pestaña 3.
INDICACIÓN DIGITAL Si se vuelve a producir el error, póngase en contacto con el Centro técnico de Sharp. DETALLES DEL ERROR Filtro de humedad anómalo. Motor del ventilador anómalo. Sensor de temperaturahumedad anómalo. REMEDIO Compruebe si el filtro de humidificación, la bandeja de humidificación y el rodillo están instalados correctamente; luego vuelva a conectar la corriente. Desenchufe la unidad, espere un minuto y vuelva a enchufarla.
45 55 366 Nivel de sonido (dBA) Velocidad del ventilador (m3/hora) 45 480 54 660 Potencia nominal (W) Nivel de sonido (dBA) Desodorización ES-20 *4 *3 *2 *1 UA-HD50E 2,5 ~28 ~38 460 43 20 186 43 17 186 190 23 7 60 23 5 60 2,5 ~21 ~26 370 37 14 144 37 12 144 MED 190 23 7 60 23 5 60 BAJA Polvo/Temperatura y humedad 440 43 19 180 47 25 216 MAX UA-HD40E 8,6 7,9 7,9 420 (ancho) × 242 (profundidad) × 637 (alto) 399 (ancho) × 230 (profundidad) × 615 (a
A. Información sobre eliminación para particulares Atención: Su producto está marcado con este símbolo, que significa que los productos eléctricos y electrónicos usados no deberían mezclarse con los residuos domésticos generales. Existe un sistema de recogida especial para estos productos. SI DESEA ELIMINAR ESTE EQUIPO, NO UTILICE EL CONTENEDOR DE BASURA NORMAL Y NO ARROJE EL EQUIPO AL FUEGO.
R PURIFICADOR DO AR com função humidificadora MANUAL DE FUNCIONAMENTO PORTUGUÊS UA-HD60E UA-HD50E UA-HD40E “Plasmacluster” e “Device of a cluster of grapes” são marcas registadas da Sharp Corporation.
Por favor, leia antes de usar o seu novo Purificador do Ar O purificador de ar suga o ar da divisão através da entrada de ar, passa-o através de um filtro prévio, um filtro desodorizante e um filtro HEPA por dentro da unidade, em seguida descarrega o ar através da saída de ar. O filtro HEPA pode remover 99,97% da partículas de pó tão pequenas como 0,3 mícrones que passam através do filtro e ajuda a absorver os cheiros. O filtro desodorizante absorve gradualmente os odores à medida que passam pelo filtro.
PORTUGUÊS Combinação única de tecnologias de tratamento do ar Sistema de filtração tripla + Plasmacluster + Humidificação AGARRA O PÓ* O filtro prévio agarra o pó e outras partículas grandes do ar. DIMINUI OS ODORES O filtro desodorizante absorve diversos odores domésticos comuns. REDUZ O PÓLEN E O MOFO* O filtro HEPA agarra 99,97% de partículas tão pequenas como 0,3 mícrones.
INSTRUÇÕES DE SEGURANÇA IMPORTANTES Quando usar eletrodomésticos, deve seguir as precauções básicas de segurança, incluindo o seguinte: - Para reduzir o risco de choque elétrico, incêndio ou lesões em pessoas: AVISO • Leia todas as instruções antes de usar a unidade. • Use apenas uma tomada com voltagem de 220-240. • Não use a unidade de o cabo de alimentação ou a ficha estiverem danificados ou se a ligação à parede estiver solta. • Retire periodicamente o pó da ficha.
NOTA - Interferência em rádio ou TV PRECAUÇÕES SOBRE O FUNCIONAMENTO • Não bloqueie a entrada e/ou a saída de ar. • Não use a unidade perto ou em cima de objetos quentes, como fornos ou aquecedores, onde pode entrar em contacto com vapor. • Use sempre a unidade numa posição vertical. • Segure a unidade pelas pegas de ambos os lados quando a mover. Não mova a unidade enquanto estiver a funcionar. • Não mova ou altere a direção da unidade principal arrastando as rodas.
INSTRUÇÕES DE SEGURANÇA IMPORTANTES • Use apenas água fresca da torneira. A utilização de outras fontes de água promove o desenvolvimento de mofo, fungos e/ou bactérias. • Não agite o depósito de água quando segurar na pega de transporte. • Não remova o filtro de humidificação da moldura do filtro. • Evite derramar água quando remover ou limpar o tabuleiro de humidificação. • Não remova o flutuador e o cilindro. Caso o flutuador e/ou o cilindro saiam do sítio, veja PT-18.
NOMES DAS PEÇAS FRENTE / TRÁS 1 2 3 1 2 3 4 5 6 Saída de ar (frente) Painel de funcionamento (Ver PT-6) Mostrador (Ver PT-6) Unidade principal Travão (2 localizações) Roda (4 localizações) PORTUGUÊS 4 5 6 8 1 2 9 3 10 4 11 5 12 6 7 13 (O formato da fi cha varia por país.
NOMES DAS PEÇAS PANEL DE FUNCIONAMENTO 3 2 1 a 1 a b c 2 3 4 4 b 5 6 c Botão LIGAR Botão MODO DE AR LIMPO / LUZ INDICADORA (verde) Botão MODO DE HUMIDIFICAR AR LIMPO / LUZ INDICADORA (verde) Botão MODO DE DUCHE DE IÕES LIMPOS / LUZ INDICADORA (verde) • Botão VELOCIDADE DA VENTOINHA / 5 • Botão CONTROLO DE LUZES LUZ INDICADORA (verde) • Botão REPOSIÇÃO DO FILTRO (carregue 3 seg.) / LUZ INDICADORA (laranja) • Botão de iões Plasmacluster ligados / desligados (carregue 3 seg.
PREPARAÇÃO Certifique-se de que retira a ficha da tomada. INSTALAÇÃO DO FILTRO (2 localizações) 2 Filtro HEPA (branco) Filtro desodorizante (preto) 3 Retire os filtros do saco de plástico. Instale os filtros pela ordem correta, como indicado. Etiqueta Filtro HEPA (branco) 4 Filtro desodorizante (preto) Instale o painel de trás. Clic 5 Preencha a data de início de utilização na etiqueta da data. PT-7 PORTUGUÊS 1 Remova o painel de trás.
PREPARAÇÃO Certifique-se de que retira a ficha da tomada. ENCHER O DEPÓSITO DE ÁGUA Quando usar o modo de humidificar ar limpo ou o modo de duche de iões limpos. 1 ② Remova o depósito de água puxando a pega para baixo e para a frente. ③ ① 2 Encha o depósito de água com água da torneira. MÁX ATENÇÃO • Verifique para ver se não há fuga de água. • Certifique-se de que limpa o excesso de água no exterior do depósito de água.
FUNCIONAMENTO HUMIDIFICAR AR LIMPO Usar para limpar rapidamente o ar, reduzir cheiros e humidificar. PARAR • A palheta abre-se e a unidade inicia automaticamente o funcionamento. • Selecione a velocidade desejada da ventoinha. (Ver PT-10) • A menos que o cabo de alimentação tenha sido desligado, o funcionamento inicia-se no modo em que foi usado pela última vez. NOTA • Encha o depósito de água.
FUNCIONAMENTO VELOCIDADE DA VENTOINHA Selecione a velocidade desejada da ventoinha. AUTO AUTOMÁTICO PÓLEN AVANÇADO BAIXO MÉDIO MÁX NOTA AUTO A velocidade da ventoinha é automaticamente alterada (entre ALTA e BAIXA) em função da quantidade de impurezas no ar. Os sensores detetam impurezas para uma purificação eficiente do ar. AUTOMÁTICO AVANÇADO A unidade funciona automaticamente num nível mais alto do que o normal, com a intensidade de libertar iões Plasmacluster de alta densidade e apanhar o pó.
FUNÇÕES ÚTEIS CONTROLO DE LUZ Use esta função para selecionar o brilho desejado. mais claro mais escuro desligar TEMPORIZADOR LIGADO 2horas 4horas 6horas 8horas 10horas 12horas 14horas CANCELAR (com a unidade DESLIGADA) TEMPORIZADOR DESLIGADO Selecione a duração do tempo que desejar com a unidade ligada. A unidade parará automaticamente assim que chegar à hora selecionada.
CUIDADOS E MANUTENÇÃO INDICADOR DO FILTRO No caso de funcionar com um volume de vento “MÉDIO”, a luz indicadora ligar-se-á ao fim de cerca de 720 horas. (30dias×24horas=720) (O tempo em que a luz se acende varia entre cerca de 360-1080 horas, dependendo do volume do vento.) Lembrete para efetuar manutenção das peças em baixo. Depois de efetuar a manutenção, reponha o indicador do filtro. (Ver PT-13) mais de 3 seg. ÍNDICE DE CUIDADOS • Nota um cheiro desagradável da saída de ar.
Certifique-se de que retira a ficha da tomada. DEPÓSITO DE ÁGUA Enxagúe o interior com um pouco de água. ATENÇÃO • Não agite o depósito de água quando segurar na pega de transporte. • Não coloque o depósito de água em baixo com a tampa deste na base. (Pode haver fuga de água.) para sujidade difícil... Limpe o interior do depósito de água com uma esponja macia e a tampa do depósito com um cotonete ou escova de dentes. Tampa do depósito Escova de dentes FILTRO DE HUMIDIFICAÇÃO Enxagúe com muita água.
CUIDADOS E MANUTENÇÃO TABULEIRO DE HUMIDIFICAÇÃO E COBERTURA Enxagúe o interior do tabuleiro de humidificação com uma escova de dentes. ATENÇÃO • Não remova o flutuador e o cilindro. • Se o flutuador e / ou o cilíndro sair do sítio. (Ver PT-18) Flutuador Cilindro NOTA para sujidade difícil... TABULEIRO 1. Encha metade do tabuleiro com água. 2. Adicione uma pequena quantidade de detergente da loiça. 3. Deixe de molho durante 30 minutos. 4. Enxagúe o detergente da loiça com água limpa.
Certifique-se de que retira a ficha da tomada. FILTRO HEPA / FILTRO DESODORIZANTE Etiqueta Remova o pó do FILTRO HEPA e do FILTRO DESODORIZANTE. ATENÇÃO Não LAVE em água, nem SEQUE ao sol. • FILTRO HEPA Faça a manutenção apenas no lado com a etiqueta. Não limpe o lado contrário. O filtro é frágil, tenha cuidado para não usar força demais. • FILTRO DESODORIZANTE A manutenção pode ser efetuada de ambos os lados. Se for usada muita potência, o filtro pode partir-se, por isso manuseie-o com cuidado.
CUIDADOS E MANUTENÇÃO Certifique-se de que retira a ficha da tomada. SUBSTITUIÇÃO DO FILTRO Tempo de substituição A vida útil do filtro pode variar em função do ambiente da divisão, da utilização e da localização da unidade. Se o pó ou o cheiro persistir, substitua o filtro.
RESOLUÇÃO DE PROBLEMAS Antes de chamar a assistência técnica, reveja a tabela de resolução de problemas em baixo, pois o problema pode não ser uma anomalia da unidade. SOLUÇÃO (não é anomalia) Os odores e fumo não são removidos. • Limpe ou substitua os filtros, se parecerem estar muito sujos. (Ver PT-12, PT-13, PT-15) O controlador de pó/cheiro fica verde, mesmo quando o ar está impuro. • O ar pode estar impuro no momento em que a unidade for ligada à tomada.
RESOLUÇÃO DE PROBLEMAS SINTOMA SOLUÇÃO (não é anomalia) Quando a divisória do cilindro / flutuador / tabuleiro for retirada. • Instale a divisória do cilindro / flutuador / tabuleiro pela ordem seguinte. Divisória do tabuleiro Clic Tabuleiro de humidificação FLUTUADOR CILINDRO Prenda o cilindro ao tabuleiro de lado. Flutuador 1. Insira o flutuador por baixo desta patilha. 2. Insira a patilha do flutuador no furo. Patilha 3. Insira a patilha do outro lado do flutuador, no furo.
MOSTRADOR DE ERROS Se ocorrer um erro outra vez, contacte o centro de assistência técnica da Sharp. DETALHES DO ERRO Filtro de humidificação anormal. Motor da ventoinha anormal. Sensor de temperatura e humidade anormal. SOLUÇÃO Verifique se o filtro de humidificação, o tabuleiro de humidificação e o cilindro estão devidamente instalados e volte a ligar a unidade. Desligue a unidade da tomada, aguarde um minuto e volte a ligar novamente.
45 55 366 Nível de ruído (dBA) Velocidade da ventoinha (m3/hora) PT-20 *4 *3 *2 *1 190 23 7 60 23 5 60 7,9 2,5 ~21 ~26 370 37 14 144 37 12 144 MÉDIO 190 23 7 60 23 5 60 BAIXO 7,9 399 (L) × 230 (P) × 615 (A) Pó/temperatura e humidade 440 43 19 180 47 25 216 MÁX UA-HD40E Potência do modo de espera Para poder usar os circuitos elétricos enquanto a ficha elétrica está inserida na tomada da parede, este produto consome cerca de 0.
A. Informações sobre a eliminação para utilizadores (particulares) Atenção: O seu produto está marcado com este símbolo. Isto significa que os produtos elétricos e eletrónicos usados não devem ser misturados com o lixo doméstico geral. Há um sistema de recolha separado para estes produtos. SE DESEJAR ELIMINAR ESTE EQUIPAMENTO, NÃO USE O LIXO DOMÉSTICO NORMAL, NEM O PONHA NUMA LAREIRA! O equipamento elétrico e eletrónico deve ser sempre recolhido e tratado SEPARADAMENTE, de acordo com a legislação local.
R PURIFICATEUR D'AIR avec fonction d'humidification MANUEL D’UTILISATION FRANÇAIS UA-HD60E UA-HD50E UA-HD40E “Plasmacluster” et “Device of a cluster of grapes” sont des marques déposées de Sharp Corporation.
Veuillez lire ces instructions avant d'utiliser votre nouveau purificateur d'air. Le purificateur d’air achemine l’air de la pièce par l’entrée d’air, le fait passer à l’intérieur de l’appareil par un pré-filtre, un filtre désodorisant lavable et un filtre HEPA, puis l’air est évacué par la sortie d’air. Le filtre HEPA peut éliminer 99,97 % des particules de poussière aussi petites que 0,3 micron qui passent à travers le filtre et il contribue également à absorber les odeurs.
FRANÇAIS Combinaison unique de technologies de traitement de l'air Triple système triple + Plasmacluster + Humidification CAPTE LA POUSSIÈRE* Le pré-filtre capte la poussière et les autres grosses particules en suspension dans l’air. ABSORBE LES ODEURS Le filtre désodorisant absorbe la plupart des odeurs domestiques. RÉDUIT LES NIVEAUX DE POLLEN ET DE MOISSISURE* L e f i l t r e H E PA c o l l e c t e 9 9 , 7 % d e s particules de plus de 0,3 microns.
CONSIGNES IMPORTANTES DE SÉCURITÉ Lorsque vous utilisez des appareils électriques, des précautions élémentaires de sécurité doivent être suivies, notamment les suivantes : AVERTISSEMENT – Pour réduire le risque d’électrocution, d’incendie ou de blessures corporelles : • Lisez toutes les instructions avant d'utiliser l'appareil. • Utilisez uniquement une prise 220-240 volt. • N'utilisez pas l'appareil si le cordon d'alimentation ou la fiche est endommagé ou si la connexion à la prise murale est desserrée.
NOTE – Interférences TV ou radio Si ce purificateur d'air crée des interférences aux signaux TV ou radio, essayez de remédier aux interférences en prenant une ou plusieurs des mesures suivantes : • Réorientez ou déplacez l'antenne. • Éloignez l’appareil du poste de radio ou de télévision. • Connectez l'équipement à une prise sur un circuit différent de celui auquel le récepteur est connecté. • Consultez le revendeur ou un technicien radio/TV expérimenté. • Ne bloquez pas l'entrée et/ou la sortie d'air.
CONSIGNES IMPORTANTES DE SÉCURITÉ • Utilisez uniquement de l'eau fraiche du robinet. Utilisez d'autres sources d'eau risquent de favoriser la formation de moisissure, de champignons et/ou de bactéries. • Ne secouez pas le réservoir d'eau lorsque vous tenez la poignée de transport. • Ne retirez pas le filtre d'humification du support de filtre. • Évitez de renverser de l'eau lorsque vous retirez ou nettoyez le bac d'humidification. • Ne retirez pas le flotteur et le rouleau.
NOMENCLATURE AVANT / ARRIÈRE 1 2 3 1 2 Sortie d'air (Avant) Panneau de commandes 3 4 5 6 Affichage (Réf. F-6) Appareil principal Butoir (2 emplacements) Roulette (4 emplacements) (Réf. F-6) 8 1 2 9 3 10 4 11 5 12 6 7 13 (La forme de la prise varie d’un pays à l’autre.
NOMENCLATURE PANNEAU DE COMMANDES 3 2 1 a 1 a b c 2 3 4 4 b 5 6 c Touche Marche Touche/voyant indicateur du mode Nettoyage de l'air (vert) Touche/voyant indicateur du mode Nettoyage de l'air et humidification (vert) Touche/voyant indicateur du mode Nettoyage de l'air et douche d'ions (vert) • Touche Vitesse de ventilateur / 5 • Touche Contrôle de la luminosité Voyant indicateur (vert) • Touche Réinitialisation de filtre (Pressez 3 sec.
PRÉPARATION Assurez-vous de débrancher le cordon d'alimentation de la prise murale. INSTALLATION DU FILTRE (2 emplacements) 1 Filtre désodorisant (noir) Retirez les filtres du sac plastique. FRANÇAIS 2 Filtre HEPA (blanc) Retirez le panneau arrière. 3 Installez les filtres dans l'ordre correct tel qu'indiqué. Attache Filtre désodorisant (noir) Filtre HEPA (blanc) 4 Installez le panneau arrière. Clic 5 Notez la date de début d’utilisation des filtres sur l’étiquette .
PRÉPARATION Assurez-vous de débrancher le cordon d'alimentation de la prise murale. REMPLISSAGE DU RÉSERVOIR D'EAU Lorsque le mode Nettoyage de l'air et humidification ou le mode Nettoyage de l'air et douche d'ions est utilisé. 1 ② Retirez le réservoir d'eau en poussant la poignée vers le bas et en la tirant vers l'avant. ③ ① 2 Remplissez le réservoir d'eau avec de l’eau du robinet. MAX ATTENTION • Vérifiez que le système ne présente pas de fuite d'eau.
FONCTIONNEMENT NETTOYAGE DE L'AIR ET HUMIDIFICATION Utilisez-le pour rapidement nettoyer et humidifier l'air tout en absorbant les odeurs. ARRÊT • Le volet s'ouvre et l’appareil se met en route automatiquement. • Sélectionnez la vitesse de ventilation désirée. (Réf. F-10) • Sauf si le cordon d'alimentation a été débranché, le fonctionnement reprend dans le mode précédemment utilisé. REMARQUE • Remplissez le réservoir d'eau. (Réf.
FONCTIONNEMENT VITESSE DE VENTILATION Sélectionnez la vitesse de ventilation désirée. AUTO AUTO POLLEN FAIBLE MED AVANCÉ MAX REMARQUE AUTO La vitesse de ventilation change automatique (entre élevée et faible) selon la quantité d'impureté dans l'air. Les détecteurs détectent les impuretés pour une purification efficace de l'air. AUTO AVANCÉ L’appareil fonctionne automatiquement à un niveau plus élevé que la normale en libérant des ions Plasmacluster haute densité et en attrapant la poussière.
FONCTIONS UTILES CONTRÔLE DE LA LUMINOSITÉ Utilisez cette fonction pour sélectionner la luminosité désirée. plus lumineux moins lumineux éteint MINUTERIE DE MISE EN ROUTE Sélectionnez la durée que vous souhaitez. L’appareil démarre automatiquement une fois la durée sélectionnée atteinte. (avec l’appareil à l'arrêt) MINUTERIE D'ARRÊT Sélectionnez la durée que vous souhaitez, l’appareil étant en route. L’appareil s'arrête automatiquement une fois la durée sélectionnée atteinte.
ENTRETIEN ET MAINTENANCE INDICATEUR DU FILTRE Lorsque l'appareil fonctionne à flux d'air « moyen », le voyant indicateur s'allume après environ 720 heures. (30 jours x 24 heures = 720) (La durée d'allumage variera entre 360 et 1080 heures selon le volume d'air). Rappelez-vous d'effectuer la maintenance sur les pièces ci-dessous. Après avoir effectué la maintenance, réinitialisez le voyant de filtre. (Réf. F-13) plus de 3 sec.
Assurez-vous de débrancher le cordon d'alimentation de la prise murale. RÉSERVOIR D'EAU Rincez l'intérieur avec une faible quantité d'eau. ATTENTION • Ne secouez pas le réservoir d'eau lorsque vous tenez la poignée de transport. • Ne placez pas le réservoir d'eau avec le bouchon vers le bas. (De l'eau pourrait fuire.) REMARQUE pour la saleté tenace... Nettoyez l'intérieur du réservoir d'eau avec une éponge douce et le bouchon du réservoir avec un coton-tige ou une brosse à dent.
ENTRETIEN ET MAINTENANCE BAC D'HUMIFICATION ET COUVERCLE Rincez l'intérieur du bac d'humidification avec une brosse à dents. ATTENTION • Ne retirez pas le flotteur et le rouleau. • Si le flotteur et/ou le rouleau se détachent. (Réf. F-18) Flotteur Rouleau REMARQUE pour la saleté tenace... 1. Remplissez le bac à moitié d'eau. 2. Ajoutez une faible quantité de détergent de cuisine. 3. Faites tremper pendant 30 minutes. 4. Rincez le panneau arrière avec de l'eau propre.
Assurez-vous de débrancher le cordon d'alimentation de la prise murale. FILTRE HEPA / DÉSODORISANT Attache Enlevez la poussière du filtre HEPA et désodorisant. ATTENTION Ne LAVEZ pas dans l'eau et ne SÉCHEZ pas au soleil. • FILTRE HEPA N'effectuez la maintenance que sur le côté sur lequel l'onglet est présent. Ne nettoyez pas l'autre côté. Le filtre est fragile, faites attention à ne pas appliquer trop de pression.
ENTRETIEN ET MAINTENANCE Assurez-vous de débrancher le cordon d'alimentation de la prise murale. REMPLACEMENT DU FILTRE Période de remplacement La durée de vie du filtre dépend de l'environnement de la pièce, de l'utilisation et de l'emplacement de l’appareil. Si la poussière ou l'odeur persiste, remplacez le filtre. (Référez-vous à « Veuillez lire ces instructions avant d'utiliser votre nouveau purificateur d'air.
DÉPANNAGE Avant d'appeler le service après-vente, veuillez vous référer au diagramme de dépannage cidessous, le problème pouvant ne pas être lié à une panne. REMÈDE (Quand il ne s'agit pas d'une panne) Les odeurs et la fumée ne sont pas absorbées. • Nettoyez ou remplacez les filtres s'ils paraissent très sales. (Réf. F-12, FR13, F-15). Le voyant de Suivi de la poussière et des odeurs est vert lorsque l'air est impur. • L'air peut être impur au moment de brancher l'appareil.
DÉPANNAGE SYMPTÔME REMÈDE (Quand il ne s'agit pas d'une panne) Si le rouleau, flotteur et la partition du bac ont été retirés. • Installez le rouleau, le flotteur et la partition du bac dans l'ordre ci-dessous. Partition du bac Clic Bac d'humification FLOTTEUR ROULEAU Placez le rouleur dans le bac de côté. Flotteur 1. Insérez le flotteur sous cette attache. 2. Entrez l'onglet du flotteur dans le trou. Attache 3.
AFFICHAGE D'ERREUR DÉTAILS DE L'ERREUR Filtre d'humification anormal. Moteur de ventilateur anormal. Détecteur de température/humidité anormal. SOLUTION Vérifiez que le filtre d'humidification, le bac d'humidification et le rouleau sont correctement installés puis mettez à nouveau le système en route. Débranchez l’appareil, attendez une minute puis branchez l'appareil à nouveau. FRANÇAIS NUMÉRIQUE INDICATION Si l'erreur survient à nouveau, contactez le centre de service Sharp.
Niveau de bruit (dBA) Humidification (mL/heure)*1 Désodorisation Capture des poussières F-20 *4 *3 *2 *1 600 54 49 288 55 54 306 2,5 ~28 ~38 460 43 20 186 43 17 186 190 23 7 60 23 5 60 440 43 19 180 47 25 216 MAX 2,5 ~21 ~26 370 37 14 144 37 12 144 MED UA-HD40E 190 23 7 60 23 5 60 FAIBLE 8,6 420 (L) × 242 (P) × 637 (H) 7,9 399 (L) × 230 (P) × 615 (H) 2,0 Désodorisant HEPA avec contrôle microbien *4 7,9 399 (L) × 230 (P) × 615 (H) Poussière
A. Informations sur la mise au rebut (pour les utilisateurs domestiques) Attention : votre produit est marqué de ce symbole. Il indique que les produits électriques et électroniques usagés ne doivent pas être mélangés aux ordures domestiques. Il existe un système de collecte séparé pour ces produits. SI VOUS SOUHAITEZ METTRE CET ÉQUIPEMENT AU REBUT, N'UTILISEZ PAS UNE POUBELLE ORDINAIRE ET NE LE METTEZ PAS AU FEU.
R UA-HD60E UA-HD50E UA-HD40E OCZYSZCZACZ POWIETRZA z funkcją nawilżania INSTRUKCJA OBSŁUGI Typ wolnostojący POLSKI „Plasmacluster” i „Device of a cluster of grapes” są znakami handlowymi firmy Sharp Corporation.
Prosimy o przeczytanie poniższej informacji przed włączeniem nowego oczyszczacza powietrza Oczyszczacz powietrza zasysa powietrze przez otwór wlotowy, przeprowadza je przez filtr wstępny, filtr pochłaniający przykre zapachy oraz filtr HEPA, a następnie wydmuchuje je przez otwór wylotowy z powrotem do pomieszczenia. W trakcie przepływu powietrza przez oczyszczacz filtr HEPA usuwa 99,97% drobin kurzu o rozmiarach rzędu 0,3 mikrona, a także wspomaga pochłanianie zapachów.
POLSKI Unikalne połączenie technologii oczyszczania powietrza Potrójny system filtrów + generator jonów Plasmacluster + nawilżacz WYCHWYTUJE KURZ* Filtr wstępny wychwytuje kurz i inne duże unoszące się w powietrzu cząsteczki. ZMNIEJSZA ILOŚĆ PRZYKRYCH ZAPACHÓW Filtr pochłaniający przykre zapachy pochłania wiele powszechnie występujących w gospodarstwach domowych zapachów. ZMNIEJSZA ILOŚĆ PYŁKÓW I PLEŚNI* Filtr HEPA zatrzymuje 99,97% cząsteczek o wielkości rzędu 0,3 mikrona.
ŚRODKI OSTROŻNOŚCI Podczas korzystania z urządzeń elektrycznych należy przestrzegać podstawowych zasad bezpieczeństwa, do których należą, między innymi, następujące zalecenia: OSTRZEŻENIA – Żeby zmniejszyć ryzyko porażenia prądem, pożaru i obrażeń osób znajdujących się w pobliżu: • Przed przystąpieniem do korzystania z urządzenia należy uważnie przeczytać wszystkie zalecenia. • Urządzenie należy podłączać wyłącznie do sieci o napięciu 220-240 V.
UWAGI – zakłócenia odbiorników radiowych i telewizyjnych Jeśli opisywany oczyszczacz zakłóca pracę odbiorników radiowych i telewizyjnych, należy spróbować temu zapobiec, wykonując jedną lub więcej z poniższych czynności: • Zmień kierunek lub przestaw antenę zakłócanego odbiornika. • Zwiększ odległość pomiędzy opisywanym urządzeniem a odbiornikiem. • Podłącz urządzenie do gniazdka elektrycznego w innym obwodzie niż ten, do którego podłączony jest odbiornik.
ŚRODKI OSTROŻNOŚCI • Nie wolno używać wody mineralnej, wód alkalicznych, wody ze studni ani wody destylowanej itp. W przeciwnym razie mogłoby dojść do rozwoju grzybów pleśniowych i bakterii. • Nie wolno potrząsać zbiornikiem na wodę, trzymając go za uchwyt. • Nie wolno wysuwać filtra nawilżającego z ramy filtra. • Podczas demontażu i czyszczenia pojemnika nawilżacza postępuj ostrożnie, aby nie rozlać wody. • Nie wolno demontować pływaka ani kółka.
NAZWY CZĘŚCI WIDOK OD PRZODU / OD TYŁU 1 1 Wylot powietrza (z przodu) 2 3 2 Panel sterowania (patrz opis na 3 Wyświetlacz (patrz opis na stro- 4 5 6 Urządzenie główne Hamulec (w 2 miejscach) Kółko (w 4 miejscach) stronie PL-6) nie PL-6) 4 5 6 9 3 10 4 11 5 12 6 7 13 (Kształt wtyczki zależy od regionu sprzedaży.
NAZWY CZĘŚCI PANEL STEROWANIA 3 2 1 a b 1 a b c 2 3 4 4 5 6 c Przycisk POWER ON (włączenie) Przycisk/wskaźnik trybu oczyszczania (zielony) Przycisk/wskaźnik trybu oczyszczania i nawilżania (zielony) Przycisk/wskaźnik trybu CLEAN ION SHOWER (zielony) • Przycisk prędkości wentylatora / 5 • Przycisk regulacji jasności wskaźników wskaźnik prędkości wentylatora (zielony) • Przycisk resetowania filtra (Naciśnij i przytrzymaj przez 3 sekundy.
PRZYGOTOWANIE DO PRACY Odłącz wtyczkę od sieci elektrycznej. INSTALACJA FILTRÓW (w 2 miejscach) 2 Filtr HEPA (biały) Filtr pochłaniający zapachy (czarny) 3 Wyjmij filtry z plastikowej torebki. Zainstaluj filtry w prawidłowej kolejności, jak pokazano na rysunku. Etykieta Filtr HEPA (biały) 4 Filtr pochłaniający zapachy (czarny) Zainstaluj panel tylny. Kliknięcie 5 Wpisz datę początku eksploatacji filtra na etykiecie. PL-7 POLSKI 1 Zdejmij panel tylny.
PRZYGOTOWANIE DO PRACY Odłącz wtyczkę od sieci elektrycznej. NAPEŁNIANIE ZBIORNIKA WODĄ W przypadku wykorzystania urządzenia w trybie oczyszczania i nawilżania lub w trybie CLEAN ION SHOWER. 1 ② Żeby wyjąć zbiornik na wodę, naciśnij uchwyt do dołu i pociągnij go do siebie. ③ ① 2 Napełnij zbiornik bieżącą wodą. MAX OSTRZEŻENIE • Sprawdź, czy nie ma żadnych wycieków wody. • Nadmiar wody na zbiorniku należy wytrzeć.
OBSŁUGA TRYB OCZYSZCZANIA I NAWILŻANIA Służy do szybkiego oczyszczania i nawilżania powietrza oraz pochłaniania zapachów. URUCHOMIENIE • Prowadnica otworzy się i urządzenie automatycznie rozpocznie pracę. • Ustaw żądaną prędkość wentylatora. (patrz opis na stronie PL-10) • Jeśli od poprzedniego użycia oczyszczacz nie był odłączany od sieci elektrycznej, uruchomi się w ostatnio wybranym trybie pracy. UWAGA • Napełnij zbiornik wodą (patrz opis na stronie PL-8).
OBSŁUGA PRĘDKOŚĆ WENTYLATORA Ustaw żądaną prędkość wentylatora. AUTO ADVANCED POLLEN LOW AUTO MED MAX UWAGA AUTO Prędkość wentylatora jest automatycznie przełączana (pomiędzy ustawieniami HIGH (wysoka) i LOW (niska)) w zależności od stopnia zanieczyszczenia powietrza wykrytego przez czujniki. ADVANCED Urządzenie automatycznie rozpocznie działanie przy wyższym ustawieniu prędkości wentylatora niż podczas normalnej pracy, zwiększając uwalnianie stężonych jonów Plasmacluster i zatrzymując kurz.
PRZYDATNE FUNKCJE REGULACJA JASNOŚCI WSKAŹNIKÓW Wykorzystaj tę funkcję do ustawienia żądanej jasności. jaśniejsze ciemniejsze wyłączone WŁĄCZNIK CZASOWY Ustaw żądany czas, po którym oczyszczacz rozpocznie pracę. Po osiągnięciu ustawionego czasu urządzenie zostanie uruchomione automatycznie. 2 godziny 4 godziny 6 godzin 8 godzin 10 godzin 12godzin 14 godzin ANULOWANIE (przy wyłączonym urządzeniu) Ustaw żądany czas pracy oczyszczacza.
CZYSZCZENIE I KONSERWACJA WSKAŹNIK FILTRA W przypadku ustawienia prędkości nawiewu powietrza na „MEDIUM” (średnia) wskaźnik włączy się po ok. 720 godzinach pracy oczyszczacza. (30 dni × 24 godziny = 720) (Czas, po którym wskaźnik zaświeci się, zawiera się między 360 i 1800 godzin pracy w zależności od ustawionej prędkości nawiewu powietrza.) Przypomnienie o konieczności przeprowadzenia czynności konserwacyjnych poniższych elementów. Po wykonaniu czynności konserwacyjnych należy skasować wskaźnik filtra.
Odłącz wtyczkę od sieci elektrycznej. ZBIORNIK NA WODĘ Wypłucz wnętrze zbiornika niewielką ilością wody. OSTRZEŻENIE • Nie wolno potrząsać zbiornikiem na wodę, trzymając go za uchwyt. • Nie wolno odwracać zbiornika na wodę w ten sposób, by korek zbiornika znajdował się na dole. (Mogłoby dojść do wycieku wody.) UWAGA Usuwanie silnych zanieczyszczeń... Do czyszczenia wnętrza zbiornika użyj miękkiej gąbki, a korek zbiornika wyczyść wacikiem lub szczoteczką do zębów.
CZYSZCZENIE I KONSERWACJA POJEMNIK NAWILŻACZA I OSŁONA Wyczyść wnętrze pojemnika nawilżacza szczoteczką do zębów. OSTRZEŻENIE • Nie wolno demontować pływaka ani kółka. • Jeśli pływak i/lub kółko się odłączy. (patrz opis na stronie PL-18) Pływak Kółko UWAGA Usuwanie silnych zanieczyszczeń... POJEMNIK 1. Napełnij pojemnik do połowy wodą. 2. Dodaj niewielką ilość środka do mycia naczyń. 3. Namocz przez 30 minut. 4. Spłucz środek do mycia naczyń czystą wodą.
Odłącz wtyczkę od sieci elektrycznej. FILTR HEPA/FILTR POCHŁANIAJĄCY ZAPACHY Etykieta Usuń kurz z FILTRA HEPA i FILTRA POCHŁANIAJĄCEGO ZAPACHY. OSTRZEŻENIE Filtr HEPA (biały) Nie wolno MYĆ filtra HEPA w wodzie ani SUSZYĆ w nasłonecznionym miejscu. Filtr pochłaniający zapachy (czarny) • FILTR POCHŁANIAJĄCY ZAPACHY Czynności konserwacyjne można przeprowadzać po obu sronach. Należy zachować ostrożność i nie przykładać zbyt dużej siły, ponieważ mogłoby dojść do uszkodzenia filtra.
CZYSZCZENIE I KONSERWACJA Odłącz wtyczkę od sieci elektrycznej. WYMIANA FILTRÓW Częstotliwości wymiany filtrów Częstotliwość wymiany filtra zależy od warunków w miejscu eksploatacji, stopnia wykorzystania i sposobu ustawienia urządzenia. Jeśli kurz lub przykry zapach się utrzymują, należy wymienić filtry. (Patrz „Prosimy o przeczytanie poniższej informacji przed włączeniem nowego oczyszczacza powietrza”.
ROZWIĄZYWANIE PROBLEMÓW Przed wezwaniem serwisu prosimy o zapoznanie się z poniższą tabelą, ponieważ problem może nie być wynikiem uszkodzenia oczyszczacza. ROZWIĄZANIE (brak usterki) Zapachy i dym nie są skutecznie usuwane. • Wyczyść lub wymień filtry, jeśli są silnie zanieczyszczone. (patrz opisy na stronach PL-12, PL-13 i PL-15) Monitor kurzu/zapachu świeci na zielono, chociaż powietrze jest zanieczyszczone. • W chwili włączenia urządzenia powietrze mogło być silnie zanieczyszczone.
ROZWIĄZYWANIE PROBLEMÓW OBJAW ROZWIĄZANIE (brak usterki) Jeśli kółko, pływak, przegroda pojemnika zostaną zdemontowane. • Zainstaluj kółko, pływak, przegrodę pojemnika w kolejności pokazanej poniżej. Przegroda pojemnika Kliknięcie Pojemnik nawilżacza PŁYWAK KÓŁKO Zamontuj kółko z drugiej strony pojemnika. Pływak 1. Wsuń pływak pod ten zaczep. 2. Wsuń wypustkę pływaka do otworu. Wypustka 3. Wsuń wypustkę z drugiej strony pływaka do otworu.
SYGNALIZACJA BŁĘDÓW W przypadku ponownego wystąpienia błędu, prosimy o kontakt z autoryzowanym serwisem firmy Sharp. PRZYCZYNA USTERKI Niesprawne działanie filtra nawilżającego. ROZWIĄZANIE Upewnij się, że filtr nawilżający, pojemnik nawilżacza i kółko są prawidłowo zainstalowane, a następnie włącz zasilanie ponownie. Usterka silnika wentylatora. Zbyt wysoka temperatura czujnika temperatury i wilgotności. Odłącz oczyszczacz od sieci, odczekaj minutę i włącz go ponownie.
240 26 45 480 366 70 54 660 Poziom szumów (dBA) Prędkość wentylatora (m3/h) Moc znamionowa (W) Poziom szumów (dBA) CZANIA Usuwanie przykrych zapachów PL-20 *4 *3 *2 *1 600 54 49 288 55 54 306 2,5 ~28 ~38 460 43 20 186 43 17 186 190 23 7 60 23 5 60 HEPA o działaniu przeciwko drobnoustrojom*4 190 23 7 60 23 5 60 LOW 8,6 7,9 7,9 420 (szer.) × 242 (gł.) × 637 (wys.) 399 (szer.) × 230 (gł.) × 615 (wys.) 399 (szer.) × 230 (gł.) × 615 (wys.
A. Informacje dla użytkowników (prywatnych gospodarstw domowych) dotyczące usuwania odpadów Uwaga: Państwa produkt jest oznaczony tym symbolem. Oznacza on, że zużytych urządzeń elektrycznych i elektronicznych nie można łączyć ze zwykłymi odpadami z gospodarstw domowych. Dla tych produktów istnieje oddzielny system zbiórki odpadów.
R UA-HD60E UA-HD50E UA-HD40E LUCHTREINIGER met bevochtigingsfunctie BEDIENINGSHANDLEIDING NEDERLANDS “Plasmacluster” en “Device of a cluster of grapes” zijn geregistreerde handelsmerken van Sharp Corporation. Vrijstaande uitvoering * Het nummer in dit technologiemerk geeft bij benadering een indicatie van het aantal ionen dat aan de lucht wordt afgegeven op 1 cm 3 .
Lees dit alvorens u uw nieuwe luchtreiniger gebruikt De luchtreiniger neemt via de luchtinlaat de kamerlucht op, voert de lucht achtereenvolgens door een voorfilter, een geurfilter en een HEPA-filter en blaast de lucht via de luchtuitlaat weer de kamer in. De HEPA-filter verwijdert 99,97% van stofdeeltjes groter dan 0,3 micron die de filter passeren en helpt zo geuren absorberen. De geurfilter absorbeert geurtjes als deze door de filter gaan.
NEDERLANDS Unieke combinatie van luchtbehandelingstechnologieën Drievoudig filtratiesysteem + Plasmacluster + Bevochtiging VANGT STOFDEELTJES OP* Het voorfilter vangt stofdeeltjes en andere grote luchtgedragen deeltjes op. VERMINDERT GEUREN De geurfilter absorbeert veel van de in normale huishoudens voorkomende geuren. VERMINDERT POLLEN & SCHIMMELS* D e H E PA - f i l t e r v a n g t 9 9 , 9 7 % v a n stofdeeltjes groter dan 0,3 micron op.
BELANGRIJKE VEILIGHEIDSINSTRUCTIES Bij het gebruik van elektrische apparaten dient u altijd enkele fundamentele veiligheidsvoorschriften in acht te nemen, waaronder: WAARSCHUWING – Om het gevaar voor een elektrische schok, brand of lichamelijk letsel te voorkomen: • Lees alle instructies goed door voordat u de unit in gebruik neemt. • Gebruik uitsluitend een stopcontact van 220 ~ 240 volt. • Gebruik de unit niet als het netsnoer of de stekker beschadigd is of als de aansluiting op het stopcontact loszit.
OPMERKING – Verstoring van de radio- of televisieontvangst Als deze luchtreiniger de radio- of televisieontvangst verstoort, probeer deze storing dan op te lossen met een of meer van de volgende maatregelen: • Verander de plaats of oriëntatie van de ontvangstantenne. • Vergroot de afstand tussen de luchtreiniger en de ontvangstantenne. • Sluit de luchtreiniger aan op een stopcontact in een andere stroomgroep dan die waarop de radio of televisie is aangesloten.
BELANGRIJKE VEILIGHEIDSINSTRUCTIES • Gebruik alleen schoon kraanwater. Het gebruik van andere bronnen van water kan de groei van schimmels en/of bacteriën bevorderen. • Schud het waterreservoir niet terwijl u de draaghendel vasthoudt. • Verwijder de bevochtigingsfilter niet van het filterframe. • Vermijd het morsen van water van de luchtbevochtigingsbak, als u deze verwijdert of schoonmaakt. • Verwijder de vlotter en de roller niet. Zie pagina E-18 als de vlotter en/of de roller loslaten.
NAMEN VAN DE ONDERDELEN VOORZIJDE / ACHTERZIJDE 1 1 2 3 2 Luchtuitlaat (voorzijde) Bedieningspaneel (Zie NL-6) 3 4 5 6 Display (Zie NL-6) Hoofdunit Stopper (2 locaties) Zwenkwieltje (4 locaties) 4 5 6 8 1 2 9 3 4 11 5 12 6 7 13 (Stekkervorm varieert per land.
NAMEN VAN DE ONDERDELEN BEDIENINGSPANEEL 3 2 1 a 1 a b c 2 3 4 4 b 5 6 c AAN-knop Knop LUCHT REINIGEN/INDICATORLAMPJE (groen) Knop LUCHT REINIGEN EN BEVOCHTIGEN/INDICATORLAMPJE (groen) Knop REINIGEN DOOR IONENDOUCHE/INDICATORLAMPJE (groen) • Knop VENTILATORSNELHEID/ 5 • Knop BESTURING LAMPJES INDICATORLAMPJE (groen) • Knop FILTER RESETTEN (3 sec. indrukken) / INDICATORLAMPJE (oranje) • AAN/UIT-knop plasmaclusterion (3 sec.
VOORBEREIDING Trek de stekker uit het stopcontact. FILTERINSTALLATIE (2 locaties) 1 Geurfilter (zwart) Haal de filters uit de plastic zak. 3 Installeer de filters in de juiste volgorde, zoals afgebeeld. NEDERLANDS 2 HEPA-filter (wit) Verwijder het achterpaneel. Label Geurfilter (zwart) HEPA-filter (wit) 4 Installeer het achterpaneel. Klik 5 Noteer de datum waarop u de filter begint te gebruiken op het datumetiket.
VOORBEREIDING Trek de stekker uit het stopcontact. VULLEN VAN HET WATERRESERVOIR Indien u het programma luchtreinigen en bevochtigen of het programma reinigen door ionendouche gebruikt. 1 ② Verwijder het waterreservoir door de hendel omlaag te drukken en deze naar voren te trekken. ③ ① 2 Vul het Waterreservoir met kraanwater. MAX VOORZICHTIG • Controleer of er geen water uit het waterreservoir lekt. • Droog de buitenkant van het waterreservoir af, indien u water heeft gemorst.
BEDIENING LUCHT REINIGEN EN BEVOCHTIGEN Gebruiken om snel de lucht te reinigen, geurtjes te verminderen en om te bevochtigen. START STOP • De klep opent en de unit start automatisch. • Kies de gewenste ventilatorsnelheid. (Zie NL-10) • Tenzij het stroomsnoer is losgekoppeld, begint de bediening in het vorige programma waarin hij is gebruikt. OPMERKING • Vul het waterreservoir. (Zie NL-8) • Als het waterreservoir leeg is, werkt de unit het programma “LUCHT REINIGEN” en knippert (rood).
BEDIENING VENTILATORSNELHEID Kies de gewenste ventilatorsnelheid. AUTOMA- GEAVANCEERD POLLEN LAAG TISCH AUTOMATISCH MED MAX OPMERKING AUTOMATISCH De ventilatorsnelheid wordt automatisch geschakeld (tussen HOOG en LAAG), afhankelijk van de hoeveelheid onzuiverheden in de lucht. De sensoren detecteren onzuiverheden voor een efficiënte luchtzuivering. GEAVANCEERD De unit werkt automatisch op een hoger intensiteitsniveau dan normaal qua afgifte van plasmaclusterionen met hoge dichtheid en stofverzameling.
NUTTIGE FUNCTIE BESTURING LAMPJES Gebruik deze functie om de gewenste helderheid te kiezen. helderder donkerder uitschakelen AAN-TIMER Kies de tijdsduur. De unit start automatisch zodra de gekozen tijdsduur bereikt is.
VERZORGING EN ONDERHOUD FILTERINDICATOR Als de unit gebruikt wordt met "GEMIDDELD" windvolume, dan gaat het indicatorlampje na ongeveer 720 uur aan. (30 dagen × 24 uur = 720) (Het moment waarop het lampje aan gaat, varieert tussen ongeveer 360-1080 uur, afhankelijk van het windvolume.) Herinnering om onderhoud uit te voeren aan onderstaande onderdelen. Na het uitvoeren van onderhoud, reset u de filterindicator. (Zie NL-13) meer dan 3 sec.
Trek de stekker uit het stopcontact. WATERRESERVOIR Spoel de binnenkant met een kleine hoeveelheid water. VOORZICHTIG • Schud het waterreservoir niet terwijl u de draaghendel vasthoudt. • Houd het waterreservoir niet op zijn kop, met het tankdopje aan de onderkant. (Er kan water lekken.) voor hardnekkig vuil...
VERZORGING EN ONDERHOUD LUCHTBEVOCHTIGINSBAK EN -AFDEKKING Reinig de binnenkant van de luchtbevochtigingsbak met een tandenborstel. VOORZICHTIG • Verwijder de vlotter en de roller niet. • Indien de vlotter en/of de roller loslaten. (Zie NL-18) Vlotter Roller ACHTERPANEEL Sensor voor hardnekkig vuil... OPMERKING 1. Vul de lade tot halverwege met water. 2. Voeg een kleine hoeveelheid keukenreiniger toe. 3. Laat dit 30 minuten weken. 4. Verwijder de keukenreiniger met schoon water.
Trek de stekker uit het stopcontact. HEPA-FILTER/ GEURFILTER Label Verwijder het stof op de HEPA-FILTER en de GEURFILTER. VOORZICHTIG HEPA-filter (wit) Niet WASSEN met water en niet laten DROGEN in de zon. • HEPA-FILTER Voer het onderhoud alleen uit aan de zijde waar het label zit. Maak de andere zijde niet schoon. De filter is breekbaar, dus pas niet te veel druk toe. • GEURFILTER Het onderhoud mag aan beide zijden uitgevoerd worden.
VERZORGING EN ONDERHOUD Trek de stekker uit het stopcontact. FILTERVERVANGING Moment van vervanging bepalen De levensduur van de filter hangt af van de omgeving, het gebruik en de locatie van de unit. Als stof of geurtjes aanhouden, vervangt u de filter.
PROBLEEMOPLOSSING Lees de onderstaande tabel voordat u contact opneemt met een reparateur. Een probleem duidt niet altijd op een defect. OPLOSSING (geen defect) Geuren en rook worden niet verwijderd. • Reinig of vervang de filters als deze erg vuil lijken. (Zie NL-12, NL-13, NL-15) De stof- /geurmonitor licht groen op hoewel de lucht niet schoon is. • Mogelijk was de lucht niet schoon op het moment waarop de stekker in het stopcontact werd gestoken.
PROBLEEMOPLOSSING PROBLEEM OPLOSSING (geen defect) Als de roller/de vlotter/het tussenschot verwijderd zijn geweest. • Installeer de roller/de vlotter/het tussenschot in onderstaande volgorde. Tussenschot Klik Luchtbevochtigingsbak VLOTTER ROLLER Maak de roller vast in de bak vanaf de zijkant. Vlotter 1. Plaats de vlotter onder dit lipje. 2. Steek het lipje van de vlotter in de uitsparing. Lipje 3. Steek het lipje aan de andere kant van de vlotter in de uitsparing.
FOUTAANDUIDINGEN FOUTDETAILS Abnormaal bevochtigingsfilter. Abnormale ventilatormotor. Abnormale temperatuur-/luchtvochtigheidssensor. OPLOSSING Controleer of de bevochtigingsfilter, de luchtbevochtigingsbak en de roller correct zijn geïnstalleerd en zet de stroom vervolgens weer AAN. Trek de stekker uit het stopcontact, wacht ongeveer een minuut en steek de stekker weer in het stopcontact. NEDERLANDS DIGITALE INDICATIE Neem contact op met het Sharp servicecenter wanneer dezelfde fout nogmaals optreedt.
45 240 26 45 480 55 366 70 54 660 Geluidsniveau (dBA) Ventilatorsnelheid (m3/uur) Nominaal vermogen (W) Geluidsniveau (dBA) 2,5 ~28 ~38 460 43 20 186 43 17 186 190 23 7 60 23 5 60 NL-20 *4 *3 *2 *1 8,6 7,9 2,5 ~21 ~26 370 37 14 144 37 12 144 MED 190 23 7 60 23 5 60 LAAG 7,9 399 (B) × 230 (D) × 615 (H) Stof/temperatuur & luchtvochtigheid 440 43 19 180 47 25 216 MAX UA-HD40E Stand-by stroomverbruik Voor het voeden van de elektrische circuits terwijl
A. Informatie over afvalverwijdering voor gebruikers (particuliere huishoudens) 1. In de Europese Unie 2. In andere landen buiten de Europese Unie Als u dit product wilt weggooien, neem dan contact op met de plaatselijke autoriteiten voor informatie omtrent de juiste verwijderingsprocedure. Voor Zwitserland: U kunt afgedankte elektrische en elektronische apparatuur kosteloos bij de distributeur inleveren, zelfs als u geen nieuw product koopt.
production control code printed in China TINS-B185KKRZ 18K - ① UMC Poland Sp. z o.o. Ostaszewo 57B, 87-148 Łysomice, Poland SHARP CORPORATION OSAKA, JAPAN SDA/MAN/0022 www.sharpconsumer.