
Specifications

2.4 KEY COUNTER HOLDER INSTALLATION (OPTION)
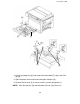
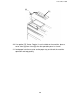
1.Make sure that the main switch is turned off.
2. Open the front cover and the manual feed table.
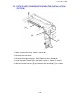
3. Remove the right cover (4 screws).
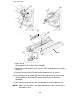
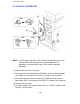
4. Remove the key counter cover [A] (2 screws).
5. Connect the 4P connector [B] of the key counter holder to the key counter
harness [C] through the key counter access hole.
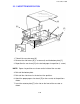
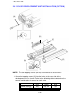
6. Position the fixing plate [D] as shown in the illustration and insert the key
counter holder.
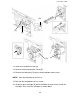
7. Align the holes in the fixing plate with the mounting holes of the key
counter holder and secure the key counter holder (2 screws).
NOTE: The fixing plate has three different hole sizes. Use the holes that
match those on the counter that you are installing.
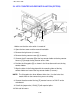
8. Connect the other end of the key [E] counter harness to CN127 on the
main board.
9. Cut off the jumper wire (JP103) [F] with a pair of pliers.
10. Reinstall all covers.
[B]
[A]
[C] [E]
[F]
1 December 1990
3-12