
Specifications

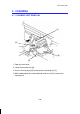
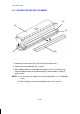

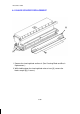
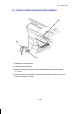


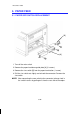

4.3 CLEANING BRUSH REPLACEMENT
1. Remove the cleaning blade [A]. (See Cleaning Blade Replacement.)
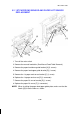
2. Remove the cleaning brush bracket screws (4); then, remove the clean-
ing brush [B] together with the cleaning side brackets [C] and gear [D].
3. Remove the gear and the two E-rings, and replace the cleaning brush.
NOTE: a) Do not touch the cleaning brush surface. Handle only the
shaft-ends.
b) Do not bend or damage the entrance seal [E].
c) These screws [⊗] are tapping screws. Do not tighten them too
much as this will strip the resin threads.
[E]
[A]
[C]
[D]
[⊗]
[B]
[C]
[⊗]
1 December 1990
5-38