SHARP VIDEO CASSETTE RECORDER OPERATION MANUAL Please read this operation manual carefully before using the VCR.
CONTENTS RECORDING GENERAL INFORMATION IMPORTANT SAFEGUARDS AND PRECAUTIONS . . . . . . . . . . . . . . . . . . . . . . . . . . . . . . . . . . . . . . . . . . . . . . . . . . . Features . . . . . . . . . . . . . . . . . . . . . . . . . . . . . . . . . . . . . . . . . . . . . . . . . . . . . . . . . . . . . . . . Accessories . . . . . . . . . . . . . . . . . . . . . . . . . . . . . . . . . . . . . . . . . . . . . . . . . . . . . . . . . . LOW POWER Feature . . . . . . . . . . . . . . . . . . . . . . . . .
w IMPORTANT SAFEGUARDS AND PRECAUTIONS CAUTION BEFORE OPERATING YOUR NEW VCR, PLEASE CAREFULLY READ THIS OPERATION MANUAL AND THEN SAVE IT FOR FUTURE REFERENCE AS IT WILL BE USEFUL IF YOU HAVE ANY PROBLEMS OPERATING YOUR VCR IN THE FUTURE. Location and Handling 1. Air vents are provided in the VCR cabinet to prevent excessive temperatures inside the unit. Do not place your VCR in closed spaces, cover it, or otherwise block the vents. 2. Do not place the VCR in direct sunlight, or near heat sources. 3.
a IMPORTANT SAFEGUARDS AND PRECAUTIONS Do not attempt to service this VCR yourself. Please carry out the user checks on page 40. If you still experience a problem, contact your dealer or nearest Sharp service facility. Copyright may exist in material you wish to record. Copying such material without permission of the relevant licensee(s) or owner(s) of the copyright is prohibited by law.
84 LOW POWER Feature This model is equipped with a LOW POWER feature to save energy when the VCR is not in use STANDBY/LOW POWER button Clock keeps time regardless of this button I This VCR is not equipped with a mains power switch. Accordingly, nominal current to drive the clock IS drawn at all times when the AC power cord is plugged into a wall socket. If the VCR IS not to be used for an extended period, be sure to unplug the cord. 1.
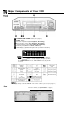
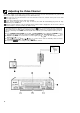
a Major Components of Your VCR 0 @ @ @ STANDBY/LOW POWER button (See page 5.) EJECT button Cassette compartment (See Playback, Recording.) Basic function controls (See Playback, Recording.) Channel tuning controls (See Setting the Channels.) @ Front AV jack (LINE IN 2: VIDEO, AUDIO-L/R) @ VCR Display (explained throughout the operation instructions) I I lpmTiF> l When the VCR is in “POWER ON” mode, this Indicator (Where a channel posltion number is usually displayed) will light up.
84 Remote Control L (VGH690X) 0 INPUT SELECT button @ REW button @ PLAY/x 2 button @ STOP button @ CHANNEL (CH) A/ 7 button @ VOLUME (VOL) 010 button @ FF button @ PAUSE/STILL, F.
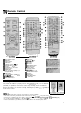
Using the Remote Control for TV Operation The provided remote control can operate the basic functions of your television. In addition to most Sharp televisions, other manufacturers’ televisions listed below can also be controlled by setting the remote control to the corresponding TV brand. The remote control’s default brand is “SHARP”, which enables control of most Sharp televisions. When you replace the batteries in the remote control, the control’s TV brand setting will be reset to SHARP.
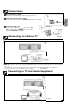
Connections 0 Disconnecting TV Cable Disconnect the aerial cable from the back of your TV set. @ Connecting Aerial Cable to VCR Connect the aerial cable to the ANTENNA IN terminal of your VCR. ANTENNA IN @ Connecting VCR to TV ANTENNA IN Connect the supplied coaxial cable to the RF OUT terminal of the VCR. Plug the other end into your TV’s ANTENNA IN terminal.
Rii Adjusting the Video Channel To view the output of your VCR on the television screen, you must select an unused channel on your TV and tune it to the output of your VCR (factory preset to UHF channel 37). 0 Turn on the TV, select the AV channel or an unused channel on the TV, and turn on the power on the VCR. (See page 5, item 3.) @ Load a prerecorded tape into the VCR (not supplied). @ If the erasure protection tab on the tape is removed, the VCR will automatically play back the tape.
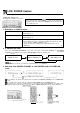
!!a Setting the Language PREPARATION Select the video channel on your TV. And turn power ON the VCR. (See page 5, item 3.) l l If the power has been disconnected, it WIII be necessary to set the language and clock agaln INoTE> *While in MENU, the ~/r/4/, buttons on the remote control operates the following functions (same functions on the VCR), A-+CHA Y+YCH 4 --f REW (Shuttle Ring) b 3 FF (Shuttle Ring) (VC-H690X) (VC-H670X) Initial Setting of Language Refer to page 12 to set the clock.
!a Setting the Clock When you use the VCR for the first time or after a power failure of more than 60 minutes the clock will be reset. Apply power to the unit to power on (see page 5, item 3) and press MENU, Then perform the following procedure. PREPARATION Select the video channel on your TV. And turn on the VCR. (See page 5, item 3.) l Initial Setting of Clock @ First set the language (refer to page 11). Then press SET, l “12H” 12-h l If 12H mode was selected, then set the AM/PM indicator.
!!§I Setting the Channels Your VCR can receive VHF channels 0 to 12, and UHF channels 28 to 69. Your VCR has 48 programmable channel positions, each of which can be set to any of the above broadcast channels. The channel positions have been preset at the factory as shown below.
Setting the Channels MANUAL TUNING PREPARATION l Select the video channel on your TV. And turn on the VCR. (See page 5, item 3.) Example: Tuning Channel Position 3 to Broadcast TV Channel 7 Select item “CHANNEL PRESET” with and press EL PRESET has been preset to MANUAL at the desired broadcast channel on your TV, and then press l Numeric buttons on the remote control can also be used to select channel numbers. Press %-to switch between one and two digit numbers for step 0.
Channel SkipKancelling Skip Channel skip If there are channel positions that are not preset. you can skip them with the following procedure. PREPARATION l Select the video channel on your TV And turn on the VCR. (See page 5, item 3.) Example: Skip channel position 12. ress 4 or F to se ect Cancelling skip PREPARATION l Select the video channel on your TV. And turn on the VCR. (See page 5, item 3.) Example: Reset channel position 12.
Ia Menu Screen @ @ @ @ Turn on your TV and select the video channel. Turn on the VCR. (See page 5, item 3.) Press MENU to display the MENU screen. Select the item you want by pressing A or v on the remote control. Refer to the pages listed below for details on each item. The following 6 items can be set by using the On Screen Display (OSD). 1: G-CODE Setting a G-CODE timer recording. (See page 26.) . .:SELECT “EN”‘.
!!§I Mode Selection You can set the basic functions listed in the table below on the MODE selection screen. PREPARATION *Turn on your TV and select the video channel. And turn on the VCR. (See page 5, item 3.) AUTO Usually select AUTO mode. PAL Strict PAL colour mode. ur VCR receives no TV signal or an due to weak TV signal reception, or ils, see Auto Repeat on page 35.) REC) on page 31.) Select the AUDIO MIX mode by pressing (For details, see pages 31 and 32.
- Playback H Inserting a Video Cassette Gently insert the video cassette into the cassette compartment. The VCR turns on automatically. If the cassette is inserted Incorrectly, the loading system will not function. Do not force the cassette into the VCR. When the cassette has been properly loaded, “ml’ appears on the VCR display. To remove the cassette, press EJECT during stop mode. \Playback PREPARATION *Turn on your TV and select the video channel Insert a cassette FF ‘L.AYI x 2 REW REW Pl.
R Playback Shuttle System The shuttle system lets you control all the basic playback functions usrng just the shuttle ring part l The shuttle ring does not rotate 360”. D URING STOP MODE Fast Forward and Rewind @ Turn the ring either to the right or the left and release it. (The shuttle ring will return to centre.) @ Press STOP to stop fast forward or rewind.
R Playback Still Picture and Frame Advance 0 Press PAUSE/STILL (F.ADV) during playback. This will freeze the picture on your TV. @ If noise bars appear on the screen during still picture, set your VCR to the slow mode and press CHANNEL A/V (CH &‘I) to make the noise disappear. Then press PAUSE/STILL (F.ADV) again. @ If there is vertical jitter during Still Picture Playback, press CHANNEL A/V (CH A/v) to stop the jitter. @ Press PAUSE/STILL (F.ADV) during still mode for frame advance.
R Playback Auto Tracking Control System This function automatically adjusts the tracking to match the recorded tape. Auto tracking engages In the following cases: l When you insert the cassette and begin playback. *When you press CHANNEL A and 7 (CH A and v) at the Poor tracking Normal tracking same time. *When the VCR has been playing back an unrecorded section of tape, and then reaches a recorded tape segment. When auto tracking engages, ” .” on the TV screen flashes for a few seconds.
Playback Blue Back Set the BLUE BACK mode to AUTO on the MODE-selection screen. (See Mode Selection on page 17.) This function eliminates monitor noise and mutes sound during playback of unrecorded portions of a tape, and when receiving a non-broadcasting channel. A blue screen will also appear if the VCR is set to the Auxiliary Input (LINE IN) mode but no video signal is fed to the VCR. (The BLUE BACK mode is set to AUTO at the factory.
m Recording a TV Programme Cassette Erase Protection A m cassette has a removable tab to prevent accidental erasure of recorded mate”ri”al. Removing the tab prevents recording. To record on a video cassette with the tab removed, place adhesive tape over the tab opening Recording a TV Programme Insert a cassette. STANDBY PAUSE/STILL STOP CH i/v REC EJECT (VC-H690X) PREPARATION *Turn on your TV and select the video channel. PROCEDURE @ Turn on the VCR (See page 5, item 3.
!!I Recording Hi-Fi Stereo Sound This VCR automatically records audio signals on two kinds of audio tracks. Using specialized rotary heads, audio signals are recorded on the video track in the FM format, MultiHi-Fi: channel broadcasts (stereo or bilingual programmes) are automatically recorded on two channels. Normal: Audio signals are recorded monaurally on the linear track. Stereo broadcasts are recorded in mono, and only the main audio track of bilingual programmes is recorded.
!!I Simple Recording Timer There are two ways to use this Simple Recording Timer for your convenience. Immediate Recording Immediate recordrng: Convenient when havrng an unexpected visitor or telephone call l Delaved recordina: 1 Convenrent whenjeaving the house or going to bed. l 0 Select the channel position to be recorded by pressing CHANNEL A/V (CH A/7). (fx.: Channel position: 2) @ Press REC to enter the normal recording mode. Then, press REC repeatedly to set the desired ending time. (fx.
m Programming the Timer with G-CODES This VCR has the G-CODE Programming System. By simply inputting the G-CODE number with the O-9 numeric buttons, you can programme your VCR for timer recording. The G-CODE numbers are listed in most newspaper, TV guide, and local cable TV listings. The timer can be set for automatic recording of up to 8 events over a 365 day period. In addition, each of the events can be set to be recorded on a daily or weekly basis up to the limit of the tape.
Programming the Timer with G-CC& m SET 0 &J-CODE I) SET m WEEKLY DAILY 0 @ Press SET. 1NoTE> To programme additional timer settings, press SET and repeat steps @ through 0. (0) : MENU 0 e TIMER ON/OFF O* TIMER lo To return to the normal screen, press MENU. Normal Screen @ To set the VCR for automatic timer recording, press TIMER ON/OFF and ensure the “13” indication lights on the VCR display.
!il Recording with the Timer The timer can be set manually for automatic recording of up to 8 events over a 365 day period. PREPARATION Select the video channel on your TV. Turn on the VCR (See page 5, item 3). l Load the cassette, ensuring the erasure protection hole is covered. The VCR power will automatically turn on. l Check that the clock is displaying the correct time. (See Setting the Clock on page 12.
Recording with the Timer e numeric to 24H mode, “AM/ --,-- __ -:__ __ WOPl [Tape Speed] --11mm12 --I---,---,-- Timer Recording (JU PR START STOP 47 12:00.12:301H~ __ .:-- -:__ _. . -:__ _:.. __ .:-- _:__ __ [Timer review] ----m @ Press SET. To programme additional timer settings, repeat steps @ through 0. ATE PR START ST To return to the normal screen, press MENU. TIMER @ To set the VCR for automatic timer recording, press TIMER ON/OFF and ensure the “Q” indicator lights on the VCR display.
q Recording with the Timer Confirming Timer Programmes You can see on the On Screen Display a list of all timer programmes that are already set PREPARATION l Turn on your TV and VCR and select the vrdeo channel on the TV. SET 0 Press MENU. (If the “0” indicator on the VCR display is lit, cancel the timer standby mode by pressing TIMER ON/OFF and then turn on the power.
q Intelligent Timer Recording (JUST REC) When the tape is expected to run out halfway during timer recording (except for the Simple Recording Timer) in the SP (standard play) mode, the mode will automatically change to the LP (long play) mode to prevent termination of recording. This functron works only when JUST REC mode on the MODE selection screen is set to ON.
Audio Dubbing Listening to an Audio Dubbed Tape l Press AUDIO OUT on the remote control to select the desired audio output. (See the table below and refer to Audio Output Mode on page 22.) l If you want to listen to the orIginal and dubbed audio stgnals simultaneously, set the AUDIO MIX mode to ON (see page 17).
m Virtual Dolby Surround/SURROUND-Function
m New Sharp Super Picture This function creates clearer modulation during playback for high picture quality. S.PICT”RE O N Press S. PICTURE on the VCR. “S.PICTURE ON (or OFF)” will appear on the TV screen for a few seconds. Each time the button is pressed, the mode switches between ON and OFF. (The New Sharp Super Picture is preset to ON at the factory.) ON: Normally leave the mode set to ON. This high picture quality function will create a clearer image during playback.
p;4 Auto Repeat With this feature, the entire tape is played back repeatedly. 0 Set the REPEAT mode on the MODE-selection screen to ON. When the video cassette reaches its end, the VCR will stop playback, rewind the tape, and automatically play it back again. BLUE AUTO JUST REC AUDIO MIX pmTFNoTE l l BACK RENTAL The ON/OFF status of the Auto Repeat can be checked on the MODE Selection screen (See Mode Selection on page 17.) (And when the Auto Repeat is ON, “REPEAT” will be displayed on the OSD.
m New Child-Proof Lock 0 rl With this feature, you can lock all VCR modes to prevent accidental change. This function works even when the VCR power is off, thus preventing children from operating the VCR or viewing select programmes while you are away from home. New Child-Proof Lock 0 Press ti on the remote control for about 2 seconds. “ti” flashes and “;+---” lights on the VCR-function display. Q Press ti again.
Bl VCR Display When DISPLAY is pressed, the display changes in the following way. (However, the following is the case when the clock time is set and displayed in the 12.hour system.) Example, [TAPE REMAINING/CHANNEL] Example: [TAPE COUNTER/CHANNEL] + 5 Example: [OPERATING MODE/CHANNEL] 4 Example. [PRESENT TIME/CHANNEL] + n NoTE> l During timer recording or Simple Recording Timer, the display shows the record finish time. When DISPLAY is pressed, the display changes in the following way.
Tape Remaioing Display The tape remaining display only works with tapes recorded in PAL. It does not work with tapes recorded in NTSC. On Screen Display VCR Display *Select FULL or COUNTER display mode by pressing MODE OSD on the remote control. *Press DISPLAY on the remote control. l l This function accurately displays the tape remaining only for tapes recorded in PAL mode. (It does not accurately display the tape remaining for tapes recorded in NTSC or MESECAM modes.
m Editing from a Camcorder to Your VCR Editing from your Camcorder is extremely easy using your VCR with a linear tape counter, etc. The connection diagram below is for a guideline only. Refer to your Camcorder Operation Manual for precise connection information.
El Before Calling for Service Check this list before calling for service Problem MISCELLANEOUS l Possible PROBLEMS No power. Cannot turn on the VCR l l l l Cassette cannot be ejected *The VCR display does not operate *No operation when any button is l l l l VCR does not record *Cassette’s erasure protection tab has been removed. Use a different cassette or place adhesive tape over the tab opening. l Check if a cassette is loaded.
SHARP CORPORATION OF AUSTRALIA PTY. LIMITED A.C.N. 003 039 405 1 Huntingwood Drive, Huntingwood, Blacktown, N.S.W.