SHARP Pen Software OPERATION MANUAL Version 2.
Contents Launching an external application................................26 Searching the Internet....................................................27 Importing a Document as an Image (Pen Software Printer Driver).........................................28 Acquiring an Image From a Multifunction Machine....29 Using the Network Scanner Tool to acquire an image....29 Acquiring an image from a TWAIN device....................30 Linking to Microsoft PowerPoint...................................31 Printing...
Introduction This software is intended to facilitate effective meetings and presentations. • Letters can be created directly so that the computer screen can be used as a whiteboard. • Any document can be converted into an image and imported for display. • An image can be acquired from a multifunction machine for display. • The contents being edited can be printed out or saved.
Starting and Exiting the Software Pen Software modes and how to start the modes TIPS • The LL-S and PN-K series do not support the use of a secondary display. To use a secondary display with the PN-L series, please refer to page 33 of this manual. • Whiteboard mode and overlay mode cannot be started at the same time. To change modes, touch the “Select Whiteboard / Overlay Mode” button ( ). • To prevent the Windows taskbar from moving, lock it.
Exiting the software Touch the “Quit” button. When there is no data which is being edited and is not saved The software is exited. When there is data which is being edited and is not saved A confirmation dialog box appears. When you touch “Save and exit”, a dialog box appears to allow you to specify the destination to save the data. Confirm the saving format, specify the destination, and save the data. (Page 10) When you touch “Exit without saving”, the software is terminated without saving the data.
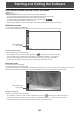
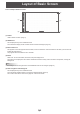
Layout of Basic Screen Screen example: Whiteboard mode (3) (1) (4) (2) (5) (1) Toolbar Used to switch functions. (Page 7) (2) SHEET LIST This is displayed only in the whiteboard mode. Touch this tab to display the list of sheets shown as thumbnail images. (Page 13) (3) Move toolbar icon This appears on the side opposite to the toolbar, and can be touched to move the toolbar to that side. (The icon and the toolbar will switch places.) Only appears when the toolbar is set to “Docked”.
Toolbar n Toolbar display method The toolbar display method can be changed. (Page 36) Docked The toolbar is displayed on the left side or the right side of the screen. You can have the toolbar automatically disappear after a fixed time elapses after the touch pen is moved away from the toolbar. (Select “Hide automatically” in the settings screen.) When the toolbar is hidden, the show toolbar icon ( or ) appears. Touch the show toolbar icon to show the toolbar.
n Toolbar function buttons The functions of the toolbar are shown as buttons. Touch a button to select the function of that button. The function buttons that appear on the toolbar vary depending on the mode.
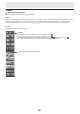
n Function buttons displayed with “Customize toolbar”. “Customize toolbar” (Page 36) can be used to change the function buttons that appear on the toolbar. Button Web Search Function Enter a keyword to search the Internet. Save PDF/image Save to the same file* Save as a new file* External Application Save the data as other than a Whiteboard file (SWS file). Save the data to the same Whiteboard file (SWS file). Save the data as a new Whiteboard file (SWS file).
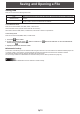
Saving and Opening a File Saving data Data can be saved in the following file formats: File format SWS (Whiteboard file) PDF, BMP, JPEG, PNG Description Data on the whiteboard is saved in the SWS format. The saved data can be re-edited with this software. The working screen is saved as a screen shot. The data is converted into the different file format so that it cannot be re-edited with the software. In the whiteboard mode Data can be saved in SWS, PDF, BMP, JPEG, or PNG format. All sheets will be saved.
Opening the whiteboard file When whiteboard mode is started, a new whiteboard file opens. (If you start the software by directly touching a whiteboard file (SWS), the whiteboard file opens.) To open a saved whiteboard file, touch the “Open” button and select the file. “Add to the current sheet” is touched, the current sheets are retained and the content of the selected file is added to When the end of the sheets.
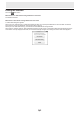
Edit Operations Changing the sheet to edit (whiteboard mode) In the whiteboard mode, each screen is displayed on a sheet. To change the sheet, touch the sheet navigation button at the bottom of the screen. The number shown at the center is the page No. of the current sheet. (1) (3) (2) (4) (1) Page No. of the current sheet (2) Sheet navigation button (Previous) Touch this button to display the previous sheet. When the first sheet is displayed, this button is disabled.
n Changing the sheet by referring to thumbnail images / Editing the sheet When “SHEET LIST” is touched in the bottom left corner of the screen, thumbnails of each sheet appear. A thumbnail can be touched to change to that sheet. The sheets can be edited, including adding, deleting, copying, and moving sheets. The method of displaying thumbnails when “SHEET LIST” is touched can be changed. (Sheet view: Page 35) Tiled View 1. Touch “SHEET LIST” in the lower left corner of the screen.
Drawing with a Pen 1. Touch any of the “Pen 1” to “Pen 3” buttons. 2. Draw on the board with the touch pen. The drawn shape will be determined as an object 0.5 second* after you lift the touch pen from the board. If you start drawing another object within 0.5 second* after you lift the touch pen from the board, the drawn shapes will be determined to be a single object even though they are separate. * This period can be changed. (Page 34) Less than 0.5 second Draw a shape. After 0.
Erasing a drawn line 1. Touch the “Eraser” button. 2. With the pen touching the screen, move the pen. The part you move over is erased. TIPS • You can switch through “Pen 1” to “Pen 3” and “Eraser” by repeatedly pressing Function Button 2 of the touch pen. To change functions using Function Button 2, select the touch panel driver “Properties”, and set “Function Button 2” to “Pen Software Link” on the “Operation Setting” tab. • The eraser function can erase only the objects drawn with the pen function.
Drawing shapes You can draw shapes such as circles, rectangles and triangles. 1. Touch the “Drawing Object” button. * Touch again to show “Property of figure”. For the properties, see below. 2. Drag on the board to draw the shape. The shape is drawn in the area specified by dragging. TIPS • “Drawing Object” can be displayed on the toolbar using “Customize toolbar” (Page 36). n Property of figure Select the shape that you want to change. The shape settings can be changed from the properties.
Drawing a shape with the figure pen Circles, squares, triangles, and lines drawn by hand can be automatically formed. 1. Touch the “Figure pen” button. * Touch again to display a palette with pen color, thickness, and translucent settings. 2. Draw a shape on the board with the pen. Draw a shape The shape that you drew is formed. TIPS • The “Figure pen” can be displayed on the toolbar using “Customize toolbar” (Page 36). • Some drawn shapes may not be formed and will remain hand-drawn.
Importing and pasting an image An image file can be imported, and the current display can be pasted. Up to 50 items can be pasted on one sheet. n Inserting an image file A BMP, JPEG, or PNG image can be imported. 1. Touch the “Insert Image” button. 2. Touch the “Insert an image file” button. 3. Select the image you want to insert. The image is inserted. TIPS • “Insert Image” and “Insert an image file” can be displayed on the toolbar using “Customize toolbar” (Page 36).
■ Capturing/saving the currently displayed screen You can load an image file or paste the currently displayed screen. Display the image that you want to capture. Capturing the entire screen 1. Touch the “Insert Image” button. 2. Touch the “Screen Capture” button. 3. Select the screen to the captured from “Desktop”, “Whiteboard”, or “Overlay mode”. 4. Touch the “Whole Screen Capture” button. The software display disappears temporarily. 5. Check the preview.
Editing an object The drawn lines and the images pasted on the board are handled in the software as an “object”. n Selecting an object You need to select an object before editing it. “Select” button. 1. Touch the 2. Touch an object. The object is selected. Select point Touch an object. Selected object Touch an area where something is drawn. You cannot select an object by touching the area where nothing is drawn.
n Moving an object You can move an object by selecting the object and dragging it. n Enlarging/reducing an object 1. Select an object. 2. Drag the select point. • Dragging the select point on the vertex enlarges/reduces the object with the same aspect ratio. • Dragging the select point on the side enlarges/reduces the object in the direction of either width or height. • The line width remains the same after the object is enlarged/reduced.
n Changing the order of objects You can change the order of the object placement. 1. Select an object. 2. Select the object placement from “Order” in the expansion menu. • Bring to Front • Send to Back • Bring forward • Send backward : The object moves to the front. : The object moves to the back. : The object moves one forward. : The object moves one backward. Object placement order When several objects overlap, the objects at the back are hidden behind the objects in front.
Enlarging the view of the screen The steps for enlarging the view of the screen vary depending on the mode. The following operations can be performed in both modes. Enlarging a specified area 1. Touch “Enlarge Specified Area”. 2. Drag the area you want to enlarge. The specified area is enlarged in a separate window. TIPS • The narrower the area specified, the more the view is enlarged. • The drawing and image capturing functions cannot be used in a window whose view is enlarged.
n Enlarging the screen in overlay mode You can enlarge part of the screen and display it. “Zoom In” button. 1. Touch the 2. Touch the board. The area around the touched point is enlarged and displayed. Touch the point to enlarge. The area around the point is enlarged. Using the background image You can show a template image such as a monthly schedule sheet or a calendar as the background of the whiteboard. (The background image can be set individually for each sheet.
Displaying the Pen Software in a split-screen The Pen Software can be displayed in a split-screen. Touch “Split screen” to change from full-screen display to half-screen display. TIPS • • • • This can only be used in whiteboard mode. “Split screen” can be displayed on the toolbar using “Customize toolbar” (Page 36). The screen is the half of the screen in which the toolbar appears. The screen zoom is fixed at 100%.
Launching an external application An external application can be added to allow the application to be launched while this software is running. n Adding an external application Up to 5 applications can be added. Adding a new application 1. Touch “Settings of Pen Software”. 2. Touch “External Application Settings”. 3. Touch “Edit” next to an application that is shown in the list as being “Not set”. Set the information below. • Name: Set the name that will be shown on the toolbar.
Searching the Internet By specifying a keyword and a search engine, you can search the Internet while the software is running. n Entering a keyword and searching 1. Touch “Web Search”. The search keyword entry screen appears. 2. Enter the “Keyword”. 3. Select the “Search Engine” and touch “Search”. The last used search engine is selected. TIPS • “Web Search” can be displayed on the toolbar using “Customize toolbar” (Page 36). n Searching using entered text as a keyword 1.
Importing a Document as an Image (Pen Software Printer Driver) A document of any application can be converted into an image and displayed on the whiteboard. A document is imported as an image similar to an image printed by a printer. n In the software application 1. In the software application, open the document that you wish to import. 2. Select the print command and open the print settings screen. For details, see the manual for the software application. 3.
Acquiring an Image From a Multifunction Machine If a SHARP multifunction machine is connected to the same network as the computer on which the Pen Software is installed, an image scanned on the multifunction machine can be acquired onto the whiteboard. TIPS • Supports the Network Scanner Tool 3.3 or higher (as of August 2013). • For details, contact your dealer or nearest authorized service representative for the multifunction machine.
Acquiring an image from a TWAIN device When a scanner or other TWAIN device is connected to the computer on which the Pen Software is installed, an image scanned on the TWAIN device can be acquired to the Whiteboard. Before starting, make sure that “Import images” is not blinking. TIPS • For the procedure for using the TWAIN device, see the manual for the TWAIN device. 1. Place the original in the TWAIN device 2. Touch the “Import images” button.
Linking to Microsoft PowerPoint When the slideshow display of Microsoft PowerPoint is detected, a control toolbar that makes it easy to operate the Microsoft PowerPoint slideshow and Pen Software appears automatically. The presentation support tool automatically starts and an icon ( ) appears on the taskbar. Supported applications • Microsoft PowerPoint 2007/2010 (1) (2) (3) (4) (5) (6) (7) (1) Show the previous slide. (2) Show the next slide. (3) Change to arrow (select) mode.
Printing To print only the currently displayed sheet, touch the To print all sheets on the whiteboard, touch the Store the print settings ahead of time. “Print Current Sheet” button. “Print All” button. (Whiteboard mode only) TIPS • The operation tools of the software, such as the toolbars and tabs will not be printed. • In the whiteboard mode, a sheet with no data will not be printed. n Register the settings for printing 1.
Using a secondary display Applicable models (as of August 2013) PN-L602B/PN-L702B/PN-L802B Available models differ according to region. Caution • • • • • This feature is not compatible with Window XP/Vista. Set the screen resolution to 1920 x 1080. Set the touch mode of the touch panel driver to “Dual”. The software keyboard for text entry does not appear in a secondary display. An external application (Page 26) launched from the pen software may appear in the primary display.
Customizing the Settings You can customize various settings of this software. The settings are the same in both whiteboard mode and overlay mode. However, the contents of the screen will vary depending on which mode is started. 1. Touch the “Settings of Pen Software” button. 2. Set the options as necessary. (See below.) 3. When you finish adjusting the settings, touch “OK”.
(5) Pen Cursor Set whether to show a cursor when you draw with the pen function. In Windows 8, the cursor only appears when mouse operation is used (not during pen touch), regardless of this setting. (6) Sheet view Set the sheet list display method (Page 13). (7) Flick Sheet To disable moving to the previous/next sheet by flicking the sheet advance area (Page 12), remove the checkmark. (8) About The version information of this software is displayed. (9) Default Reset the settings to the initial values.
n Customizing the toolbar You can set the toolbar display method and show/hide function buttons. 1. In the “Settings” dialog box (Page 34), touch the “Customize toolbar” button for “Toolbar Customize”. 2. Set the options as necessary. (See below.) 3. When you finish adjusting the settings, touch “OK”. (1) (2) (3) (4) (1) Style Set the toolbar display style. (Page 7) The display style is the same in whiteboard and overlay mode.
Installing/Uninstalling the Software The operations in this section require administrator privilege. Installing the Pen Software n Installing the Pen Software 1. Exit all running software applications. 2. Insert the supplied CD-ROM into the CD-ROM drive of the computer. 3. Double-click the setup program. • 32-bit/64-bit operating system: \PenSoftware\setup.exe 4. For the remainder of the procedure, follow the instructions shown on the screen.
Installing the Network Scanner Tool The Network Scanner Tool is used to acquire an image from a SHARP multifunction machine connected to the same network. n Installing the Network Scanner Tool The Network Scanner Tool is not included on the provided CD-ROM. Use the Network Scanner Tool (Version 3.3 or later) that is provided with the multifunction machine. (If already installed, there is no need to reinstall.
V2.