
Quick Guide

INPUT 2 Mode
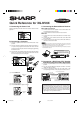
E. Connecting a VCR, Laser Disc Player and
Other Audiovisual Equipment
1 Connect the yellow (Video) RCA connector to the corresponding
yellow terminals on the projector and video source.
2 Connect the red and white (Audio) RCA connectors to the
corresponding red and white terminals on the projector and
video source.
g
g
g
g
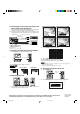
2 Press ENTER to display test pattern.
3 Press ∂/ƒ/ß/© to make adjustments.
4a.Press LENS until normal screen appears.
4b.To reset the KEYSTONE setting, press UNDO.
• Straight lines and the edges of the displayed image may appear jagged, when
adjusting the KEYSTONE setting.
• Do not touch the lens when adjusting the focus or zoom.
H. Turning the Projector Power off
1 Press POWER OFF.
Power OFF
button
2 Press POWER OFF again while the message is displayed.
Printed in Japan
TINS-6738CEZZ
9P06-JWG
To video output terminal
To S-video output terminal
VCR
or
Laser disc player
Audio cable
(sold separately)
S-video cable (sold separately)
Video cable (sold separately)
To audio output terminals
VIDEO Mode
F. Selecting and Checking the Input Mode
1 Press INPUT to select the desired input mode.
2 Press INPUT again to change the mode.
EXAMPLE
INPUT 1 Mode
INPUT button
G. Adjusting the Lens
2
3
1, 4a
4b
1 Press LENS to select mode. Each time LENS is pressed, the
screen changes in the following order.
Use this terminal when the
audio-visual equipment to be
connected has an S-VIDEO
output terminal.
PDF operation manuals in several languages are included in the CD-ROM. See “How to Access the
PDF Operation Manuals” in the operation manual of the projector for more details.
XG-NV6XU/QR (E) 99.11.8, 2:05 PM2