
Installation Guide


INSTALLATION
3. Select a starter wall. An outside wall is best: it's most likely to be straight and square with the room. Measure out from the wall, at each end, the overall
width of the plank plus ½” for expansion. If the rst row requires ripping then measure from the wall the width of the ripped board plus ½” for expansion.
4. Snap a chalk line using a (brightly colored chalk) from these points.
5. Install Underlayment: Unroll the 6 mil. Poly sheeting overlapping edges 4” and seal seams with clear plastic tape. Allow the poly to run 2” up the wall
and trim back after installation of ooring. Install 1/8” foam underlayment.
Note: Use of a oating oor 2 in 1 underlayment may be used. Follow manufacturer’s instructions for application installing the 2 in 1
underlayment.
6. Prior to installing the ooring, secure a straight edge (starter board) inside the chalk line to act as a guide and to prevent the row of planks from shifting
during installation. The straightedge could be a straight piece of lumber or piece of ooring. This is temporary and will be replaced as the oor is
completed.
Installing the Floor
7. Insert spacers at walls to maintain the expansion space between the ooring and the wall.
8. Before starting to glue planks, dry lay the rst two rows of ooring. Working from right to left, install planks so that the groove faces the straight edge
(starter board). When reaching the end of the rst row, cut the plank as necessary to t. On the rst 4 rows stagger end joints a minimum of 16” and then
8” thereafter.
9. Use the remainder of the plank from the rst row to start the second row. If the piece is less than 8” long, cut a new plank in half and use that piece to
start the second row.
10. Lay the remainder of the planks in the second row. Make sure that the rows are straight and no gapping exists on the sides or ends. Once you have dry
laid the rst two rows, remove all the planks in order. You are ready to begin.
11. Begin gluing the boards; Run a continuous bead of adhesive along the groove of the short side (width) and the plank’s side groove (length). Proper
alignment is critical. Misaligned starter rows can cause side and end gaps to appear in proceeding rows of ooring.
12. Install rst row of planks with groove facing the straight edge. Work from right to left. Complete the rst row. Make sure there are no gaps between the
boards. Use a tapping block if need to close the boards together. Immediately wipe away any excessive adhesive with a clean, slightly dampened cloth.
CAUTION: Adhesive that is allowed to dry on the nish surface can be difcult to remove and may leave a haze.
13. At the end wall use an end pry bar, if needed, to pull the ends of the planks tight.
14. Continue to install the oor working right to left, repeating the process until the completion of the oor. Continue to use the spacers on all vertical
surfaces to maintain the ½” expansion.
DO NOT USE laminate straps as they may damage the ooring
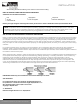
15. The last row will most likely require cutting to width but it should be no less than 1 ½” wide. To do this, lay the plank face up on top of the last full row
installed. Trace the wall contour on the last plank using a scrap piece of plank and a pencil.
16. Install cut planks and pull into place with a pry bar. Install spacing wedges between planks and wall.
17. Remove the straight edge (starter row) and install the last row using the pry bar.
Allow oor to dry for a minimum of 12 hours before removing all spacing wedges and allowing foot trafc.
18. Install trim and moldings the following day.
RADIANT HEATED SUBFLOORS
Refer to Website or Sample board to conrm as an approved product. Non Approved products are not warranted for use
over Radiant Heat
Prior to installation of ooring over radiant heat system it is important that the guidelines are followed in strict accordance. Failure to follow
the guidelines may produce unsatisfactory results.
Floating installation method only, direct glue down is NOT recommended.
Suboor must be at to 3/16” in 10’ or 1/8” in 6’
Prior to installation moisture testing must be conducted and documented per ASTM test method 1869-89 for concrete or using a pin type meter
for wood suboors.
The moisture content for concrete suboors registered after a calcium chloride test must not be greater than 2 pounds per 1000 square feet of
area. If it exceeds these limits, DO NOT install the ooring.
Relative humidity of the jobsite must be maintained between 35-55% relative humidity. Use of humidication system may be required to
maintain the proper humidity level. Failure to maintain proper humidity level can result in excessive dryness of ooring.
It is highly recommended that the radiant heat system be designed specically to accept a wood oor.
1. Use of an in oor temperature sensor as well as a separate thermostat for the individual room is required.
2. An outdoor temperature sensor should be used to adjust water temperature according to anticipated heat loss.
JOBSITE REQUIREMENTS
Prior to installation of ooring the radiant system must be installed per manufacturer’s instructions.
Before installation of ooring material the follow conditions are required
1. Moisture content of concrete must not exceed 2.0 lbs. per CaCl test method (ASTM1869-89) Wood suboors not to exceed 12% and be within 4% of the
wood ooring.
2. Concrete must be allowed to properly cure and dry a minimum of 4 weeks prior to operation of radiant heat system.
3. Operation of radiant heat system should be set to run at 2/3 maximum output for a minimum of 2 weeks prior to installation of ooring to further allow
moisture from concrete to dissipate and reach a nal moisture content. This must be done in both heating and non-heating seasons.
4. Prior to installation (4 days) reduce to a temperature of 65°.
5. Floating Installation - Install ooring according to oating oor installation guidelines. Use of a 2 in 1 underlayment is required.
6. When gluing planks run a continuous bead of adhesive in the groove on both the end and length of the board.
7. Remove any excess glue that squeezes out onto surface of the planks with a clean damp rag. Change rags and water periodically to avoid leaving a haze
on surface.
7
shawoors.com
For reference purposes only if printed or downloaded.