2.
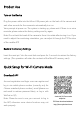
Product Use Turn on the Device Plug the power cable into the Micro-USB power jack on the back of the camera and wait a few seconds for the camera to automatically turn on. Voice prompt at power-on: The system is starting up, please wait. If there is no voice reminder, please restore the factory settings and try again. Note: Do not twist the head of the camera to force it to rotate after turning it on.
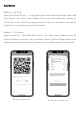
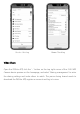
Add Device Method 1:QR Code Open the P6SLite APP, click ‘+’ in the upper right corner of the home page, select ‘Add Wi-Fi Device’, click ‘Next’, select ‘Please use the scan code distribution network to connect the router ’, follow the page prompts for follow-up operations, and wait for the device to successfully connect to the network.
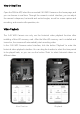
View in Real Time Open the P6SLite APP, select the connected 2.4G WIFI Camera on the home page, and you can browse in real time. Through the camera's control interface, you can adjust the camera's sharpness, horizontal and vertical angles, as well as screen capture and recording, and remote calls operation, etc. Video Playback The 2.4G WIFI Camera can only use the historical video playback function after installing a MicroSD memory card.
AI Human Tracking Intelligent Automatic Care Turn on the AI ‘Human Tracking’ mode. When human beings appear on the screen, the device will automatically capture pictures, record videos, and push alarm messages to the user's mobile phone in conjunction. Note: The linkage push function needs to be turned on (P6SLite APP home page → device preview list →2.4G WIFI Camera preview → turn on ‘Arm/Disarm’ in the lower left corner). Setting Method 1.
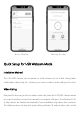
Device Setting Human Tracking Video Share Open the P6SLite APP, click the ‘···’ button on the top right corner of the 2.4G WIFI Camera device preview on the homepage, and select ‘Sharing management’ to enter the sharing settings and invite others to watch. The person being shared needs to download the P6SLite APP, register an account and log in to view.
Device Sharing Sharing Setting Quick Setup for USB Webcam Mode Installation Method The 2.4G WIFI Camera can be placed on a flat surface such as a desk, dining table, coffee table, cabinet top, etc., wherever you want to make a video calling or live chat. Video Calling Designed for the way you like to make a video call, place the 2.4G WIFI Camera where you want it and then connect the camera to a computer USB port. The Windows® UVC or Mac drivers are loaded automatically.
video calling application you prefer. Precautions The proper environment temperature for this device range from -10℃ to 50℃.Please avoid exposing it to too much hotter or colder environment. Please do not use this camera in somewhere moist or highly risk of getting water inside of it, thus to ensure this device of precise electronics a long service life. For better using experience, please keep the front and both sides of the camera lens away from objects reflective as glass, white wall etc.
FCC Statement This equipment has been tested and found to comply with the limits for a Class B digital device, pursuant to part 15 of the FCC rules. These limits are designed to provide reasonable protection against harmful interference in a residential installation. This equipment generates, uses and can radiate radio frequency energy and, if not installed and used in accordance with the instructions, may cause harmful interference to radio communications.