Contents 1 Product Stalls And Package List. 21 Plug In The Power Supply. 2.2 wall Mounting Guide. 23 Launch The Frame. 2.4 Launch The Mainframe APF, 25 Send Photos and Videos via "BiuFrame® APP, 26 Send Photos and Videos via Email 27 Send Photos and Videos via TF Card, OF Navigating Your Frame. 31 Use as Calendar Fran 4.5 Frame, 4.4 Slideshow. 45 About, OF Launch “Mainframe” APP, 6 Specification. OF Troubleshoot {98 FAG. Of FOL Caution...
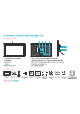
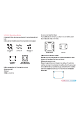
01 Product Details and Package List 1.15.6 FHI IPS Screamer Touch Screen & Reboot Hole: Use a deadline or paper cll to react unit 2. Power Button 7. Type C Port Connect to PC or OTG to transform photos and videos 3. Slot for Stand 8 TF Card Port: Load external max 64GB micro 5D memory card here 4, Speakers for importing or exporting photos 5, Keyhole Mounting Port 8.
(2 Buick Starting AN NOTICE Before Starting Using Sky zoo Frame «The frame is NON-BATTERY powered, Use only the included power supply and keep it plugged in when using it. «The photo frame only supports 2.4GHz WI-Fi network, doesn't support GHz WI-Fi, » Male sure the frame is connected to the internet when adding friends or sharing photos via Mainframe APP.
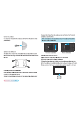
Mow Let's Start Using the Simony Frame! 1. Flip over the photo frame and place it on a flat surface. 2. Resew the two screws inch the Slots for Stand. 3. The frame can be placed In landscape, portrait, or hang up through the hanging hole. 4. Plug one end of the AC Power Adapter into the DC jack of the photo frame, then plug the other end into a socket. LANDSCAPE PORTRAIT HANGING UP Tha photo frame will power on automatically acne plugged in.
1. Ba fore installation, make sure you have the following accessories and tools. 13 Marks sure the following accessories are included in the package: & a & Long Screw Anchor x 4 Short Screw x4 x4 Positioning Metal Wall Mount Testicle x1 Frame Back Bracket 25 Aka sure you have the following tools on hand: ~ Electric hand drill Earner ~ Phillip's screwdriver 2. installing the Metal Wall Mount The metal bracket has two parts, one fixed to the wall and the other fined to the back of the photo drama.
threatened Interfaces. Place the spring washer and tighten the four short 3) Install the anchors sorrows into each interface. Use a hammer to tap the four anchors into the four holes drilled in the previous step. == a 4) Secure the wall mount. Horizontal installation Vertical installation Attach the wall mount to the wall with the big opening facing up, and then drive the four long screws Into the anchors to fix the wall mount on 4. Fix the photo frame on the wall the wall.
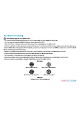
1. Tha frame will automatically power on afar connecting the power. 2 Frame Quick setup When starting your frame for the first time, you will need to sat up the frame. + Sol act a language. This will ba the language used on the frame. + Download APR. Scan ths GR Code on the frame or search "Blu Frame” In APP Store. + Connect frame to tha interment by connecting It to WI-FL Skip this step if you just want to share photos and videos via TF card. + Congratulations! Frame Is connected successfully.
Connect io Wik When you see the following screen, its ready to add friends and fates! 650866 3575: SUES Cid Fran menses.
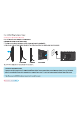
1. Download APP: Search for "Mainframe” on App Store™ / Google Play™ Sean the GR code 1 download and Install it on the mobile device, 2, Open APP: Launch the "Mainframe” application. 3. Sign Up an account: Please click "Sign Up” to register an account, Set a profile photo{net required, star your ema, and set your pleasantness enter a 618 sigh password, Both latter and numbers must be include, fill in your first name and fast name, Read and agree with Privacy Policy and Terms of Service.
Si © Daa nie i a Open APP Signal Login Siam Frame Add Frame you to guide you through adding frames. Fill in Frame ID and name your frame. The Frame ID is a code with 10 digits, Amber you activate the device, it will be displayed on the last page of the wizard (as shown in the figure). f you have already completed the wizard, please proceed to your desired device ane by one: (Please go to Settings» Friends>Frame ID).
1. Click "Add Photos” Launch the "Mainframe” application. After adding the frame successfully, You can view your frame on the homepage by clicking “Add Photos”. 2. Choose photos and videos: Select the photos or videos on the app, only 20 photos and videos (each dives max 15) can be sent at a time. Click @ and select "Edit" the dives bs capture 15s video, refer to the below image to slide left and right of dives range on the bottom to select the range to save. Click "OK" to save operate.