D80 PRO
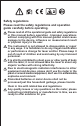
Safety regulations Please read the safety regulations and operation guide carefully before operating. Please read all of the operational guide and safety regulations in this manual before operation . Improper operations without complying with this manual guided could cause damage to the device, influence on measurement result or physical injury to the user. The instrument is not allowed to disassemble or repair in any ways.
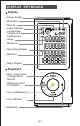
DISPLAY KEYBOARD Display Power Supply Bluetooth Record Laser indicator Length,Area, Volume and Pythagorean Angle Maximum Secondary Display Minimum Major Display Keyboard Size, Volume And Triangle/check Record Reference Point Unit Switch Turn on/Measuring Turn off/Clear Bluetooth -2-
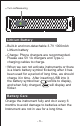
Turn on/Measuring Lithium Battery Built-in and non-detachable 3.7V 1000mAh Lithium battery Charge: Phone chargers are recommended. Please use 5V 1A chargers and Type-C charging cables to charge. When we can not activate instruments or there is a blank battery symbol flickering after it has been used for a period of long time, we should charge it in time. After inserting USB into it, the battery symbol bar scrolls to display, and when fully charged, will display and flicker.
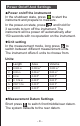
Power On/off And Settings Power on/off the instrument In the shutdown state, press to start the instrument and prepare to measure. In the power-on state, press and hold for 3 seconds to turn off the instrument. The instrument will be power off automatically after 150 seconds with no operation on the instrument. Unit setting In the measurement mode, long press to switch between different measurement units. The instrument offers 6 units to choose from. Units: Length Area Volume 1 0.000 m 0.000 m2 0.
Backlight On/off The instrument`s backlight is power on/off automatically. The instrument will open the backlight for 15 seconds after you press any keys of the instrument. And the instrument will power off the backlight to save power after 15 seconds of no operation on the instrument. Self-calibration and sound settings To ensure the accuracy of the instrument, a self-calibration function is provided.
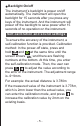
If the measured value of the instrument is 3.783m, which is 3mm higher than the actual value, you can enter the calibration mode, and press to lower the calibration value by 3mm on the existing basis. After adjustment, press to save the calibration result. Press to save calibration result and enter sound settings, the screen shows “ ” and there are flashing letters at the bottom. Press to switch sound on/off, “ ” is sound on, “ ” is sound off. After the setting is completed, press to exit the setting.
The main display area shows current measurement value, short press or exit continuous measurement mode. Size Measurement Press once, the screen shows and one side of the triangle flickers. to , Complete the following actions as prompted: Press to measure the first side(width) Press to measure the second side(length) The instrument will calculate the size automatically, and the result shows on the main display area. The secondary display area will show the measurement value of the length and width.
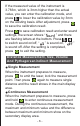
Complete the following actions as prompted: Press to measure the first side(width) Press to measure the second side(length) Press to measure the third side(height) The instrument will calculate the volume automatically, the calculation result shows in the main display area. And the length, width and height of the cube show in the secondary display area. During measurement, we can press to clear the measurement result and remeasure.
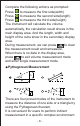
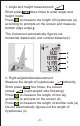
1. Angle and height measurement . Short press three times to enter angle and height mode: Press to measure the length of hypotenuse (a) according to prompts on the screen and measure bottom edge angle . The instrument automatically figures out horizontal distance(b) and vertical distance(h) a a h b h b 2. Right-angledsidemeasurement Measure the length of hypotenuse indirectly.
3. Short press five times, the screen shows: (hypotenuse flickering). Press to measure the length of one leg (a) Press to measure the length of the middle side (b). Press to measure the length of another side (c). Device automatically calculates the length of hypotenuse (x). 4.
Data Storage Function The measurement results are saved automatically. the user can export the recording through Apps. Bluetooth Function It will automatically record the data when the instrument figures out the final results. And the user can press and hold to check the recordings.Complete the following actions as prompted to check the recordings: 1. Short press to switch recordings. 2. Long press to clear all recordings. 3. Short press to exit checking recordings.
Prompts During use, the following prompts may appear in the main display area Prompts Reason Solution Err1 Signal is too weak Measure the targetwith strong reflectivity Err2 Measure the target with weak Signal is too strong reflectivity Err3 Battery voltage is too low Err5 Err6 Err8 Charge the battery Pythagorean measurement violations Exceeds the measurement distance range Re-measureto make sure the hypotenuse is larger than the right-angled side The angle sensor is wrong returned to the fac
Prompts Project D80 PRO Range 0.05-80m Precision ±(2mm+D * 1/10,000th)* Continuous measurement Bluetooth Bluetoothdistance Size/Volume measurement Pythagorean measurement 10m Max/Mini Self-calibration Laser class Laser type 630-680nm, <1mW The number of storage records 100 Auto laser off 20s Auto power off 150s Charging time Working times (full charged) About 2.5h 15000 times Sound prompts Storage temperature Working temperature -20˚C~60˚C 0˚C~40˚C Storage humidity 20%~80%RH Battery 3.
*The minimum of the range refers to the distance measured by front-end datum * ‘ D ’ refers to actual distance **There will be a large error in the measurement results in harsh environments such as: strong sunlight, fluctuating temperature, weak reflectivity of reflective surface andinsufficient battery power. In this case, it is better to use the target reflector.
Packing List Please carefully check whether all the accessories are completed according to the packing list when purchasing. NO.
FCC Statement This device complies with part 15 of the FCC Rules. Operation is subject to the following two conditions: (1) This device may not cause harmful interference, and (2) this device must accept any interference received, including interference that may cause undesired operation. This equipment has been tested and found to comply with the limits for a Class B digital device, pursuant to part 15 of the FCC Rules.