
Product Manual
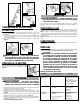

WARNING – TO AVOID ELECTRIC SHOCK, DO NOT USE ON
WET SURFACES — DO NOT EXPOSE TO RAIN — STORE INDOORS.
3
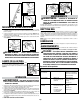
COLLECTION BAG ASSEMBLY
1. Install the exhaust gasket into the discharge port of the vac if not already installed. Make sure
the lip of the exhaust gasket is facing the outside of the discharge port.
2. Connect the collection filter bag to the discharge port of the vac (Figure 5). Twist slightly until
locked into position. Secure power cord with the supplied wire ties (C).
3. Secure the end of the collection bag to the upper handle with the strap connection provided
(Figure 6).
(C)
Figure 5
Figure 6
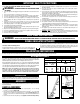
HEIGHT ADJUSTMENT
The Indoor/Outdoor Vac has a 2-position height adjustment.
Adjust the front wheels by placing the axle in the slot that best
suits your cleaning requirements (Figure 7).
Figure 7
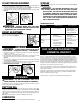
OPERATION
1. Inspect power cord for loose or damaged wiring. If repairs are necessary contact Shop-Vac
Corporation for assistance.
2. Connect cord to a 2 or 3 wire polarized extension cord.
3. The cable restraint is designed to hold a loop of your extension cord. This helps to avoid the
plug and socket connections from coming loose if the cable is pulled accidentally
(Figure 8).
4. Disengage stand. To disengage, keep hands and feet away from stand and tilt unit forward
until stand disengages (Figure 9).
5. The Indoor/Outdoor Vac has a powerful motor. It can pick up some objects which may damage
the impeller. Avoid rocks or hardware (screws, nuts, etc.) when possible.
6. NEVER OPERATE ON A WET SURFACE.
Figure 9
Figure 8
MAINTENANCE
WARNING
– BE SURE TO DISCONNECT POWER SUPPLY
BEFORE ATTEMPTING TO SERVICE OR REMOVE ANY COMPONENTS.
EMPTYING BAG
The collection bag can be easily emptied by removing the strap connection from the upper
handle. Next, disconnect the collection bag from the discharge port by twisting slightly. NOTE:
When removing collection bag tilt opening up to prevent contents from spilling out. Make sure
exhaust gasket stays in discharge port of vac. Unzip collection bag and empty debris into a suit-
able container.
Note: Make sure exhaust gasket is in place before reattaching collection bag.
LUBRICATION
No lubrication is necessary as the motor is equipped with lifetime lubricated bearings.
STORAGE
Empty collection bag and unplug units cord from extension cord before storing. Store indoors;
do not expose to rain.
DANGER – THIS EQUIPMENT INCORPORATES PARTS SUCH
AS SWITCHES, MOTORS, OR THE LIKE, THAT TEND TO PRODUCE
ARCS OR SPARKS, THAT CAN CAUSE AN EXPLOSION. DO NOT PICK
UP FLAMMABLE, COMBUSTIBLE, OR HOT MATERIALS. DO NOT USE
AROUND EXPLOSIVE LIQUIDS OR VAPORS, AS ELECTRICAL DEVICES
PRODUCE ARCS OR SPARKS WHICH CAN CAUSE A FIRE OR EXPLO-
SION – DO NOT USE AT FILLING STATIONS OR ANYWHERE GASO-
LINE IS STORED OR DISPENSED.
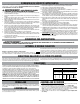
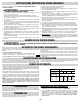
Symptom Possible Cause(s) Corrective Action
Vacuum will Loose connection Check extension cord
not start plug at receptacle
Check extension cord
connection at handle
Weak suction Obstruction Clean nozzle
Full collection bag Clean discharge port
Empty bag
Blowing Obstruction Clean discharge port
debris Full collection bag Empty bag
Exhaust gasket not Install gasket
installed properly
Troubleshooting Chart
SHOP-VAC
®
ONE YEAR INDUSTRIAL/
COMMERCIAL WARRANTY
Shop-Vac
®
Corporation warrants the vacuum cleaner contained in this package for one year
from the date of purchase to correct by repair or parts replacement without charge any product
defect due to faulty material or workmanship. Should this product be used for rental service, a 90
day limited warranty will apply. THIS WARRANTY DOES NOT COVER ACCESSORIES. Shop-
Vac
®
assumes no responsibility for damage or faulty performance caused by misuse or careless
handling, or where repairs or modifications have been made or attempted by others. Proof of pur-
chase date is required. This warranty gives you specific legal rights, and you may also have other
rights which vary from state to state or province to province.
Customers in the United States: for product service contact Shop-Vac
®
Corporation Customer
Service, at (570) 326-3557 or go to www.shopvac.com/support. Visit www.shopvac.com for you
vacuum's parts list schematic.
Customers in Canada: for product service return the complete unit, (transportation prepaid), to
the Authorized Shop-Vac
®
Service Centre nearest you. A complete list of Authorized Service
Centres is included with each vacuum cleaner.
Customers in Mexico: for product service see paperwork that came with your unit.
Limited One-Year Warranty
WARNING – HAZARDOUS MOVING PARTS! KEEP HANDS
AND FEET AWAY FROM OPENING. TO REDUCE THE RISK OF INJURY
FROM MOVING PARTS, UNPLUG BEFORE SERVICING.
Do not attempt to service your vacuum beyond that described in the user manual. For all other
servicing, follow instructions under Warranty Section.