
Owner's manual


7
DIRECTIONS FOR USING THE PRO LIFT
®
:
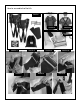
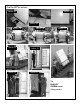
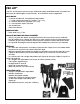
Assembly: (Photo 1) The PRO LIFT
®
system sold by Nielsen Products, LLC comes with two padded har-
ness’s with attached tri-snaphooks, two specialty 5” / 12.7 cm tension buckles, and one 12’ / 3.66 meters
x 5” /12.7 cm wide lifting strap, a carrying bag, and an instructional DVD.
Step 1 Harness: (Photos 2a, 2b) Each harness comes fully assembled. Put the harness on in the same
manner as a vest. (Photos 2a, 2b). There are two rectangular buckles sewn into the harness. These buck-
les should rest towards the front of your shoulders. The lifter will use these to adjust the webbing for the
height of the person (Photo 2a). The two metal Tri-snaphook pieces should rest at your sides at the level
of your hip bones. (Photo 2a).
Step 2 Specialty Tension Buckle: (Photo 3) Each lifter will snap each Tri-snaphook buckle into the 5” ten-
sion buckle (Photo 3). The Tri-snaphooks attach to the hole located at the top of the 5” tension buckle.
Step 3 Threading The Lifting Strap Through The Specialty Tension Buckle: (Photos 4, 5, 6a, 6b) Each lifter
should be wearing a harness with the specialty tension buckles attached. Place the lifting strap under
the object being moved. Make sure the strap is not twisted. Next, each person will pick up one end of
the lifting strap. To thread the specialty buckle, weave the lifting strap through the buckle starting with
the webbing going under the buckle, push it up behind the larger metal rod and the middle rod (clos-
est to your body), pull it up over the top of the buckle and then thread it back down through the middle
and front rods. Please view demonstration videos online at: www.shoulderdolly.com.
Step 4 Adjust The Length Of The Lifting Strap To Fit Your Object: (Photos 7, 8, 9) Once the lifting strap is
under your product, each lifter will need to tighten/adjust the lifting strap so that the product will lift into
the air once you stand up.
TO MAKE THE STRAP SHORTER: Once the lifting strap is threaded, turn the buckle horizontally (Photo 8)
and pull down on the end of the lifting strap that is farthest away from your legs as needed. The more
you pull, the higher the item will be lifted.
TO MAKE THE STRAP LONGER: Turn the buckle horizontally (Photo 9) and pull down on the part of the
lifting strap that is closest to your legs as needed. The more you pull, the lower the item will be lifted.
Step 5 – The Lift: Each lifter will need to squat down between 6” to 12”. The lifters back should remain
straight up and down; do not lift while hunched over. The lifter is in the correct position if the harness is
pressing into the shoulders as you attempt to stand up. Once both lifters have adjusted the lifting strap
in the buckle, both lifters will simultaneously straighten their legs and push the object toward the other
lifter until their arms are fully extended at the elbows. Continuously communicate with your lifting part-
ner throughout the process.
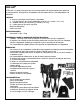
GENERAL USE OF PRO LIFT
®
:
Step 1 Placing the lifting strap: (Photos 10a, 10b, 10c) The lifting strap must be placed underneath the
object to be carried. There are two methods to accomplish this:
1. If the object is elevated off the ground by its legs (appliances and some furniture) simply slide
one end of the lifting strap (before it is attached to the specialty buckle) underneath the object,
push it across and pull the strap through when it reaches the other side (Photos 10a, 10b, 10c).
2. Tip the object slightly (Photo 11a) and slide the strap underneath the object.
Step 2 Lifting: (Photos 11a, 11b, 11c)
1. When the lifting strap is underneath the middle of the object to be carried, center it in a way
that will keep the object balanced.
2. Both individuals squat slightly and adjust the length of the lifting strap until it is taught. (See
step 4 above) This will leave each lifter with his/her legs partial bent, in a semi-squatting position.
3. Next, both lifters push the object that is to be lifted with their arms in a straight position. This will
ensure that your back remains in an upright position (Photo 11b).
4. When both lifters are ready to lift, the object is lifted by communicating with your partner that
you are ready to lift, and by straightening the legs simultaneously (Photo 11b).
5. TO MAKE THE ITEM STABLE WHEN WALKING: Make sure to push the object at your partner until
your arms are locked at the elbow.
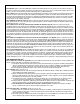
Special Tips — Stairs: (Photos 12, 13, 14, 15)
1. Whenever lifters are going up or down stairs, the object must be lifted at least 12”/ 30 cm off
the ground in order to clear the stair. To accomplish this, decrease the length of the webbing
between the two buckles.
2. Remember to keep the object level on the strap. Keeping your arms straight will keep the ob-
ject from crowding your upper body and head.