® SHU LEG EN DARY PE R F O R MAN C ET"' I SHU;u; .. . . · -• ,:, , ,, ' . - - I , ' BLX® Wireless Microphone System Systeme de microphone sans fil BLX® Sistema de micr6fonos inalambricos BLX® Sistema de Microfone Sem Fio BLX® ©2015 Shure Incorporated 27A29459 (Rev.
IMPORTANT SAFETY INSTRUCTIONS 1. 2. 3. 4. 5. 6. 7. READ these instructions. KEEP these lnstructlons. HEED all warnings. FOLLOW all instructions. DO NOT use this apparatus near water. CLEAN ONLY with dry cloth. 00 NOT block any ventilation openings. Allow sufficient distances for adequate ventila- tion and ins1aH In accordance with the manufaeturer's instructions. 8.
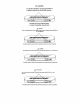
&Caution For proper operation, set each transmitter to a different channel on the BLX88 receiver. Consult your BLX Channel guide to select compatible channel sets. Lt, Attention Pour un fonctionnement correct, regler chaque cdte du recepteur double BLX88 sur un canal different. Consulter le guide des canaux BLX pour selectionner des jeux de canaux compatibles. & Cuidado Para oper~o correta, ajuste cada lado do Receptor duplo BLX88 em um canal diferente.
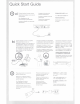
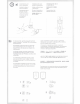
Quick Start Guide ©a) Connect receiver to power source. Brancher le recepteur a une source d'alimentation. Den Empfiinger an die Stromversorgung anschlieBen. Conecte el receptor a la fuente de alimentaci6n. b) Connect receiver to mixer or amplifier. Hold power button to turn on. Brancher le recepteur a un melangeur ou un amplificateur. Appuyer sur le bouton d'alimentation pour allumer le recepteur. Den Empfiinger an das Mischpult oder den Verstiirker anschlieBen.
@ a) Install batteries and turn on transmitter. lnstallate le pile ed accendete ii trasmettitore. l:!~Xl-!i -:..1::i:I~ Cf-§% ·WI~ 7'!{JAl.2.. Installer les piles et allumer l'emetteur. lnstale as pilhas e ligue o transmissor. ~~~i1!!1HTH~t-tm Die Batterien/Akkus einlegen und den Sender einschalten. BCTaBbTe 6arnpeHKl'1 1-1 BKJ1t041-1re nepet1aT41'1K. Pasang baterai dan hidupkan pemancar. lnstale las baterfas y encienda el transmisor. ~~- i!mi11:::•1m>t-An, ::t ✓ I::: l.
If setting up additional systems, leave the first transmitter and receiver on. For each additional receiver, manually set the group to match the first receiver. Note: The receiver will automatically perform a channel scan to find an available frequency after the group has been selected. Set the transmitter frequency to match the receiver. Si l'on configure d'autres systemes, laisser les premiers emetteur et recepteur allumes.
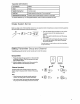
BLX® Features Front Panel BLX4 SHU~ - BLX88 ---•-- .... 2 ©audio LED Indicates strength of incoming audio signal: green for normal and red for overload. @ready LED Green light indicates system is ready for use and receiving transmitter signal. @ LED Display Displays group and channel setting. @ group and channel Buttons Scan: Push and release group button to scan for an open group and channel. Manual: Push and hold group button to select a group.
Back Panel BLX4 • BLX88 4 © DC Power Jack @ Adapter Cord Tie-Off @ XLR microphone output Jack (MIC out) © 6.35 mm (1 /4") instrument level output jack (instrument out) BLX1 © LED Indicator Displays power and battery status (see Transmitter LED Indicators). BLX1 @power Switch Toggles power on or off. @4-Pin Microphone Input Jack (TA4 connector) ©Antenna @ group Button Changes group setting. @ LED Display Displays group and channel setting. ® channel Button Changes channel setting.
Transmitter LED Indicators LED Indicator Status Green Ready Rapldly Flashlng Red Controls locked Solld Red Battery power low (less than 1 hour remaining•) Flashlng Red and shuts off Batteries dead (change batteries to power on transmitter) •For alkaline batteries only. For rechargeable batteries, solid red means the batteries are dead.
Multiple System Setup Up to 12 systems can operate simultaneously (band and RF environment dependent). Important: Set up each system one-at-a-time. Once a receiver and transmitter are tuned to the same group and channel, leave the transmitter powered on. Otherwise, scans from the other receivers will not detect that channel as occupied. For the BLX88, be sure to setup both transmitters before progressing to the next receiver.
Tips to Improve Wireless System Performance If you encounter interterence or dropouts, try the following suggestions: Choose a different receiver channel Reposition the receiver so there is nothing obstructing a line of sight to the transmitter (including the audience) Avoid placing transmitter and receiver where metal or other dense materials may be present • Move the receiver to the top of the equipment rack Remove nearby sources of wireless interterence, such as cell phones, two-way radios, computers, m
Batteries Expected life for AA batteries is up to 14 hours (total battery life varies depending upon battery type and manufacturer). 0 0 When the LED indicator turns red, it signifies "low battery" with approximately 60 minutes of remaining battery life. For alkaline batteries only. For rechargeable batteries, solid red means the batteries are dead. To remove batteries from the handheld transmitter, push them out through the opening in the microphone battery compartment.
Troubleshooting Issue Indicator Status Solution No sound or faint sound Receiver ready LED on • Verify all sound system connections or adjust gain as needed (see Adjusting Gain) • Verify that the receiver is connected to mixer/ amplifier Receiver ready LED off • Turn on transmitter • Make sure the batteries are installed correctly • Perform transmitter setup (see Single System Setup) • Insert fresh batteries Receiver LED screen off • Make sure DC adapter is securely plugged into electrical outlet.
System BLX2 Audio Input Level Working Range gain 91 m (300 ft) Line of Sight Note: Actual range depends on RF signal absorption, reflection and interference. Audio Frequency Response OdB -20 dBV maximum -10dB -10 dBV maximum Gain Adjustment Range 10 dB 50 to 15,000 Hz Note: Dependent on microphone type RF Transmitter Output Total Harmonic Distortion 10 mW, typical Ref. ±33 kHz deviation with 1 kHz tone varies by region 0.5%, typical Dimensions Dynamic Range 224 mm X 53 mm L x Dia.
Certifications This product meets the Essential Requirements of all relevant European directives and is eligible for CE marking. The CE Declaration of Conformity can be obtained from Shure Incorporated or any of its European representatives. For contact information please visit www.shure.com The CE Declaration of Conformity can be obtained from: www.shure.
Frequency Range and Transmitter Output Level Band Range Output Power H8 518 to 542 MHz 10mW H8E 518 to 542 MHz 10mW H9 512 to 542 MHz 10mW H10 542 to 572 MHz 10mW J10 584 to 608 MHz 10mW K3E 606 to 630 MHz 10mW K12 614 to 638 MHz 10mW K14 614 to 638 MHz 10mW M15 662 to 686 MHz 10mW M17 662 to 686 MHz 10mW 025 7 42 to 766 MHz 10mW R12 794 to 806 MHz 10mW S8 823 to 832 MHz 10mW T11 863 to 865 MHz 10mW Note: Frequency bands might not be available for sale or authori
LEGENDARY PERFORMANCE- United States, Canada, Latin America, Caribbean: Shure Incorporated 5800 West Touhy Avenue Niles, IL60714-4608 USA Phone:+1847-600-2000 Fax:+1847-60(H212(USA) Fax:+ 1 847-600-6446 Email: infO@shure.com www.shure.com Europe, Middle East Africa: Shure Europe GmbH Jakob-Dieffenbacher-Sir. 12, 7S031 Eppingen, Germany Phone: -+-19-7262-92490 Fax: -+-19-7262-9249114 Email: infO@shure.de www.shure.
CD .. PGA31 Headworn Wireless Microphone , ,, _ ., ._. • >< The Shure PGA31 is a headworn electret condenser microphone for use with a wireless bodypack transmitter. Wearing the Microphone 1. Install the windscreen on the microphone boom. 2. Place the headband around the back of the head, with the boom on the left side. © 2013 Shure Incorporated 27A21259 (Rev. 1) Printed in Taiwan 3. Place the microphone at the corner of the mouth.
®
Certifications Note: Testing is based on the use of supplied and recommended cable types. The use of other than shielded (screened) cable types may degrade EMC performance. Homologations Zulassungen Remarque : Le contr6le est fonde sur l'utllisatlon des types de cAble fournls et recommandes. L'utilisation de types de ~ble autres que bllndes peut degrader les perfonnances GEM. The CE Declaration of Conformity can be obtained from: www.shure.
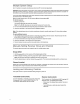
Specifications Type Electret Condenser Caracteristiques Equivalent Output Noise c11 typical, A-Weighted 28d8 Frequency Response 60 Hz to 20,000 Hz Unidirectional (Cardioid) Output Impedance @1kHz 6000 Audio Output Level -50.0 dBV/Pa Signal-To-Noise Ratio 111 @1kHz 66 dB Condensateur a electret Power Requirements 60 Hz a 20,000 Hz Alimentation Courbe de directivite +5 V c.c.
20 ----- -·- .... ...... 15 10 - -, 5- m "C ~1- .,. ______ "II 0-5 ~ .... -10 ~ ,..,,,_. - ......~ -15 ,_ --- ~ I -- A- • • ,._ ' '' -20 -25 -30 I I 20 100 I I 1k 10k I 20k Hz 0.6 m (2 ft.) from sound source United States, Canada, Latin America, Caribbean: Shure Incorporated 5800 West Touhy Avenue Niles, IL 60714-4608 USA www.shure.com Phone: 847-600-2000 Fax: 847-600-1212 (USA) Fax: 847-600-6446 Email: info@shure.com - - - - - 1 cm (0.
Service Centers United States, Canada, Latin America, Carrlbbean Shure Incorporated Attn: Service Department 945 Chaddick Dr. Wheeling, IL 60090-6449 Europe, Middle East, and Africa Shure Europe GmbH Attn: Service Jakob-Dieffenbacher-Str. 12 75031 Eppingen, Germany Asia Shure Asia Limited 22/F, 625 King's Road North Point, Island East Hong Kong Attention: Service Department Phone: (852) 2893-4290 Fax: (852) 2893-4055 Email: info@shure.com.
LIMITED WARRANTY Shure Incorporated ("Shure") hereby warrants to the original consumer purchaser only that, except as otherwise specified below, this product will be free in normal use of any defects in materials and workmanship for a period of two (2) years from the consumer's original date of purchase directly from Shure or from a Shure-authorized reseller.
FOR ORIGINAL PURCHASES IN AUSTRALIA ONLY LIMITED WARRANTY AGAINST DEFECTS Shure Incorporated ("Shure") hereby warrants to the original consumer purchaser in Australia only that, except as otherwise specified below, this product will be free in normal use of any defects in materials and workmanship for a period of two (2) years from the consumer's original date of purchase directly from Shure or from a Shure-authorized reseller.