s Quick Start Guide SIEMENS ADSL C-110 ADSL Router • Do never open the housing! • Use only the power supply provided with this device. • Use only the cables provided with this device and do not perform any modifications on them.
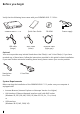
Before you begin Verify that the following items came with your SIEMENS ADSL C-110 kit: SIEMENS ADSL C-110 USB cable (beige) Quick Start Guide ADSL cable (silver) CD-ROM Power supply Ethernet cable (light gray) Optional: Your service provider may include Stand-alone Line Filter(s) and Y-Line Filter(s). If you have received any of these items, follow the instructions provided in this guide for basic installation.
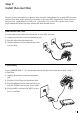
Step 1: Install the Line Filter Devices such as fax machines or phones that share the same phone line as your ADSL account require a line filter, which protects your phone or fax from ADSL frequencies. Filters can be in the form of a stand-alone Line Filter or a Y-Line Filter. The Y-Line Filter can be used if your ADSL modem will share the same phone jack with another device. Stand-alone Line Filter For each device that shares the phone line as your ADSL account: 1.
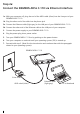
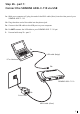
Step 2a: Connect the SIEMENS ADSL C-110 via Ethernet interface 1a. With your computer off, plug the end of the ADSL cable (silver) into the Line port of your SIEMENS ADSL C-110. 1b. Plug the other end of the cable into the phone jack. 2a. Connect the Ethernet cable (light gray) to the LAN port of your SIEMENS ADSL C-110. 2b. Connect the other end of the Ethernet cable to the LAN port of your computer. 3. Connect the power supply to your SIEMENS ADSL C-110. 4. Plug the power plug into a power outlet. 5.
Step 2b - part 1: Connect the SIEMENS ADSL C-110 via USB 1a. With your computer off, plug the end of the ADSL cable (silver) into the Line port of your SIEMENS ADSL C-110. 1b. Plug the other end of the cable into the phone jack. 2a. Connect the USB cable to the USB port on your computer. 2b. Do NOT connect the USB cable to your SIEMENS ADSL C-110 yet! 3. Proceed with step 2b - part 2.
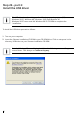
Step 2b - part 2: Install the USB driver The USB driver is only working on the following operating system (OS): Windows 98 SE, Windows ME, Windows 2000 and Windows XP. Windows 98 SE users need the Windows 98 SE CD-ROM to complete the installation. To install the USB driver proceed as follows: 1. Turn on your computer. 2. Insert the Siemens installation CD-ROM in your CD-ROM drive. Click on setup.exe in the directory /USB driver on your Siemens installation CD-ROM.
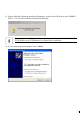
3. After a while the following windwo will apppear. Connect the USB cable to your SIEMENS ADSL C-110. The driver will be installed automatically. Note for Windows 98 SE users: If prompted, you need to insert the Windows 98 SE CD-ROM in your CD-ROM drive to complete the installation 4. If the following window appears click on Next.
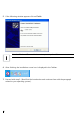
5. If the following window appears click on Finish. Note for Windows XP users: You have to repeat step 4 and 5. 6. After finishing the installation a new icon is displayed in the Taskbar. 7. Proceed with step 3. (Read first the introduction and continue then with the paragraph related to your operating system).
Step 3: Configure the PC (TCP/IP settings) Introduction In step 3, you will configure your computer to communicate with the SIEMENS ADSL C-110. To do this, you will need to configure your PC’s network settings to obtain an IP address automatically. Computers use IP addresses to communicate with each other across a network or the Internet. Find out which operating system your computer is running, such as Windows 95, Windows 98, Windows Me, Windows NT4, Windows 2000 or Windows XP or Macintosh OS 8.6, 9.x, 10.
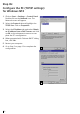
Step 3b: Configure the PC (TCP/IP settings) for Windows NT4 1. Click on Start -> Settings -> Control Panel. Double-click on the Network icon. The Network screen will appear. 2. Select the Protocol tab and highlight the TCP/IP line. Click on Properties. 3. Select the IP Address tab and select Obtain an IP address from a DHCP server and click on OK on the subsequent screens to complete the PC’s configuration. 4. When prompted with “Activate DHCP” dialog box, click Yes. 5. Restart your computer. 6.
Step 3a: Configure the PC (TCP/IP settings) for Windows 98 and Windows ME Windows 98 users need the Windows 98 Installation CD to complete the installation. 1. Click on Start -> Settings -> Control Panel. Double-click on the Network icon to open the Network screen. 2. Select the Configuration tab and highlight the TCP/IP line for the applicable Ethernet adapter1). If the word TCP/IP appears by itself, select that line2). Click on Properties. 3.
Step 3c: Configure the PC (TCP/IP settings) for Windows 2000 1. Click on Start -> Settings -> Control Panel. Double-click on the Network and Dial-up Connections icon. The Network screen will appear. 2. Select the Local Area Connection icon for the applicable Ethernet adapter (usually it is the first Local Area Connection listed). Double-click on Local Area Connection and click on Properties. 3. Select Internet Protocol (TCP/IP) and click on Properties. 2 4.
Step 3d: Configure the PC (TCP/IP settings) for Windows XP The following instructions assume you are running Windows XP’s default interface. If you are using the Classical interface (where the icons and menus look like previous Windows versions), please follow the instructions for Windows 2000 (Step 3b). 1. Click on start -> Control Panel. Click on the Network and Internet Connections icon. Click on the Network Connections icon. The Network screen will appear. 2.
Step 3e: Configure the PC (TCP/IP settings) for Mac OS 8.6 and OS 9.x 1. From the Apple Menu, point to Control Panels and then click TCP/IP. 2. From the Connect via pull-down menu select Ethernet built-in. From the Configure pull-down menu select Using DHCP Server. 3. Close the TCP/IP window and click on [Save].
Step 3f: Configure the PC (TCP/IP settings) for Mac OS X 1. From the Apple Menu, select System Preferences... 2. Click on the Network icon in the Internet & Network area. 3. From the Show pull-down select Built-in Ethernet. On the TCP/IP tab, select Using DHCP from the Configure pull-down menu. 4. On the PPPoE tab, make sure that the Connect using PPPoE check box is NOT activated. Click Apply Now. 2 5. Close the Network window.
Step 5: Configure the Internet Access Once installation is complete on your PC, you need to configure the Internet access. To access the SIEMENS ADSL C-110 entry page proceed as follows: Accessing the modem entry page The modem state page is accessed via a web browser as follows: - Launch web browser. - First check that the browser configuration is not set to use a server proxy.
Modem State Information Once installation is complete on your PC, it is possible to access the SIEMENS ADSL C-110 state page, which displays the most important information on the configuration and state of the ADSL Bridge C-110. Accessing the modem state page The modem state page is accessed via a web browser as follows: - Launch web browser. - Enter the pre-set IP address of the ADSL modem in the browser address field: http://192.168.1.
Trouble shooting If the solution proposed in this section does not resolve your problem, contact your network administrator or technical support. No LEDs come on when the modem is on 1. Check the connection between the power supply unit and the SIEMENS ADSL C-110. 2. Check that the mains socket and power supply unit are operating correctly. The LAN LED does not come on 1. Check the Ethernet connection between your PC and the SIEMENS ADSL C-110. 2.
3. Make sure that the user name and password entered are correct. 4. Make a telephone call to ensure that there are no problems on the telephone line. The ADSL modem cannot be reached with the PING command 1. Check the connection used (Ethernet or USB) between your PC and the ADSL modem. 2. Check the configuration of the interface used by your PC. 3. Make sure the TCP/IP settings of the Ethernet card or the virtual LAN card used by the USB interface are set to find the IP address automatically.
Glossary 1. Make sure that the connections to the ADSL modem are correct, that the port used (Ethernet or USB) is working correctly and that the modem is on. 2. Check that the IP address in the browser address bar is 192.168.1.1 10/10 0Base-T 10/100Base-T uses an unshielded UTP cable (category 5) for Fast Ethernet connections. The cable meets IEEE standard 802.3, has a maximum length of 100 meters and a transmission speed of 100 Mbps. ADSL Abbreviation of Asymmetrical Digital Subscriber Line.
Domain name system. This is not an actual internet protocol, but a system for translating node names (for example www.nasa.org) into numerical addresses (for example 192.168.2.1). DSL Digital Subscriber Line. Network Technology that transmits using a broad bandwidth over short distances using traditional telephone copper pairs. There are four types of DSL: ADSL, HDSL, SDSL and VDSL. Each of these uses two specific devices (similar to modems) at each end of the transmission.
PPPoE (RFC2516) PPP over Ethernet. Transmission protocol used for ADSL connections. In Italy, this is usually an alternative to PPPoA. In fact, data packets, whether in PPPoA or PPPoE, are transmitted on the ATM network. The correct term for this protocol is in fact Ethernet over ATM. PVC Permanent Virtual Circuit. Virtual connection between two fixed endpoints of the network. Routing, frame and ATM network terminal. RFC Abbreviation of request for comments.
Step 6: Front panel system messages LED Indicators The ADSL Bridge modem is equipped with LEDs on the front as described in the table below (from left to right): LED Color Status Description PWR green On Off Unit is powered on Unit is powered off DSL LNK green Blinking Constant The modem is establishing the ADSL connection The physical ADSL link is active USB green On Flashing Off Connection active Traffic No connection active ETH green On Flashing Off Ethernet connection active (10M or 1