
Operating instructions


11
Figure 15
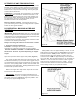
Figure 16 Plenum Clean Out & Draft Adjustment
d. The clean-out port cover should be removed and the
vent pipe checked every four to six weeks or
whenever you utilize the clean-out mode on the
control dial.
e. Fly-ash can also accumulate in the vent pipe and
termination cap. Inspect exhaust system frequently to
maintain free flow of exhaust fumes and fly-ash. The
frequency of clean-out depends entirely on the quality
of the pellets, so you will have to initially monitor the
buildup in the pellet vent pipe.
2. Hopper Clean Out: Vacuum the accumulated saw dust
in the hopper weekly. Keep free of debris and foreign
material. AN ACCUMULATION OF SAW DUST CAN
CAUSE IRREGULAR PELLET FEED. For best results
this should be done on a regular basis depending upon
how often the heater is used. If you burn the heater all
the time you should do this every eight to ten days.
3. Cleaning the Exhaust Fan Blade & Heat Exchanger:
The exhaust blower should be checked for excessive Fly-
ash buildup. Regular and routine maintenance utilizing
the CLEAN OUT feature will keep the exhaust blower
housing and fan blades clean. This cleaning can only be
done when the heater is NOT burning. For best results
run the fan in the CLEAN OUT position with the door
open for approximately one minute or until ash is no
longer being picked up by the fan. Remember, you must
always check the clean out tee after utilizing the CLEAN
OUT feature (Figure 13).
4. Keeping the Glass Clean: If soot deposits accumulate
on the glass, clean with window glass cleaner and a
paper towel when the glass is cold.
5. Polishing the Gold and Chrome: All chrome and gold
plating used on the EASYFIRE heater can be cleaned
with a soft cloth and non-abrasive cleaner.
6. Cleaning & Polishing Gold Plated Parts: Gold is a soft
metal and therefore a fragile surface. Prior to the first
burn it is important to use Windex or comparable product
and a soft clean cloth to wipe any marks off all gold
surfaces or the heat will cause the marks to remain in the
surface permanently. Always clean the gold surface
when the heater is COOL.
7. Door glass replacement: Should the door glass
become broken it may be replaced by scraping the sealer
from around the outer edge of the glass. Carefully pry
glass from door frame then clean all sealer from frame.
Obtain a replacement glass from your local dealer and
attach glass to door using High Temperature Silicon
Sealer (min. 400 ° F). Apply sealer to all four corners of
the glass and set glass into frame. Apply sealer to mating
edge of glass and frame. Allow two hours dry time before
installing door onto heater. Note: Replace with Corning
Pyro-Ceramic Glass only. Refer to parts list for
specifications.
8. Plenum clean out & draft adjustment: Access to clean
under the burn pot is through the plenum clean out plates
on right or left side low front (Figure 16). Remove the
fastener and plate and vacuum out ash accumulations.
Additionally, the draft plate is accessible through this
opening and maybe turned with a long standard screw
driver clockwise to reduce the draft through the burn pot.
This adjustment is made generally only during
installation.
Troubleshooting Guide
The following scenarios are provided in order to help you
locate a difficulty if the heater performs in a manner which
would seem to indicate a malfunction:
l. Problem: I loaded the heater for start-up, pressed “Low”
and the heater did not start.
Solution: Check power cord to see that it is plugged in.
Check 5 amp ignitor fuse. Replace if burned.
2. Problem: Heater starts slow with lots of smoke.
Front ash access