
Operating instructions


3
Figure 3
Figure 4
Figure 5
Figure 6
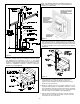
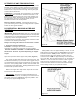
3. If the hearth and fireplace floor are not at the same
elevation, leveling legs may be installed on the rear of the
unit (Figure 4) for distances of up to 1". For larger
distances shimming may be used using a non-combustible
material. A Hearth Base Support is available from your
dealer for installations where the hearth is below the
fireplace opening (Figure 5).
NOTE: THE INSERT WEIGHT IS SUBSTANTIAULLY
FRONT HEAVY AND IF NOT FULLY SUPPORTED IT
COULD FALL FORWARD.
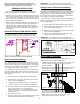
4. Install vent system into existing chimney by using 3" flex
from left side of hearth, passing damper and continuing to
the top of the chimney. If the total vent length is longer than
10 Feet, install Ø4" vent from that point to top of chimney
(Figure 6).
5. Pack fiberglass insulation around the vent pipe and
combustion air duct. Install a flashing cover over
chimney. Secure flashing and seal as required. Install
listed vent cap and secure.
6. Measure fireplace opening and adjust hopper top to the
required level allowing for installation clearance. This is
accomplished by removing the four #8 screws on the sides
and rear of unit and raising the top by 1" increments until
desired height and reinstalling screws (Figure 4).
7. Slide insert into fireplace and center. Level as required,
then secure vent to outlet on left side of insert. Connect
combustion air duct and secure.