
Operating instructions


7
IF THIS STOVE IS NOT PROPERLY INSTALLED, A
HOUSE FIRE MAY RESULT. FOR YOUR SAFETY,
FOLLOW THE INSTALLATION INSTRUCTIONS.
CONTACT LOCAL BUILDING OR FIRE OFFICIALS
ABOUT RESTRICTIONS AND INSTALLATION
INSPECTION REQUIREMENTS IN YOUR AREA.
THIS STOVE MUST BE CONNECTED TO A LISTED
HIGH TEMPERATURE RESIDENTIAL TYPE AND
BUILDING AND HEATING APPLIANCE CHIMNEY OR
AN APPROVED MASONRY CHIMNEY WITH FLUE
LINER.
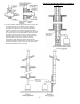
II. INSTALLATION AS A FREESTANDING STOVE
The SIERRA Hearthstove may be safely installed as a
freestanding unit provided a 6" minimum listed All Fuel
chimney or tile lined masonry chimney is used. The same
chimney requirements as reviewed in page 5 apply.
Various listed all fuel prefabricated chimneys are widely
available and can be used to install your Hearthstove in the
best possible location in your house. Follow the
manufacturer’s installation instructions carefully or have a
qualified installer do this job for you.
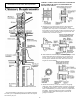
Chimney connectors must be at lest 6" in diameter and
constructed of 24 gauge black steel, or stainless steel.
Chimney connectors should be installed by crimped end
down so that creosote will drip back into the stove to be
burned. Horizontal pipe should have the seam up. Each
connector joint must be secured by three sheet metal
screws., Single wall connectors pipes are only to be used
between the stove and an approved chimney - but never
as the chimney itself. To minimize creosote formation in
the chimney connector pipe, place stove as close to the
chimney as safety clearances will allow. Never use more
than two elbows. Any horizontal pipe section should rise
1/4" per foot towards chimney. This will allow creosote to
run back into the stove.
Special methods are required when passing a chimney
through a wall or ceiling. A section of listed All Fuel
chimney installed per manufacturers instructions may be
used for this. Check your local building code for other
approved methods.
Do not install a stove in a closet or other small enclosure.
The SIERRA Hearthstove is a radiant heater - so most
owners place in a frequently used area such as a family
room. It is best to select a central location on the first level
of the house where heated air can flow naturally by
convection to the est of the house. Heated air rises by
natural convection to the rest of the house, so you may
want to install ceiling vents or use existing ones to heat
upper rooms in a multi-level house. For large rooms with
high ceilings, a ceiling fan switched to blow upwards can
help distribute the heat evenly.
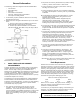
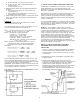
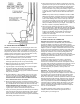
When you have selected the location for your stove, you
must make sure that any combustible materials (i.e. walls,
furniture, drapes, etc.) are not any closer than the
laboratory approved clearances shown.
Clearances may be reduced from those shown provided
you use a listed wall clearance reduction kit. Follow
manufacturer’s instructions carefully when using kits. The
rear manifold option available from your Sierra dealer will
reduce clearance to 18"
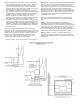
All SIERRA Hearthstoves require floor protection when
installed on a combustible surface. For hearthstoves
without the ash pan or catalytic option, you must place your
stove on a anon-combustible floor protector equivalent to
two 3/8' layers of asbestos covered with one sheet of 24
gauge minimum sheet steel. The floor protector must
extend 16" in front of the door side, 12" from the rear side
on rear vents stoves, 8" from rear side on top vent stoves,
8" from the other side of the stove, under the chimney
connection and 2" beyond each side.
MINIMUM CLEARANCE TO COMBUSTIBLES
Rear Vented Top Vent
Units To
18" A Side Wall 18"
26" B Back Wall 18"
16" C Corner 12'
Flue To
31" D Side Wall 30"
18" E Back Wall 19"
18" F Corner 24"
ASBESTOS MATERIAL SHALL NOT BE USED
There are listed non-asbestos floor protectors available at
your local woodstove supplier.
Recommended floor protection is based on a standard of
3/8" Inch of asbestos millboard or equivalent. This is used
as a standard only.
The k, C or R factor that correlates with the floor protector
material used during the test if the room heater is not
provided with a floor protector. The units of measure for k,
C and R factors shall use the same applicable units.
Directions and examples on how to use alternate materials
and how to calculate equivalent thickness shall be shown.
An easy means of determining if a proposed alternate floor
protector meets requirements listed in the appliance
manual is to follow this procedure:
1. Convent specifications to R-value