
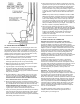
Operating instructions


8
a. R-value is given - no conversion is needed.
b. K-factor is given with a required thickness (T) in
inches: R=1/k+T
c. C-factor is given: R=1/C
2. Determine the R-value of the proposed alternate floor
protector.
a. Use the formula in step 1 to convert values not
expressed as “R”.
b. For multiple layers, add R-values of each layer to
determine the overall R-value.
3. If the overall R-value of the system is greater than the R-
value of the specified floor protector, the alternate is
acceptable.
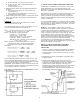
EXAMPLE:
The specified floor protector should be 3/4 inch thick
material with a k-factor of .84.
The proposed alternate is 4" brick with a C-factor of 1.25
over 1/8" mineral board with a k-factor of .29.
Step 1: Use formula above to convert specification to
R-value. R=1/kT = 1/0.84 x .75 = .893
Step 2: Calculate R of proposed system.
4" brick of C - 1.25, therefore
R brick = 1/C = 1/1.25 = 0.80
1/8" mineral board of k+ 0.29, therefore
R min.bd. = 1/0.29 x 0.125 = 0.431
Total R = R brick + R brick + R mineral Board
= 0.8 + 0.431 = 1.231
Step 3: Compare the proposed system R of 1.231 to
specified R of 0.893. Since proposed system
R is greater than required, this is acceptable.
Definitions:
3/8 inch asbestos millboard has a “K” factor of 0.84. The
newer substitute CERAFORM board has a “K” factor of
0.21. Your floor protector must have an equivalent or better
“K” factor than the above recommendations.
W ARNING: The installation of this stove must comply with
state and local requirements and be inspected by the state
or local building inspector, if required.
This stove is not approved or recommended for use in
mobile homes.
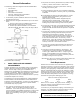
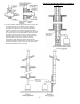
III. INSTALLATION USING A MASONRY FIREPLACE
Several types of installations can be used to connect the
Sierra Hearthstove to an all masonry fireplace. Two
methods are described here. Method I and Method II meet
NFPA 211* guidelines.
Both methods use a section or sections of stove connector
pipe that connect the stove flue outlet to the fireplace
chimney. Method I is normally used and is generally the
easiest to install. Method II may be used in chimneys that
need a new flue liner.
There are qualified installers in most areas that can install
your stove for you. Sierra recommends that you contact the
National Chimney Sweep Guild for a member in your area
or aks your Sierra Dealer.
Method I – This installation uses a direct connection
adapter kit that provides a section of flexible or rigid stove
connector pipe. Various kits are available from your local
dealer. This pipe connects stove flue outlet to the first
section of tile liner at the bottom of the chimney. The width
of the damper opening and throat of the chimney will
determine which type of pipe, rigid, round flexible or oval
flexible, should be used. Some openings are large enough
(6 inches or more) to allow the use of the standard
connector pipe or round flexible pipe. If the damper or
throat area is narrow, the oval flexible pipe or a rectangular
sheet metal adapter must be used.
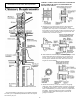
REFER TO INSTALLATION AND CLEARANCE
DIAGRAMS, READ THOROUGHLY BEFORE
INSTALLING.
1. Have your chimney cleaned and inspected by certified
chimney sweep. Your chimney MUST be lined with a
ceramic tile liner. If your chimney is not lined, you must
use method II.
2. Install direct connector into fireplace using instructions
supplied with kit.
3. Install connector pipe (24 ga, Steel min.) to direct
connector kit. Measure sections carefully to allow pipe to
extend 2" in front of fireplace opening. The vertical
height from the hearth extension to the top of the
horizontal pipe section should be either 24" fro 6" height
standard pedestal hearthstoves or 22" for 4" low
pedestal hearthstoves. Secure all joints with three 1/8"
self threading sheet metal screws.