
User Manual
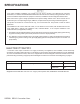

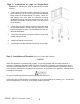
Table Of Contents

9
Step 2: Installation of Legs on Single-Deck
Ovens (For Stacking kit, refer to instructions included
with kit)
1. Raise oven sufficiently to allow clearance for the legs
to be attached. Use of a lift truck or other mechanical
lifting means is recommended. For safety, “shore up”
and support the oven with an adequate blocking
arrangement strong enough to support the load. (If it is
absolutely necessary to rest the oven on its side, rest it
on its left side.)
2. Attach the legs to the bottom corners of the oven using
the provided machine screws and lock washers. Each
leg is secured by 3 screws. The mounting holes are pre-
drilled and threaded.
3. Lower the oven gently onto a level surface. Never drop
or allow the oven to fall.
4. Make sure that the oven is level.
5. Install required cable restraint connecting oven to wall.
Step 3: Installation of Restraint (Only for Ovens with Casters)
NOTICE
When this appliance is installed with casters, it must be installed with the caster supplied, a
connector complying with either ANSI Z21.69 or CAN/CGA-6.16 and a quick-disconnect device
complying with either ANSI Z21.41 or CAN1-6.9. It must be installed with a restraining means to
guard against transmission of strain to the connector, as specified in the appliance manufacturer’s
installation instructions.
To avoid accidental gas disconnection and potential explosion:
If disconnection of this restraint is necessary to move the appliance for cleaning, etc., reconnect it
when the appliance is moved to its originally installed position.
SIERRA SRCO Convection Oven