OPERATOR’S MANUAL SRF Series Fryers Model SRF-35/40NG SRF-35/40LP (3 Burners Fryer) Model SRF-75/80NG SRF-75/80LP ( 5 Burners Fryer) ! WARNING Improper installation, adjustment, alteration, service or maintenance can cause property damage, injury or death. Read the installation, operating and maintenance instructions thoroughly before installing or servicing this equipment.
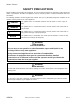
SIERRA FRYERS SAFETY PRECAUTIONS Before installing and operating this equipment, be sure everyone involved in its operation is fully trained and aware of precautions. Accidents and problems can be caused by failure to follow fundamental rules and precautions. The following symbols, found throughout this manual, alert you to potentially dangerous conditions to the operator, service personnel, or to the equipment. ! DANGER This symbol warns of immediate hazards that will result in severe injury or death.
SIERRA FRYERS NOTICE Sierra Fryers are intended for commercial use only. Not for household use. Warranty will be void if service work is performed by other than a qualified technician, or if other than genuine Sierra replacement parts are installed. Be sure this Operator’s Manual and important papers are given to the proper authority to retain for future reference. Congratulations! You have purchased one of the finest pieces of commercial cooking equipment on the market.
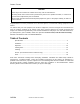
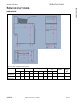
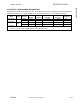
SPECIFICATIONS SIERRA FRYERS SPECIFICATIONS S PECIFICATIONS DIMENSIONS D B Note: for mm, multiply inches by 25.4 Model Width (in) Depth (in) Height (in) Total BTU/hr Crated Weight (lbs) A B C D E F SRF-35/40NG SRF-35/40-LP 15.5 14.0 30.3 14.0 47.2 34.7 6.0 4.2 7.0 90,000 150 SRF-75/80NG SRF-75/80LP 21.0 18.0 34.3 18.0 47.2 34.7 6.0 4.2 7.
SPECIFICATIONS SIERRA FRYERS Supply pressure should be minimum of 4" W.C. for natural gas or 10" W.C. for propane. The fryer comes with ¾” NPT male connector on a ½” pipe, allowing you to connect with either ¾” or ½” NPT female connector. Model SRF-35/40NG SRF-35/40-LP SRF-75/80NG SRF-75/80LP Burners Main Main Gas Type Manifold Pressure Number of heat tube Rate Each BTUs / Hour Total Rate BTUs / Hour Orifice Size Natural 4" W.C. 3 30,000 90,000 # 39 Propane 10" W.C.
INSTALLATION SIERRA FRYERS I NSTALLATION NOTICE NOTICE These installation procedures must be followed by qualified personnel or warranty will be void. Local codes regarding installation vary greatly from one area to another. The National Fire Protection Association, Inc. states in its NFPA 96 latest edition that local codes are the “authority having jurisdiction” when it comes to installation requirements for equipment.
INSTALLATION SIERRA FRYERS Step 2: Install the Legs (or Optional Casters) and Restraints A set of legs is packed with the fryer. Casters are optional, purchased separately. Mounting fasteners are pre-mounted on the base plates. 1. Raise fryer sufficiently to allow legs or casters to be screwed into the base plate. For safety, “shore up” and support the fryer with an adequate blocking arrangement strong enough to support the load. 3. Lower the fryer gently. Never drop or allow the fryer to fall. 4.
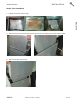
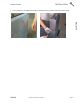
INSTALLATION SIERRA FRYERS Step 3: Flue Installation 1. Unpack the flue box and flue wrap INSTALLATION 2. Slide the flue box over the flue and secure it with the two self-tapping screws using a 5/16” socket 3.
INSTALLATION SIERRA FRYERS 4.
INSTALLATION SIERRA FRYERS Step 4: Check Clearances and Ventilation Select a firm, level location for your fryer. Leave clearance, whenever possible, so that access from the rear is possible to permit cleaning. If the unit is to be set on non-combustible flooring, such as a concrete slab, 3 inches minimum toe room must be provided to prevent restriction of the air opening in the bottom of the unit.
INSTALLATION SIERRA FRYERS Step 5: Gas Connection A 3/4" male NPT line for the gas connection is located near the lower right rear corner of the fryer. The serial plate (located inside the front door of the fryer) indicates the type of gas the unit is equipped to burn (natural gas or propane). The fryer should be connected ONLY to the type of gas for which it is equipped. A circuit diagram is located inside the front door of the fryer.
SERVICE SIERRA FRYERS PHOTO 1 O PERATION LIGHTING ! CAUTION IF YOU SMELL GAS DURING THE LIGHTING PROCEDURE, IMMEDIATELY SHUT OFF THE GAS SUPPLY UNTIL THE LEAK HAS BEEN CORRECTED. Open the burner compartment door and do the following: 1. Turn thermostat to “OFF” 2. Press down the knob of the combination gas valve, turn it counterclockwise to the “PILOT” position (shown), and continue to press the knob down. Robert Shaw 7000BMVR Honeywell VS8200 SERVICE 3.
SERVICE SIERRA FRYERS FILLING THE FRYPOT 1. Close drain valve completely before filling the frypot. 2. When the fryer is new, fill the frypot with water and clean thoroughly (see “Weekly Cleaning” on page 15) in order to remove protective coatings and any foreign matter. 3. The recommended solid shortening capacity for the frypot (35, 55 or 75lbs) is described on the serial plate (which is located inside the front door). 4. Remove the basket support frame when filling the frypot with solid shortening. 5.
SERVICE SIERRA FRYERS HIGH LIMIT CONTROL Sierra Fryers are equipped with a secondary heat control that prevents the oil temperature from rising above 450F. (Because of the accuracy tolerance of the sensor, the oil temperature may reach as high as 475F.) In the event the fryer shuts down due to this condition, the oil must be cooled to below 400F before the pilot burner can be re-ignited. When the oil has cooled, use the “Lighting” procedure on page 12 to place the fryer back in operation.
SERVICE SIERRA FRYERS ! CAUTION SOME AREAS OF THE FRYPOT MAY BE HOT! 5. Close drain valve and strain the oil back into the frypot through several thicknesses of cheesecloth, or filter it back using a filter machine. 6. Replace the basket support frame (if applicable) 7. Add oil or shortening to MIN oil level mark on rear of frypot. 8. To resume cooking, turn the combination gas valve knob to “ON” position. WEEKLY CLEANING 1. Follow steps 1 through 4 of the Daily Cleaning procedure (see previous section).
SERVICE SIERRA FRYERS cleanser. Heat tint action may be lessened by not applying or by reducing, heat to equipment during slack periods. S ERVICE ( F OR AU T H OR I Z E D S E R V I CE T E CH NI CI AN O N LY ) NOTICE Warranty will be void and the manufacturer is relieved of all liability if: (A) Service work is performed by other than a qualified technician (see page 30 for detail) OR (B) Other than approved Sierra replacement parts are installed.
SERVICE SIERRA FRYERS CHECKING AND ADJUSTING PRESSURE REGULATOR The combination gas valve (includes pressure regulator) is factory set at 4" W.C. for natural gas and 10" W.C. for propane gas. To check the manifold pressure, do the following: 1. Turn thermostat “OFF” and combination gas valve knob to the “PILOT” setting. 2. Remove pressure tap plug from burner manifold located directly below the burners in the cabinet. 3. Install a fitting appropriate to connect a manometer. 4.
SERVICE SIERRA FRYERS CHECKING AND ADJUSTING AUTO SAFETY PILOT The pilot flame should surround the thermopile for 1/2". It must be large and sharp enough to cause the thermopile to glow a dull red, or sufficient to hold the safety valve open. 1. Remove pilot adjustment cap 2. Adjust pilot key to provide properly sized flame shown in diagram B. Diagram A shows an improperly adjusted pilot 3. Replace pilot adjustment cap. TROUBLESHOOTING Likely Cause Burners do not come on Gas supply to unit off.
SERVICE SIERRA FRYERS Wiring Diagram SERVICE SIERRA OPERATOR’S MANUAL 170911 PAGE 19
SIERRA FRYERS PARTS NOTICE INSTALLATION OF OTHER THAN GENUINE SIERRA PARTS WILL VOID THE WARRANTY ON THIS EQUIPMENT. The serial plate is located inside the front door on the left side. Replacement parts may be ordered either through a Sierra Authorized Parts Distributor or a Sierra Authorized Service Agency. When ordering parts, please supply the Model Number, Serial Number, Part Number, and Description.
SIERRA FRYERS Gas Parts for Fryer (3 tube shown) 15 4 10 5 11 14 3 12 1 Key 1 3 4 4 4 4 5 10 11 12 12 14 15 SIERRA Part Number 400045 400044 400042 400146 400242 400246 400070 300031 400043 300034 300035 400046 400047 Qty 1 1 1 1 1 1 1 ea 1 ea ea 1 1 Description Knob, thermostat Thermostat Fryer, regulating 200-400 Combination Valve (Nat)_Invensys Combination valve (LP)_Invensys Combination Valve (Nat)_Honeywell Combination valve (LP)_Honeywell Tubing, ¼” fryer pilot Burner, Fryer Safety thermop
SIERRA FRYERS Tank Parts (3 tube shown) Key Part Number 1 400037 * 400058 2 400036 3 C200016 * C200017 * C400056 4 400071 5 400075 * 400076 * 400077 6 400078 * 400079 *not shown SIERRA Qty 1 1 1 1 1 1 1 1 1 1 1 1 Description Screen, crumb, 3 and 4 tube fryer Screen, crumb, 5 tube fryer Valve, Ball Tank, 3 tube fryer (excluding flue) Tank, 4 tube fryer (excluding flue) Tank, 5 tube fryer (excluding flue) Drain, extension Flue, top, removable, 3 tube fryer Flue, top, removable, 4 tube fryer Flue, top, re
SIERRA FRYERS Other Parts Key 1 2 3 4 5 6 7 Part Number 100106 100137 C400000 C400108 497296-2 400038 400039 SIERRA Description Door assembly, complete, 3 and 4 tube Door assembly, complete, 5 tube Leg Kit, 6”, adjustable, set of 4 with mounting hardware Caster Kit, 4”, adjustable, set of 4 (two w/brake and two w/o brake) Magnet door Basket double, 3 and 4 tube fryer Basket double, 5 tube fryer OPERATOR’S MANUAL 170911 PAGE 23
SIERRA FRYERS 2299 SIERRA FRYER MVP GROUP MONTREAL QC CANADA A product with the Sierra name incorporates the best in durability and low maintenance. We all recognize, however, that replacement parts and occasional professional service may be necessary to extend the useful life of this unit. When service is needed, contact a Sierra Authorized Service Agency, or your dealer. To avoid confusion, always refer to the model number, serial number, and type of your unit.
SIERRA FRYERS LIMITED ORIGINAL COMMERCIAL EQUIPMENT WARRANTY FOR THE SRF SERIES GAS FRYERS Sierra warrants the SRF Gas Fryer to be free of defects in materials and workmanship for a period of 1 year from the date of original installation. This Warranty is subject to the following conditions and limitations: 1. This warranty is limited to product(s) sold by Sierra to the original user in the continental United States and Canada. 2.