
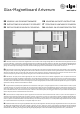
Manual


6
EN CONTENTS
Mounting instructions . . . . . . . . . . . . . . . . . . . . . . . . . . . . . . . . . . . . . . . . . . . . . . . .Page 3
Storing this user guide . . . . . . . . . . . . . . . . . . . . . . . . . . . . . . . . . . . . . . . . . . . . . . .Page 6
Safety Precautions . . . . . . . . . . . . . . . . . . . . . . . . . . . . . . . . . . . . . . . . . . . . . . . . . . .Page 6
Mounting . . . . . . . . . . . . . . . . . . . . . . . . . . . . . . . . . . . . . . . . . . . . . . . . . . . . . . . . . . . .Page 6
Use & cleaning . . . . . . . . . . . . . . . . . . . . . . . . . . . . . . . . . . . . . . . . . . . . . . . . . . . . . . .Page 7
Guarantee . . . . . . . . . . . . . . . . . . . . . . . . . . . . . . . . . . . . . . . . . . . . . . . . . . . . . . . . . .Page 7
Magnets . . . . . . . . . . . . . . . . . . . . . . . . . . . . . . . . . . . . . . . . . . . . . . . . . . . . . . . . . . . .Page 7
Disposal and recycling . . . . . . . . . . . . . . . . . . . . . . . . . . . . . . . . . . . . . . . . . . . . . . . .Page 7
Distance between drill holes . . . . . . . . . . . . . . . . . . . . . . . . . . . . . . . . . . . . . . . . . Page 16
STORING THIS USER GUIDE
This user guide will help you to make the best use of your new magnetic glass board. In addition to this, it contains important information
about how to safely mount and use your magnetic glass board.
Read this user guide and make sure you have understood it before mounting and using your new magnetic glass board.
Store this user guide near your magnetic glass board. If the magnetic glass board is passed on to another user, make sure that person also
receives this user guide.
SAFETY PRECAUTIONS
The Artverum Magnetic Glass Board is made of tempered safety glass tested to EN 12150-1.
1 | Before mounting, check that there are no service pipes, e.g. for electricity, gas or water, in that part of the wall.
2 | When mounting the magnetic glass board, please ensure that it does not come into contact with sharp objects or hard surfaces such as
stone or tiles. We cannot accept any claims for resulting damage to the board. Place the board on a soft surface until it is ready to be mounted
and do not remove the protective corners until it is attached to the wall.
3 | The magnetic glass board should only be mounted on an even, solid wall.
4 | In order to mount our magnetic glass boards correctly, we recommend using the enclosed drilling templates. You will find the measure-
ments for the relevant distances between drill holes on page 16 and on our website at www.sigel-office.com/en-gb/mounting-instructions
SIGEL GmbH does not assume any responsibility or guarantee for boards that have been incorrectly mounted or for any resulting damage.
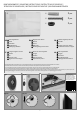
MOUNTING
1 | The magnetic glass board can be mounted in portrait or landscape format. The enclosed drilling templates make it simple to mark the
position of the drill holes. The wall fixings
44
are screwed securely to the wall using anchors
22
and screws
33
. The side of the board with the
SIGEL logo should be facing outwards (fig. I).
Tip: Please use a spirit level to check that the wall fixings
44
are lined up straight.
The wall fixings
44
have an oblong hole that can be used to adjust their position if necessary. To do so, loosen the screw and move the wall
fixings
44
vertically or horizontally as required. Then tighten the screw again.
2 | The magnetic glass board
11
is then mounted onto the wall fixings
44
(Fig. II). There are two mounting fittings
55
on the back of the board
for this. Each mounting fitting
55
has two openings (Fig. III); the wall fixings
44
must always be slotted into the top opening rather than the
side opening, whether the board is hung in portrait or landscape format. Place the mounting fittings
55
on the back of the board over the wall
fixings
44
so that the wall fixings
44
are in the centre (Fig. III). Now slide the board downwards so that the wall fixings
44
click into the moun-
ting fittings
55
(Fig. IV) and the board is mounted securely.
Make sure that the magnetic glass board is always mounted on two fittings and check that the board is securely in place before letting go.
Silicon pads on the back of the board keep it steady while it is being written on.
3 | MOUNTING SEVERAL BOARDS IN A ROW
Please note the following if mounting several boards next to each other:
Due to the fragile glass edges, the magnetic glass boards should not be mounted right next to each other. There should be a gap of at least
3 mm between the individual boards. When mounting the boards, make sure the edges do not knock against each other, as this can cause
the board to break. SIGEL is not liable for any damage caused in this way. Do not remove the protective corners until the mounting process is
complete.
Mount the first magnetic glass board as described under “Mounting” before marking the drill holes for the next board. This will allow you to
adjust the position of the additional boards to any slight inaccuracies there may be in the position of the first board.