
Indoor Fireplace User Manual


G8860 _4 Installation Manual NZ
9
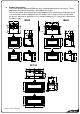
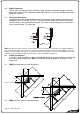
DESIGN EXAMPLE ONLY
LONG SECTION THROUGH FLUE ENCLOSURE
Scale: 1:10
Angle fixing bracket
supplied with flue kit.
100
150
2525
Seal - Deck Tight or similar
5
0
0
mm
c
l
e
a
r
a
n
c
e
t
o
n
e
a
r
e
s
t
p
a
r
t
o
f
r
o
o
f
Gap between flue shield and any timber
Trimmers shown diagrammatic
GENERAL CONSTRUCTION AND CLADDING SHOWN AND IS INDICATIVE ONLY
ALL INSTALLATION & FLUING MUST COMPLY WITH NZS 5261
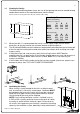
GENERAL CONSTRUCTION AND CLADDING SHOWN INDICATIVE ONLY
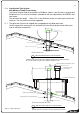
ENCLOSURE DESIGN EXAMPLE ONLY
LONG SECTION THROUGH FLUE ENCLOSURE
Trimmers shown diagrammatic.
Gap between flue shield and any .timber
100
150
25
25
Deck-tite or similar flashing
200mm min
If another flue shares
same enclosure
200 min but allow for flue flashings at base
Scale: 1:10
Angle fixing bracket
supplied with flue kit.
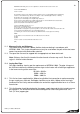
11.0 Installing the Flue System:
Non-Masonry Timber Frame Cavity:
The heater must be flued to the outside via Ø100mm stainless steel flue that is covered by a
Ø150mm liner. This must be installed in accordance with the requirements of NZS5261 and
local codes.
The minimum flue length = 3.6m (This is the minimum vertical rise from the fire to the flue
terminal.) The flue and liner must be supported
11.1 The top of the flue must be capped with an appropriate anti down draft cowl.
All the required flue components are available from your Escea dealer in both kitset form
and as individual components.