SALES NETWORK SAMSUNG TECHWIN CO., LTD. 145-3, Sangdaewon 1-dong, Jungwon-gu, Seongnam-si, Gyeonggi-do 462-703, Korea TEL : +82-31-740-8137~8141 FAX : +82-31-740-8145 • SAMSUNG OPTO-ELECTRONICS AMERICA,INC. ELECTRONIC IMAGING DIV. 40 Seaview Drive, Secaucus, NJ 07094, U.S.A TEL : +1-201-902-0347 FAX : +1-201-902-0429 • SAMSUNG TECHWIN MOSCOW OFFICE Korp 14, 37-A, PR-KT, Lenningradsky, Moscow 125167, Russia TEL : +7-95-258-9296,9298 FAX : +7-95-258-9297 • www.samsungtechwin.com www.samsungcctv.
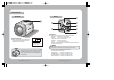
The lightning flash with an arrowhead symbol, within an equilateral triangle is intended to alert the user to the presence of uninsulated “dangerous voltage” within the product's enclosure that may be of sufficient magnitude to constitute a risk of electric shock to persons. The exclamation point within an equilateral triangle is intended to alert the user to the presence of important operating and maintenance (servicing) instructions in the literature accompanying the appliance.
Features Warning The camera requires regular maintenance. 30x Optical Zoom Day & Night Contact an authorized technician for maintenance and/or servicing. The built-in SDZ-330 optical zoom lens is a highly durable component. It features auto focus, auto iris, and zoom functions. The camera automatically determines whether it is night time or day time, selecting operating mode automatically.
Contents 8 Precautions • CAM TITLE 18 18 19 20 • WHITE BALANCE 23 • BACKLIGHT 24 25 27 Operating Your Camera Menu Configuration Menu Setup 10 Components and Accessories 11 11 12 13 Overview Top Bottom Back • MOTION DETECTION • FOCUS 31 36 • EXPOSURE • SPECIAL 43 43 • RESET • EXIT 14 Connection 14 15 16 Connecting To Monitor Connecting To Power Connecting To Connection COLOR CCD CAMERA 6 User’s Manual Troubleshooting 44 Specification 46 Protocol Command Descripition 48 COLOR CC
Precautions Do not install under extreme temperature conditions. Do not install in high humidity environment. Use only under temperature conditions between -10˚C and +50˚C. Provide good ventilation when using in high temperature conditions. Do not install under unstable lighting conditions. May lower image quality. Do not drop the camera or subject it to physical shock. May cause a product malfunction. Never keep the camera face to strong light directly. May damage the CCD.
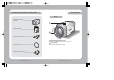
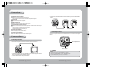
Components and Accessories Overview Top 1. 30x Zoom Color Camera SDZ-330 Close 2. Instruction Manual 3. 6-Pin Connection Cable Open Tripod Mounting Bracket Screw Hole Used to fix tripod mounting bracket on top of the camera. Front Cover Ring Removable for replacement with a filter. 4. Front Cover Ring 5.
Overview Bottom Back Tripod Mounting Hole Used to install the camera on an optional tripod. The tripod must be equipped with screws with specifications shown on the right. L 1/4"-20 UNC (20 THREAD) L:4.5mm±0.2mm (ISO standard), or 0.197" (ASA standard) Key Buttons · Following buttons control zoom, focus, and auto focus functions. WIDE button : To widen the view. (ZOOM OUT) TELE button : To close in on a far object. (ZOOM IN) F-NEAR button : To see a near object clearly.
Overview External Control Connector Relates to the motion detection output signal. Zoom and focus functions can be controlled using external siganals. Power LED Illuminates when power is supplied. Video Output Jack Used to connect an external video monitor in jack. Communication Control Connector Used to connect the Remote Controller (Optional). Includes external 'SYNC' signal input pin, which is used for the line lock function. Includes the RS-485 communication pin.
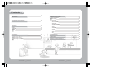
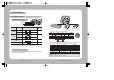
Connection Connecting to connection External Control Connector FOCUS (Input) ZOOM (Input) COM MD (output) Function Connector Signal Level Tele ZOOM COM Wide I Number Name Description Number Name Description 1 GND - 4 TRX + RS-485 Communication 5 TRX - RS-485 Communication 6 Output Power Remote Controller only I COM COM 5±0.5sec * Communication Control Connector Pin Description .
Operating Your Camera Menu Configuration MAIN SETUP MENU Menu Setup Use the six buttons on back of the camera. CAM TITLE • OFF • ON UP button SET button WHITE BAL. • ATW • AWC BACKLIGHT • OFF • WDR MOTION DET.
Operating Your Camera 3. Press SET button. Change the status using the LEFT or RIGHT button. Select feature using the UP or DOWN button. 3. Change the status of the selected feature using the LEFT or RIGHT button. 4. When completed, move the arrow indicator to 'EXIT' and press the SET button. Notes • Features marked with a have an accessible submenu. • Access the submenu by pressing the SET button. 4. You can enter up to 20 characters.
Operating Your Camera 5. Select on screen position of the CAM TITLE. Move the cursor to 'POS' and press SET button. White Balance Control Your camera provides three 'WHITE BAL' control modes for your choosing in adjusting the white balance. 1. Press the SET button to access the main setup menu and move the indicator to 'WHITE BAL' using the UP or DOWN button. 2. Set 'WHITE BAL' using the LEFT or RIGHT button. The CAM TITLE is displayed on the top-left of the monitor screen.
Operating Your Camera Notes • Proper White Balance may not be obtained under the following conditions. When the scene contains mostly high color temperature object, such as a blue sky or sunset. When the scene is dim. If your camera directly faces a fluorescent lamp or is used in an environment of varying lighting conditions. 3. Select the ' WDR' mode and Press the SET button •You can adjust the LIMIT for WDR You can select the level(LOW,MIDDLE,HIGH). WDR sensitivity is increased or decreased. 4.
Operating Your Camera FOCUS Press the SET button. Increase or decrease detection sensitivity by setting the 'SENSITIVITY' value. · When completed, press SET button. Notes Tips on Using the Motion Detection Feature • Once the sensitivity level has been set, perform a test to verify proper operation of the feature. • The feature may not function properly under flickering light conditions. • The camera interprets sudden changes in lighting and subsequent change in brightness of an object as motion.
Operating Your Camera •ONE PUSH : Focus is automatically adjusted just once, after zoom position is changed. Select ' ONE PUSH' and press the SET button to confirm. Increase or decrease optical zoom (ZOOM) or digital zoom (D-ZOOM) positions using the directional buttons while verifying the changes on screen. Press the SET button once desired image quality is obtained. •MANUAL : Select 'MANUAL' and press the SET button to confirm.
Operating Your Camera ZOOM INIT POS: Moves to the controlled ZOOM position when the power truned on and is a function of the initial ZOOM position control. END: To revert to the main setup menu. EXPOSURE LENS INIT : Use this feature to initialize the lens. Position the indicator over LENS INIT. using the UP or DOWN button. Press the SET button to confirm. COLOR CCD CAMERA 30 User’s Manual 1.
Operating Your Camera IRIS: Set 'IRIS' to 'AUTO' or 'MANUAL'. Position the indicator over 'IRIS' using the UP or DOWN button and then select the desired iris mode using the LEFT or RIGHT button. •AUTO: The iris is automatically activated upon illumination. •MANUAL: Manual iris configuration. Set 'IRIS' to 'MANUAL' using the LEFT or RIGHT button and then press the SET button. Increase or decrease iris level using the LEFT or RIGHT button while verifying the changes on screen. •A.
Operating Your Camera AGC (Auto Gain Control): For brighter images. 1. Position the indicator over 'AGC' using the UP or DOWN button. 2. Set 'AGC' to the desired mode using the LEFT or RIGHT button. •HIGH : Wide range gain value adjustment •MIDDLE : Middle range gain value adjustment •LOW : Narrow range gain value adjustment •OFF : Disabled Notes • Changing 'AGC' setting from LOW to HIGH results in greater sensitivity, as well as on screen noise. • Setting 'AGC' to OFF locks 'SSNR' configuration.
Operating Your Camera •PRESET NO : Up to eight different preset configurations are supported. SPECIAL •PRESET MODE: Configure initial settings under FOCUS, EXPOSURE, etc. 1. Press the SET button to access the main setup menu and then position the indicator over 'SPECIAL' using the UP or DOWN button. 2. Press the SET button to confirm. USER PRESET: Preset user-designated configurations using this feature.
Operating Your Camera •PRESET SAVE: Save configured preset. PRIVACY: Mask privacy area using this feature. The mask area expand/contract upon the zoom position. •PRESET CLEAR: Clear configured preset. •GROUP SEL : Choose up to four groups. Each group can consist of eight mask areas. •MASK COLOR : Select desired mask color(BLACK, BLUE, GREEN, WHITE). •AREA SEL : Configure eight mask areas. •AREA MODE : Mask area display. •TOP : To move the mask area up. •BOTTOM : To move the mask area down.
Operating Your Camera DAY/NIGHT: Select from COLOR, BW or AUTO modes. Notes • For NTSC models, the line-lock mode can be used if the external SYNC signal frequency is at 60Hz. • For PAL models, the line-lock mode can be used if the external SYNC signal frequency is at 50Hz. •COLOR : Color mode. •B/W : BW mode. •AUTO : The camera automatically detects lighting conditions and selects the mode accordingly. FREEZE: Use this feature to freeze capture an image.
Operating Your Camera V-REV: Use this feature to vertically inverse the screen. Position the indicator over 'V-REV' using the UP or DOWN button and then set to 'ON' using the LEFT or RIGHT button. Press the SET button to confirm. •CAM ID NO. : Assign an ID number to the camera (1 to 255). Identification number zero is used for Remote controller setup. •CAM ID DISP: Displays camera ID on top left corner of the screen. •BAUD RATE : Configure baud rate from 9600, 19200, or 38400bps.
Troubleshooting Refer to the following table if you are experiencing trouble with your camera. Contact an authorized technician if the table does not provide you with a solution to the trouble. Problem Flickering • The camera may be facing the sun or a fluorescent light. Adjust the position of the camera. Can't select LL mode • The camera may be connected to a DC power source. Connect to an AC power source. LL is not function properly.
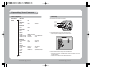
Specifications NTSC (SDZ-330N) P O W E R C C D O P T I C S S y n c. E L E C T R I C A L Input Voltage Input Current Power Consumption Size Total Pixels Effective Pixels Optics Min. Focus Distance D. ZOOM Angle Field of view Scanning System Synchronization Frequency Camera Title Camera ID Resolution Video Output S/N (Y signal) Min. Illumination WDR Day & Night Gain Control White Balance Electronic shutter speed O.S.
Protocol Command Description Command Name Function Command Packet Return Packet Function Command Packet Return Packet Function Command Packet Return Packet Function Command Packet Return Packet Function Command Packet Return Packet Function Command Packet Return Packet Function Command Packet Return Packet Function Command Packet Return Packet Function Command Packet Return Packet Parameter Reset Focus Far Focus Near Zoom Wide Zoom Tele AF Stop One push AF ZOOM Direct USER PRESET Save Function Com
Protocol Command Description Parameter P1: 00h = USER PRESET 1 01h = USER PRESET 2 02h = USER PRESET 3 03h = USER PRESET 4 04h = USER PRESET 5 05h = USER PRESET 6 06h = USER PRESET 7 07h = USER PRESET 8 USER PRESET EXEC. Function Execute selected user preset.
Protocol Command Description OSD Menu Down OSD Menu Left OSD Menu Right OSD Menu Set OSD Menu ESC Function Move OSD arrow to down. Command Packet A0h CAM ID HOST ADDR 0010h 00h 00h 00h 00h AFh CHECK SUM Return Packet A0h CAM ID HOST ADDR 0010h 00h 00h 00h 00h AFh CHECK SUM Function Move OSD arrow to left.
DECLARATION OF CONFORMITY Application of Council Directive(s) 89 / 336 / EEC Manufacturer's Name SAMSUNG TECHWIN CO., LTD Manufacturer's Address SAMSUNG TECHWIN CO., LTD 42, SUNGJU-DONG CHANGWON-CITY, KYUNGNAM, KOREA, 641-120 European Representative Name European Representative Address Equipment Type/Environment CCTV Camera Model Name SDZ-330 Beginning Serial NO. S5900001 Year of Manufacture 2005. 9.