
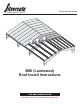
Installation Instructions


Detailed roll labeling
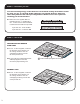
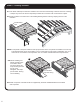
STEP 1 — Identifying your rolls
Shorter rolls split near
the ridge purlin
- Continous rolls from eave to eave
- Longer rolls split near the ridge purlin
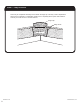
Roof
Roof
E-Wall
E-Wall
S-Wall
S-Wall
E-Wall
Where the colors go:
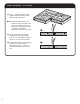
Building #1: 45' W x 80' L x 16' Eave 2:12 Pitch
Roof Rolls Are Identified with Blue Tags
Roof Starter Roll 48'' x 48'
Roof Primary Roll 72'' x 48'
Roof Primary Roll 72'' x 48'
Roof Primary Roll 72'' x 48'
Roof Primary Roll 72'' x 48'
Roof Primary Roll 72'' x 48'
Roof Primary Roll 72'' x 48'
Roof Primary Roll 72'' x 48'
Roof Primary Roll 72'' x 48'
Roof Primary Roll 72'' x 48'
Roof Primary Roll 72'' x 48'
Roof Primary Roll 72'' x 48'
Roof Primary Roll 72'' x 48'
Roof Finish Roll 48'' x 48'
Example of roof cutlist and corresponding roll label:
2
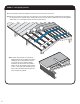
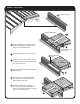
BEFORE BEGINNING READ THE CUTLIST THOROUGHLY THIS WILL GIVE IMPORTANT INFORMATION
NEEDED FOR PROPER INSTALLATION.
Verify that the material provided agrees with the cutlist. If there are any discrepancies NOTIFY SILVERCOTE
IMMEDIATELY. When installing insulation inspect rolls for any defects. If defects are detected NOTIFY
SILVERCOTE IMMEDIATELY BEFORE INSTALLING. Using the provided detailed cutlist and color coded bag
tags locate the proper insulation for each roof slope.