Silver Crest SNM 33 A1 List of contents Guarantee.....................................................................................................................................................1 Service number.............................................................................................................................................1 Important safety instructions / Appropriate use.............................................................................................
Silver Crest SNM 33 A1 Guarantee Congratulations on the purchase of your sewing machine.You have bought a top quality product which has been manufactured with great care. GUARANTEE There is a three year guarantee on this device starting from the purchase date. The device was inspected carefully and thoroughly before delivery. Please keep your receipt as proof of purchase. In case of a guarantee complaint, please call your service centre. This is the only way to ensure free shipment of your goods to us.
Silver Crest SNM 33 A1 Important safety instructions / Appropriate use When using an electrical appliance, basic safety should always be followed, including the following: Read all instructions before using this sewing machine. DANGER - To reduce the risk of electric shock: 1. 2. 3. An appliance should never be left unattended when plugged in. Always unplug this appliance from the electric outlet immediately after using and before cleaning. Always unplug before replacing the lamp.
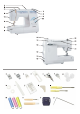
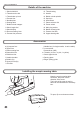
Silver Crest SNM 33 A1 Details of the machine 1. Stitch width dial 2. Thread tension dial 3. Thread take-up lever 4. Presser foot 5. Needle plate 6. Sewing table 7. Bobbin winder stopper 8. Stitch length dial 9. Stitch display 10. Reverse sewing lever 11. Presser foot pressure 12. Thread cutting 13. Handle 14. Bobbin winder spindle 15. Spool pin 16. Hand wheel 17. Patten selector dial 18. Power switch 19. Main plug socket 20. Bobbin thread guide 21. Presser foot lifter 22.
Silver Crest SNM 33 A1 Connecting machine to power source Attention: Unplug power cord when machine is not in use. A Attention: Consult a qualified electrician if in doubt as to connect machine to power source. Unplug power cord when machine is not in use. The foot control must be used with the appliance by KD-2902 (220-240V area) manufactured by FDM (zhejiang founder motor corporation ltd, China). Connect the machine to a power source as illustrated.
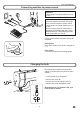
Silver Crest SNM 33 A1 Inserting the needle Attention: Turn power switch to off ("O"). D A Needles must be in perfect condition. Change the needle regularly, especially if it is showing signs of wear and causing problems. C Insert the needle following the illustrated instructions. A. Loosen the needle clamp screw and tighten again after inserting the new needle. B. The flat side of the shaft should be towards the back. C/D. Insert the needle as far up as it will go.
Silver Crest SNM 33 A1 Adjust presser foot pressure The presser foot pressure of the machine has been pre-set and requires no particular readjustment according to the type of fabric (light-or-heavy weight). However, if you need to adjust the presser foot pressure, turn the presser adjusting screw with a coin. For sewing very thin fabric, loosen the pressure by turning the screw counter clockwise, and for heavy fabric, tighten by turning it clockwise.
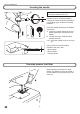
Silver Crest SNM 33 A1 Winding the bobbin a. Spool pin felt a Place an empty bobbin on spindle. Take the thread from the spool through the guide to the bobbin. Wind the thread a few times by hand around the empty bobbin in a clockwise direction. Push the bobbin to the right towards the bobbin winding position. Press the foot control gently. The bobbin will stop winding when it is full. Push the bobbin to the left to "sewing position" and remove it.
Silver Crest SNM 33 A1 Threading the upper thread a Attention: Turn power switch to off ("O"). Raise the needle bar. a. Spool pin felt Follow completely the numbered sequence in upper threading. Should you skip or fail to properly engage the thread with any of the thread guides, you will not sew properly. (1-5) Continue to draw the thread down and into the needle bar thread guide. Pass the thread through the eye of the needle from front to back. Leave loose about 10 cm (4") of thread.
Silver Crest SNM 33 A1 Thread tension Note: The bobbin thread tension does not normally have to be adjusted. Lower thread tension To test the bobbin thread tension, remove the bobbin case and bobbin and hold it by suspending it by the thread. Jerk it once or twice. If the tension is correct, the thread will unwind by about an inch or two. If the tension is too tight, it does not unwind at all. If the tension is too loose, it will drop too much.
Silver Crest SNM 33 A1 Starting to sew Reverse sewing At the end of seam, press down the reverse sewing lever. Sew a few reverse stitches. Release the lever and the machine will sew forwards again. (A) A Removing the work Turn the handwheel towards to bring the thread take up lever to its highest position, raise the presser foot and remove work towards the back. B Cutting the thread Hold the threads behind the presser foot with both hands, guide them to the slit (B) and press down.
Silver Crest SNM 33 A1 How to choose your pattern Stitch length dial S1-S2 Stitch width dial Stitch display Pattern selector dial A Reverse sewing lever For straight stitch, select pattern " " with pattern selector dial. Adjust the stitch length with the stitch length dial. You may choose any needle position, by turning the stitch width dial. For zigzag stitch, select pattern " " with pattern selector dial. Adjust the stitch length and stitch width according to the fabric being used.
Silver Crest SNM 33 A1 Zig zag stitching Stitch length dial Stitch width dial Turn the pattern selector dial to "B". Function of stitch width dial The maximum zigzag stitch width for zigzag stitching is "5"; however, the width can be reduced on any pattern. The width increases as you move zigzag dial from "0" - "5". 5 4 3 4 1 0 Function of stitch length dial while zigzaging The density of zigzag stitches increase as the setting of stitch length dial approaches "0".
Silver Crest SNM 33 A1 Blind hem foot Stitch D 1 Stitch width Stitch length 1~2 3~5 For hems, curtains, trousers, skirts, etc. 4 Blind hem/ lingerie for firm fabrics. 3 2 Fold the fabric as illustrated with the wrong side uppermost. (1) Place the fabric under the foot. Turn the handwheel forwards by hand until the needle swings fully to the left. It should just pierce the fold of the fabric. If it does not, adjust the stitch width accordingly.
Silver Crest SNM 33 A1 Buttonhole foot Stitch Stitch width Stitch length 5 0.5~1 Preparation: Remove the zigzag foot and attach the buttonhole foot. Adjust the stitch length dial between "0.5" - "1". The density of the stitch depends on thickness of the fabric. Note: Always test sew a buttonhole. a e b c d To prepare the fabric: Measure the diameter of the button and add 0.3cm (1/8") for the bartacks. If you have a very thick button, add more to the diameter measurement.
Silver Crest SNM 33 A1 Overlock stitches Stitch E, F Stitch width Stitch length 3~5 S1, S2 Attention: Use new needles or ball point needles or stretch needle! Seams, neatening, visible hems. Stretch overlock For fine knits, jerseys, neck edges, ribbing. (A) Standard overlock For fine knits, jerseys, neck edges, ribbing. (B) Double overlock stitch For fine knits, handknits, seams. (C) A B All overlock stitches are suitable for sewing and neatening edges and visible seams in one operation.
Silver Crest SNM 33 A1 Stitch selection Stitch A Stitch width Stitch length 2.5 S1, S2 Triple straight stitch: (1) For hardwearing seams. The machine sews two stitches forwards and one stitch backwards. This gives triple reinforcement. Stitch B 1 Stitch width Stitch length 3~5 S1, S2 Triple zig-zag: (2) For hardwearing seams, hems and decorative seams. Triple zig-zag is suitable for firm fabrics like denim, corduroy, etc.
Silver Crest SNM 33 A1 Monogramming and embroidering with embroidery hoop * Embroidery hoop not included with machine. Stitch B Stitch width Stitch length 1~5 0 Attach the darning plate - Remove the presser foot and the presser foot holder. - Attach the darning plate. - Lower presser foot lever before starting to sew. - Adjust the stitch width according to the size of lettering or design.
Silver Crest SNM 33 A1 Scallop stitching Stitch I Stitch width Stitch length 3~5 1~2 This machine automatically produces a scallop stitch which may be used as decorative edging. - Sew the scallop stitch along the edge of the material. (1) 1 - If desired, trim around the scallop with scissors to create a scalloped edge. Be careful not to cut the thread. (2) 2 Twin needle Stitch A Stitch width Stitch length 2.
Silver Crest SNM 33 A1 Maintenance Attention: Disconnect the machine from the electricity supply by removing the plug from the mains socket. When cleaning the machine, it must always be disconnected from the electricity supply. Remove the stitch plate (1): Turn the handwheel until the needle is fully raised. Open the hinged front cover and unscrew the needle plate screw with the screw driver. Cleaning the feed dog (2): Remove the bobbin case and use the brush supplied to clean the whole area.
Silver Crest SNM 33 A1 Trouble shooting guide Problem Cause Correction Upper thread breaks 1.The machine is not threaded correctly. 2.The thread tension is too tight. 3.The thread is too thick for the needle. 4.The needle is not inserted correctly. 5.The thread is round wound the spool holder pin. 6.The needle is damaged. 1.Rethread the machine. 2.Reduce the thread tension. (lower number) 3.Select a larger needle. 4.Remove and reinsert the needle. (flat side towards the back) 5.
Silver Crest SNM 33 A1 Disposal - Dispose of devices with dangerous defects carefully and ensure that they are no longer used. Do not dispose of the device in normal domestic waste. This product is produced according to EU directive 2002/96/EC. Dispose of the device over a registered waste disposal firm or through your communal waste disposal facility. - Observe the currently valid regulations. In case of doubt, consult your waste disposal facility.
Service number for complaints: +442030244354 www.sewingguide.