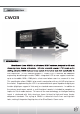
Product overview CW03 Introduction SilverStone’s Crown CW03 is a full featured HTPC enclosure designed for the most discerning home theater enthusiasts. With the venerable Lascala LC18 model as the starting point, the CW03 improves every aspect of the former case from specification to user impression.
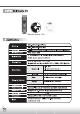
Remote control, CDs 03
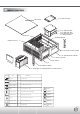
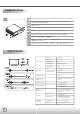
Product overview 5.25” DOCKING BAY TOP PANEL 5.25” DOCKING BAY 5.25” DOCKING BAY CAN CONVERT INTO 3.5” DOCKING BAY 80MM FAN MOTHER BOARD POWER SUPPLY OPTICAL DRIVE UPPER COVER 5.25” DOCKING BAY COVER 7” TOUCH SCREEN KEY PANEL IR ROCKMOUNT EARS 3.
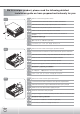
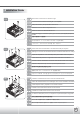
This is a unique product, please read the following detailed installation guide we have prepared meticulously for you. 01 Remove screws and top panel as shown Loesen Sie die Schrauben des Deckels um diesen abzunehmen Destornille los tornillos y saque el panel superior com se muestra. Retirez les vis et le panneau supérieur comme montré Estrarre le viti ed il pannello superiore come mostrato Открутите шурупы и снимите верхнюю панель, как показано на рисунке.
Installation Guide 04 Remove the screws and 3.5” hard drive cage Loesen Sie die Schrauben am Kaefig der 3,5“ Festplatte Saque los tornillos y la caja del disco duro de 3.5” Retirez les vis et le casier à disques durs 3.5” Svitare le viti ed il box dell’hard disk da 3.5” Открутите шурупы и снимите корзину для жесткого диска форм-фактора 3,5 дюйма. 請卸下螺絲與3.5寸硬碟架 ネジおよび3.5”ハードディスクドライブケージを外します。 나사와 3.5” 하드드라이브 케이지를 제거 하십시요.
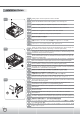
Installation Guide 07 Install graphic card and expansion cards as needed Setzen Sie Grafikkarte und Erweiterungskarte, wenn benoetigt, ein Instale la tarjeta gráfica y la tarjeta de expansión como se requiere. Installez la carte graphique et les cartes d'extension selon vos besoins Installare la card grafica e la expansion card come richiesto Установите графическую карту и карты расширения. 請依需求安裝顯示卡與擴充卡 必要なグラフィックスカードおよび拡張カードをインストールします。 그래픽카드나 기타 필요한 확장카드 등을 설치하십시요.
Installation Guide 10 Please reinstall the 3.5” hard drive cage and secure it Setzen Sie den Festplattenkäfig wieder in das Gehäuse ein Reinserte la abrazadera del disco duro en el chasis Remettez le casier à disques durs dans le boîtier Reinserire il supporto dell’hard disk nel chassis Вставьте кронштейн жесткого диска обратно в корпус. 請裝回3.5"硬碟架並以螺絲鎖固 ハードディスクドライブブラケットをシャーシに戻します 3.5” 하드드라이브 케이지를 재설치 하고 고정시키십시요. 11 Remove the screws and then remove the panel and 5.25 docking bay as shown.
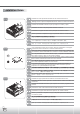
Installation Guide 13 Reinstall the main optical drive bracket into the chassis and secure it Befestigen Sie den optischen Hauptlaufwerksrahmen wieder im Chassis und sichern ihn Reinstale la abrazadera del disco óptico principal en el chasis y sujete. Réinstallez le casier 5.25 principal dans le boîtier et fixez-le. Reinstallare il supporto del disco ottico principale nel chassis e fissare. Заново установите и закрепите в корпусе кронштейн главного оптического диска.
Installation Guide 16 Make sure all necessary cables and wires are connected, then reinstall the top panel and secure with screws Versichern Sie sich, dass alle noetigen Anschluesse und Stecker verbunden sind und schrauben Sie den Deckel wieder auf das Gehaeuse Asegurese de que los cables estén conectados, luego recoloque el panel superior y fijelo con los tornillos. Vérifiez bien que tout les câbles sont correctement branchés, puis réinstallez le panneau supérieur et fixez-le avec des vis.
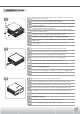
Installation Guide 19 Please install rack mounts ears before placing CW03 into a rack mount cabinet. Befestigen Sie Rack-Halterungsschellen, bevor Sie CW03 in einen Rack-Halterungskasten geben. Instale los accesorios para en montaje en rack antes de colocar el CW03 en el armario rack. Veuillez installer les fixations latérales avant de mettre le CW03 dans un rack. Installare i supporti rack prima di collocare il CW03 nella console rack. Перед монтированием CW03 в стойке поставьте рэковое крепление.
Touch Package User Guide 1 Current active device 1. Please install touch package software (setup.exe or setup64.exe) from included “AIM CD. 2. After install, please click on Touch Package icon to open up setting menu for touchscreen 3.Touch package provides a complete touch control solution including resistive touch panel and optical touch panel. Touch package software is a utility and used for adjusting our touch control devices to optimize our touch solution.
Touch Package User Guide 4 3、 Mouse page The mouse page has four main items, report mode, right click settings, double click settings, touch panel rotation(see Pic4). 1. Report mode item: User can select drawing mode to continue report all points that touch controller senses. Button mode only report two points, first pen down and lift up points. Disable touch will made touch device to not report any point, user must use mouse to return the others to work properly. 2.
Touch Package User Guide 6 5、 Advance page In the advance page (see Pic6), there are three main item functions, Linearization, HID mode, and system tools. 1. Linearization:Some kind of touch sensor, special in 5-wires resistive sensor, need 9 points or 25 points reference points to precisely positioning. User can use the “9 pts linearization” tool or “25 pts linearization” to enhance your touch sensor. 2. HID mode:We support the digitizer HID mode for windows vista.
iMON OEM Touch LCD H/W and S/W Installation Guide Connection Cables D-SUB 15P M/M CABLE USB CABLE 4-PIN/DC POWER CABLE FRONT PANEL CONTROL CABLE IR receiver connection Touch LCD Hardeare Installation For hardware installation, please connect each cables as below.
iMON OEM Touch LCD H/W and S/W Installation Guide Dual Monitor Setting for FrontView In order to use iMON OEM Touch LCD and FrontView application properly, please make setting of your display as like below before you install the iMON/iMEDIAN software installation. 1. Connect VGA cable of iMON OEM Touch LCD to secondary VGA port on your computer. 2. Set iMON OEM Touch LCD display as your secondary monitor using Extended Desktop. 3. Set screen resolution of secondary monitor as 800*600. 4.
iMON OEM Touch LCD H/W and S/W Installation Guide 5.Unless secondary display is enabled, below warning window will be shown. User cannot use FrontView for 7” Touch LCD but only iMON remote controller. 6.Make sure that iMON OEM Touch LCD is matched to secondary monitor with 800*600 resolution in Dual-View mode. IF Touch LCD’s resolution is not 800*600, warning window pops up and advises you to change resolution to 800*600(60Hz) 7.
iMON OEM Touch LCD H/W and S/W Installation Guide 8.Calibration process will begin by touching on Touch LCD. Press white cross mark (+) in every corners (from left top > right top > left bottom > right bottom) for 1 or 2 seconds, then calibration is done. Check the Feature of FrontView SoundGraph, Inc. provide FrontView for Touch LCD from Feb. of 2007. This new Graphical User Interface is designed for top level HTPC product on the market.
iMON OEM Touch LCD H/W and S/W Installation Guide 2.White FrontView is running, user touches screen and FrontView will go to the ‘Control Mode’and it shows the Media Control Buttons (Playback/Pause/ Stop/Next/Prev and so on) as left. 3.When iMEDIAN, Media Center or WinAmp plays media files, FrontView automatically changes to the Media Display Mode. It will show the various media information. In case of music file playing, graphic EQ will be displayed though Touch LCD.
Warranty Information D Warranty period is region specific, please contact your reseller or SilverStone authorized distributor for more information T W 20