Multifunction card reader with USB 3.
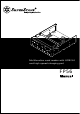
FP56 Introduction FP56 is a 5.25” bay device based on the popular FP37. It features three high speed USB 3.0 ports and a charging port that halves the charging time compare to normal USB 3.0 ports. Additional mounting slots for two 2.5” hard drives or SSDs further add to the flexibility of FP56. To make integration of FP56 more seamless, black, white and silver colored front bezels are included. Special Features Fits in any 5.25” external drive bay Full support for SDXC card Three USB 3.
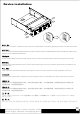
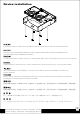
Device installation If you wish to use silver or white front panel, remove the default black front panel by pressing the clips on the side of the FP56. Wenn Sie Silber oder Weiß Frontblende nutzen möchten, entfernen Sie die standardmäßige schwarze Frontblende, indem Sie die Klemmen an der Seite des FP56 drücken.
Device installation Align all four corners and USB connectors of silver or white front panel with FP56 and push the clips into the mounting holes. Richten Sie alle vier Ecken und die USB-Anschlüsse aus Silber oder Weiß Frontblende am FP56 aus, drücken Sie die Klemmen in die Montagelöcher. Alignez quatre coins et les connecteurs USB du panneau frontal argenté ou blanc avec FP56 puis appuyez sur les clips dans les trous de montage.
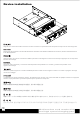
Device installation If you wish to install 2.5” HDD, remove the USB 3.0 cable and secure the 2.5” HDD with the included screws. Wenn Sie eine 2,5-Zoll-Festplatte installieren möchten, entfernen Sie das USB 3.0-Kabel und befestigen Sie die 2,5-Zoll-Festplatte mit den mitgelieferten Schrauben. Si vous voulez installer un disque dur de 2,5” , retirez le câble USB 3.0 puis fixez le disque dur de 2,5” avec les vis fournies. Si desea instalar un disco duro de 2,5”, retire el cable USB 3.
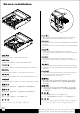
Device installation 1. Secure FP56 with the included screws into the chassis 2. Connect power and SATA cable for the 2.5” HDD. 1. Befestigen Sie das FP56 mit den mitgelieferten Schrauben im Gehäuse 2. Schließen Sie Netz- und SATA-Kabel der 2,5-Zoll-Festplatte an. 1. Fixez FP56 dans le chassis avec les vis fournies 2. Connectez le câble d'alimentation et SATA avec le disque dur de 2,5”. Connect the USB 3.0 and 4pin power cable. 1. Fije el FP56 con los tornillos incluidos en el chasis 2.
Warranty Information This product has a limited 1 year warranty in North America and Australia. For information on warranty periods in other regions, please contact your reseller or SilverStone authorized distributor. Warranty terms & conditions 1. Product component defects or damages resulted from defective production is covered under warranty. Defects or damages with the following conditions will be fixed or replaced under SilverStone Technology’s jurisdiction.
Issue Date : January, 2013 NO.