
manual


Device installation
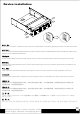
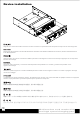
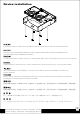
Connect the USB 3.0 and 4pin power cable.
Schließen Sie USB 3.0- und 4-poliges Netzkabel an.
Connectez l'USB 3.0 et le câble d'alimentation à 4 broches.
Conecte el cable USB 3.0 y el de potencia de 4 pines.
Collegare il cavo USB 3.0 ed il cavo d’alimentazione a 4 pin.
USB 3.0과 4핀 전원 케이블을 연결합니다.
USB 3.0と4ピン電源ケーブルを接続します。
硬碟固定後,請您將USB 3.0連接線及大4PIN電源線接上。
硬盘固定后,请您将USB 3.0连接线及大4PIN电源线接上。
Подключите кабель USB 3.0 и 4-контактный кабель питания.
Multi
f
unction card reader with
and hi
g
h speed char
g
in
g
port
5
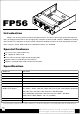
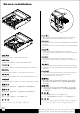
1. Secure FP56 with the included screws into the chassis
2. Connect power and SATA cable for the 2.5” HDD.
1. Befestigen Sie das FP56 mit den mitgelieferten Schrauben im
Gehäuse
2. Schließen Sie Netz- und SATA-Kabel der 2,5-Zoll-Festplatte
an.
1. Fixez FP56 dans le chassis avec les vis fournies
2. Connectez le câble d'alimentation et SATA avec le disque
dur de 2,5”.
1. Fije el FP56 con los tornillos incluidos en el chasis
2. Conecte el cable de potencia y SATA para el disco duro
de 2,5”.
1. Fissare FP56 nel telaio usando le viti fornite in dotazione
2. Collegare il cavo d’alimentazione ed il cavo SATA all’unità
HDD 2,5”.
1. 제공된 나사를 사용하여 FP56을 섀시에 고정합니다.
2. 2.5” HDD용 전원과 SATA 케이블을 연결합니다.
1. FP56を付属のネジでケースに固定します。
2. 2.5” HDD用の電源およびSATAケーブルを接続します。
1.將FP56裝上機殼並用包裝內附的固定螺絲,將FP56鎖固。
2.若您有安裝2.5吋硬碟於FP56上,請記得將硬碟電源線及
SATA線接上。
1. 将FP56装上机壳并用包装内附的固定螺丝,将FP56锁固。
2. 若您有安装2.5吋硬盘于FP56上,请记得将硬盘电源线及
SATA线接上。
1. Закрепите отсек FP56 винтами из комплекта в корпусе
2. Подключите кабель питания и кабель SATA к
2,5-дюймовому жесткому диску.