
Installation guide
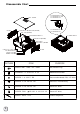
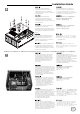

Installation Chart
3
1
2
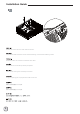
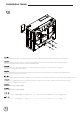
Unscrew screws from the rear of
the chassis then remove the top
cover
Ослабьте два винта на задней
панели корпуса и снимите
верхнюю крышку.
取下上蓋螺絲,取下上蓋板Lösen Sie die beiden Schrauben von
der Rückseite des Gehäuses,
entfernen Sie dann die obere
Abdeckung.
Dévissez les deux vis de l'arrière du
boîtier puis retirez le panneau
supérieur.
Afloje dos tornillos de la parte posterior
del chasis para retirar la cubierta
superior.
Allentare le due viti sul lato posterior
del telaio e poi rimuovere il coperchio
superiore.
取下上盖螺丝,取下上盖板
ケース後部のネジ2本をゆるめ
てからトップカバーを取り
外します。
섀시 후면에 있는 두 개의
나사를 푼 다음
상단 커버를 분리합니다.
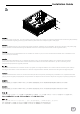
Unscrew four screws from the
optical drive bracket to remove it
Lösen Sie die vier Schrauben,
welche den Schacht für das optische
Laufwerk halten, nehmen Sie den
Schacht heraus.
Dévissez les quatre vis fixant le casier
du lecteur optique afin de le retirer
Desatornille cuatro tornillos que
sujetan el bracket del dispositivo óptico
y luego retírelo.
Svitare le 4 viti che tengono la staffa
del drive ottico e quindi rimuoverlo.
Открутите четыре шурупа,
удерживающих кронштейн
жесткого диска, и выньте
кронштейн.
鬆開光碟架4顆螺絲,卸下光碟架
松开光盘架4颗螺丝,卸下光盘架
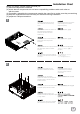
Before you begin, please make sure that you
(1) have all components collected
(2) check that all components do not have compatibility problems with each other or
with the case
(3) if possible, assemble the components outside the case first to make sure they are working
(4) keep the motherboard manual ready for reference during installation
(5) prepare a Philips screwdriver.