Owner’s Manual Series 330A Power Amplifier
30A Power Amplifier Important Safety Instructions 1. Read these instructions. 2. Keep these instructions. 3. Heed all warnings. 4. Follow all instructions. 5. Do not use this apparatus near water. 6. Clean only with a dry cloth. 7. Do not block ventilation openings. Install in accordance with the manufacturer’s instructions. 8. Do not install near any heat sources such as radiators, heat registers, stoves or another apparatus that produces heat. 9.
330A Power Amplifier Important Safety Instructions (cont’d) The lightning flash with the arrowhead symbol, within an equilateral triangle, is intended to alert the user to the presence of uninsulated “dangerous voltage” within the product’s enclosure that may be of sufficient magnitude to constitute a risk of electric shock to persons.
330A Power Amplifier Table of Contents Introduction .................................................... 6 Unpacking........................................................ 7 Installation & Placement ................................... 7 Rear Panel Layout ............................................ 9 Connecting the 330A ........................................ 9 Balanced Operation .......................................... 9 Bridged-Mono Operation ................................. 10 Operating the 330A ..
330A Power Amplifier Introduction Thank you for selecting the Nēo 330A Power Amplifier as a part of your hi-fi reproduction system. This power amplifier has been designed to offer state-of-the-art high-end performance in an elegant package, while retaining all the sonic hallmarks on which Simaudio has made its reputation. We have spared no effort to ensure that it is among the finest two-channel amplifiers available.
330A Power Amplifier Unpacking The Nēo 330A Power Amplifier should be removed from its box with care. The following accessories should be included inside the box with your amplifier: 9 AC power cable 9 This owner’s manual 9 Warranty and product registration information (USA and Canada only) Once the Nēo 330A is unpacked, inspect it thoroughly and report any damage to your dealer immediately.
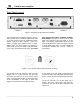
330A Power Amplifier Rear Panel Layout Figure 1: Rear panel of Nēo 330A Power Amplifier The rear panel will look similar to Figure 1 (above). Each channel has one balanced (differential) input on an XLR connector and one unbalanced (singleended) input on a RCA connector. There is no switch to toggle from balanced mode to singleended mode. You may operate the amplifier in either mode, but only one mode at one time.
330A Power Amplifier Connecting the 330A Prior to making any connections or removing the XLR jumpers, the power amplifier must be turned off and the AC cable disconnected for at least 1 minute. 1. Connect the input cables running from your preamplifier’s outputs, whether balanced or single-ended, to the amplifier’ s XLR or RCA inputs, respectively.
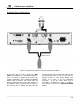
330A Power Amplifier Bridged-Mono Operation Figure 3: Bridged-Mono operation of the Nēo 330A Power Amplifier In the event that you wish to operate the Nēo 330A Power Amplifier as a monoblock amplifier, it can be converted to bridged mode without any complex modifications. Only a MOON XLR-BRIDGE adapter cable is required. This custom cable will allow one input signal to be sent to both channels of the amplifier’s inputs, as pictured above in Figure 3.
330A Power Amplifier Operating the 330A We recommend leaving your Nēo 330A powered up at all times to maintain optimal performance. When you plan on being away for a few days, it may not be a bad idea to power off your amplifier. Please keep in mind that once fully “broken-in”, your 330A requires several hours of operation before reaching optimal performance after powering it up again.
330A Power Amplifier Remote Operation Figure 4: Remote Operation In figure 4 we have a Nēo 350P Preamplifier and 330A Amplifier connected together via their respective 12V triggers; The 12V trigger output on the 350P is connected to the 12V trigger input on the 330A using a 1/8” mini-jack cable. When you turn on the 350P via remote control (or its Standby button), the 330A will automatically turn on. The same rule applies when you put the 350P into Standby mode.
330A Power Amplifier Specifications Configuration ................................................ Power Supply Transformer ............................. Power Supply Capacitance ............................. Class Of Operation ........................................ Input Impedance .......................................... Input Sensitivity ............................................ Output Device Type ....................................... Output Power at 8Ω ......................................