
Instructions / Assembly


6
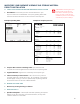
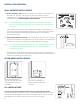
WALL-MOUNTED INSTALLATIONS
1. Anchor steel rail to wall: The key to installing your system is a well-anchored,
level steel rail. Take your time to get this step right, and the rest of the
installation will proceed quickly and smoothly. For a summary video showing the
rail installation, visit www.SimplyNeu.com/ installation.
Note: Since steel rail length is frequently determined by wood stud locations,
you must cut the rail with a hack saw. This is usually the only cutting that
is required.
If you discover steel studs or masonry walls, please call for proper fasteners.
Our sturdy systems are designed to support up to 1,200 lbs. per 8 foot section
when properly designed and installed. Please follow the rail installation
instructions carefully.
2. Hang vertical panels on steel rail: Vertical panels are notched on the rear edge
near the top to mate with the angled steel rail. Simply hang the vertical panels on
Note: The vertical panels must be hung directly on the steel rail. Plastic rail cover
is provided to conceal any exposed rail after your system has been
completely assembled.
Occasionally, a vertical panel will be positioned where a rail screw is located. In
this case, cut a small amount from the vertical panel to accommodate the screw
head. Your hacksaw can be used for this.
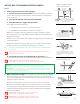
FLOOR-BASED INSTALLATIONS
ALL INSTALLATIONS
Connect vertical panels and cam shelves with cam locks and cam screws:
Cam shelves are semi-permanent. They connect vertical panels and lock in place
with cam and bolt hardware. This creates a rigid system frame in which to install
adjustable shelves, hanging rods and numerous other components.
INSTALLATION OVERVIEW
anchored to the wall by the
L-brackets.
are anchored to the wall with
L-brackets.