
Instructions / Assembly


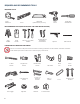


7
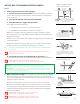
Mark
Follow these easy steps when installing your rail: Mark, Cut and Mount.
NOTE: Floor-based vertical panels do not require a rail. The installation of a
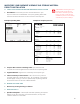
1. Determine and mark the rail height:
Rail height = Top shelf height minus 8 ¼"
You will install the rail with its bottom edge on the
rail line.
If your design is completely wall-mounted, the
bottom edge of the rail will still be 8-1/4" lower
than the top of the top shelf. For example, for a
standard 84" top shelf design, the rail would be
installed with the bottom edge at 75 ¾" from the
Allow 1" gap.
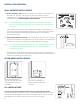
2. Mark each wall stud location:
locate studs.
NOTE: Standard 2" x 4" studs are usually located 16" on center measured from
the left or right end of the wall.
measure over 16" for the next stud.
3. Mark each vertical panel location: Mark the approximate location of each
vertical panel by referring to each unit wall plan. Note that vertical panels
are 3/4" thick and section interior widths are indicated below each wall plan.
Vertical locations can be marked on the wall with masking or painter's tape.
WALL-MOUNTED SYSTEM INSTALLATION
IMPORTANT: Follow these instructions carefully! The rail installation is the
most critical part of the installation.
Locate and mark studs.
Mark vertical panel locations.
Refer to your design plans.
Sample design showing rail
The rail runs the
full width of the
organizer.
Determine rail height & draw a
level line.
Top shelf height
Wall-mounted panel
8 ¼"
Top shelf
Height
Rail
Location
Subtract
84" 8 ¼" 75 ¾"
83
15
⁄16" 8 ¼" 75
11
⁄16"
? 8 ¼"