
Service manual


5
3 ASSEMBLY INSTRUCTIONS
3.1 RD68 Chassis Pre-Assembly
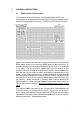
The main transmitter and receiver and second receiver PCBs are a
matched pair and replacement of either requires the tuning of both to be
checked and adjusted as necessary. Position the PCB over the Chassis.
Apply a small amount of Hellerman sleeving oil to the part of the Red and
Black power and the red and blue NMEA leads inside the chassis, to
provide lubrication and facilitate withdrawal from the chassis as the board
is set down. Ensure that the 2 copper tags from the washer on the
Antenna socket are standing up clear and insert the tinned copper wire
from the rear of the Antenna socket up through the plated hole in the
board. Fit the PCB into the chassis, carefully pulling the 4 leads through
the grommet to remove excess from the chassis interior. Locate the PCB
over the ribs in the chassis and push down to position the PCB flat into
the casting. When the board is correctly fitted, refer to drawing No
E03848 and fit 2 - M3 X 10 screws 200048 into the front of the chassis to
secure the heatsink in place, do not fully tighten these screws at this
stage .
Fit 1 washer 200081 onto each of the 2 screws M3 x 16mm 200200, and
fit into the 2 holes at the back of the chassis. When all 4 screws are in
place, lightly press down on the front part of the PCB until the front panel
connectors are clearly visible and permit engagement of the front panel
without interference. (See drawing below)