
Installation Guide
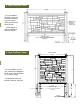


Step 6: Installing Fence Panels
1. Panel support brackets must be attached to all posts.
2. Be certain steel stiffeners are inserted in the top and
bottom rail of each panel; they come installed from the
factory, but may have been removed to use as post spacers
while installing posts.
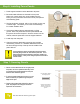
3. Six foot panels are universal, with no front or back, and no top
or bottom edge. This allows you to create a mixed design
for a better aesthetic effect.
4. Lift the panel bottom edge to approximately 4’ off the
ground. Have one person ex the next post outward until
the groove will receive the panel. Once the section is in the
channel, ease the panel down onto the support brackets.
5. Install caps over the posts.
6. Caps are pressure tted making securing them typically
unnecessary; however, a 3” stainless steel deck screw can
be driven through the top of the cap into the middle of the
post if desired.
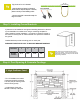
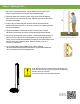
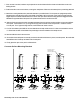
Step 7: Securing Panels
1. Panels must be attached to all six foot gate posts,
end posts, and corner posts because they could
conceivably become disengaged from the post
because of the shallower groove.
2. To prevent unauthorized panel removal, you can
drive one fastener per panel through the panel
edge into the post.
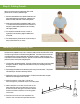
3. Caution. Never attach both sides of the panel to
posts. Polyethylene has a degree of thermal
expansion and contraction.
#14 Hex Washer Head, 3”
Self Tapping Screw
Fasteners should attach
panels to end post and
corner post inside panel
grooves
Tip
Note: Never attach both sides of any panel to posts.
The steel stiffeners in the top and the bottom rails of the panel are
specically designed to be 1/2” wider than the panel itself. This is
designed to allow for thermal expansion of the panel. DO NOT cut
the steel stiffeners, unless you are cutting the panel to accomodate a
narrower section.