instruction Book for Sewing Machine Model 3005/3015 Copyright 1983 T,$, CO. All Rights Reserved Throughout the World *A Trademark of T.S. CO. Manuel d’instructions pour machine à coudre modèle 3005/3015 Droit de publication réservé 1963 T.S. CO. Droits réservés dans le monde entier *üne marque déposée de T.S. CO. Manual de instrucciones para la de Coser modelo 3005/3015 Reproducción ® 1983 T.S. CO. Derechos reservados en todo el mundo Máquina *üna marca de fábrica de T.S. СО.
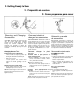
Contents 1. Getting to Know Your Machine 4 Principal Parts ................................. 4 Accessories .................................... 6 2. Getting Ready to Sew ....................... 7 Choosing and Changing Accessories................................ 7 Operating Machine.......................... 22 The Bobbin ..... .............................. 23 Threading the Machine................... 26 3. Straight Stitching ............................ 28 Adjusting Machine Stitch .................
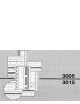
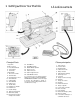
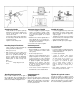
1. Gettirig to ICnow Your IHachirie Principal Parts 1 Spool Pin Z Take-up Lever 3. Rear Thread Guide 4. Tension Dial 5. Face Plate a Light Switch 7. Presser Foot Lifter 8. Thread Cutter 9. General Purpose Foot 10. Thread Guard 11. Sewing Light 12. Thread Guide 13. Fabric Feed 14. Needle Plate 15. Bobbin Case Holder 16. Bobbin Case 17. Needle Clamp 18. Extension Bed (3015) 18. Slide Plate (3005) 19. Electrical Connections and Speed Controller 1. À la découverte de Pièces principales 20. 21. 22. 23. 24.
votre machifie à coudre 1. Cómo conocer su máquina Partes principales K), Volant à main >1. Bouton de volant 12. Tige de bobineur >3, Levier de couture en arrière Cadran de points >5. Sélecteur de la longueur du point Sélecteur de la largeur du point de toujours vous faire bénéfîCîer des jerniers perfectionnements, LE FABRI CANT se réserve le droit de modifier ’aspect, la conception de cette machine >u de ses accessoires. T Porta-carrete 2. Palanca tira-hilos 3* Guia de hilo posterior 4.
Accessories Accessoires Accesorios The accessories that come with your sewing machine are designed to heip you do many kinds of sewing easiiy. Les accessoires qui accompagnent la ma chine à coudre ont été conçus afin de vous aider à coudre facilement dans toute une gamme de couture. Los accesorios que se suministrar) con su máquina de coser están diseñados para ayudarla a hacer muchas clases de costura con facilidad. 1. Bobinas transparentes (no. 541090) 2.
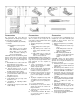
2. Getting Ready to Sew 2. Préparatifs de couture 2. Cómo prepararse para coser Choosing and Changing Accessories Comment choisir et changer les accessoires Selección у cambio de accesorios CAUTION: Disconnect the power line plug from the socket outlet when changing needles, feel or needle plates, or when leaving the machine unattended. This eliminates the possibility of starting the machine by accidentally pressing the speed controller.
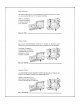
Changing the Needle Comment changer I’aiguilie Cambio de ia aguja ♦ Raise needle to its highest point by turning the hand wheel toward you. Loosen needle clamp screw A and remove the needle. • • Levante la aguja hasta su posición más alta girando el volante hacia Usted, Afloje el tornillo que fija la aguja A y saque la aguja. ♦ insert new needle up into clamp B as far as it will go, with the flat side of the needle to the back. ♦ Tighten needle clamp screw.
Remove and Replacing Needle Plate Enlèvement et plague à aiguille 3015 Machine • Raise needle to its highest position. • Raise presser foot. Machine 3015 • Relevez Taiguille à sa plus haute posi tion. • Open hook cover A. « Relevez le pied presseur. • O Ouvrez le couvercle à crochet A. With your forefinger push needle plate upward from beneath and remove plate. To replace needle plate, guide needle plate into position under the presser foot.
Fabric Weight Table There are thousands of fabrics around the world, each manufactured with a specific fibre and weight. The fabrics below have been classified according to weight to give a small sample of what is available for purchase. Refer to this table to determine the weight and type of fabric you will be using in order to select the correct needle and thread combination.
Heavy Medium Very Heavy Velvet, Crepe de Chine, Shantung, Suiting, Brocade Velvet, Taffeta, Satin, Crepe Brocade, Taffeta, Satin, Crepe Velveteen, Corduroy, Velvet, Fleece, Velour, Terry, Chintz Corduroy, Denim, Ticking, Canvas, Linen, Drapery Fabric, Burlap Denim, Duck, Canvas, Sailcloth, Upholstery Fabric Suiting, Tweed, Duffel Coating, Blanketing Stretch Velours*, Stretch Terry* "Usuaiiy contain some syntnetic fibres also.
Tableau de tissus selon Tépaisseur y y a unemuititudedetîssus variés de par le monde, dont chacun possède une fibre et une épaisseur particulières. Les tissus cidessous ont été classés selon leur épaisseur afin de fournir quelques exemples de fa gamme de tissus disponibles. Consultez ce tableau pour déterminer lepaisseur et le genre de tissu que vous utiliserez, afin de choisirl'aiguilleetfif appropriés.
Moyen Épais Très épais Velours, Crêpe de Chine, Shantung, Tissu-tailleur, Brocart Velours, Taffetas, Satin, Crèpe Brocart, Tafettas, Satin, Crêpe Velours de coton, Velours côtelé, Velours, Molleton, Ratine. Chintz Velours côtelé, Denim, Coutil è matelas. Canevas, Drap, Tissu de tentures. Toile d’emballage Denim, Toile à bâche, Canevas.
Tabla de peso de tejidos Existen millares de materiales en el mundo, cada uno de ellos fabricado con una fibra y un peso especifico. Los tejidos o materiales que se indican más adelante se han clasificado de acuerdo con su peso para dar una pequeña muestra de lo que hay disponible para compran Refiérase a esta tabla para determinar el peso y el tipo de los materiales que Usted intenta usar de modo que pueda elegir la combinación de aguja y de hilo correcta.
j— ^ ------------------------------------------------Medianos Pesados Muy pesados Terciopelo. Crepé de China. Shantung, Sastrería, Brocado Terciopelo. Tafeta, Satén, Crepé Brocado. Tafeta, Satén, Crepé Pana lisa, Pana de bordón. Terciopelo. Vellón, Pana. Tejido de rizo, Chintz Pana de bordóvi. Denim. Cutí, Lona, Lono, Material para Cortinajes, Arpillera Denim, Loneta, Lona, Material para Velamen, Material para Tapicería Sastrería, Cheviot.
Fabric, Thread and Needle Table Choosing the correct needle and thread for your fabric is of utmost importance. Correct choice will make the difference in the wear and appearance of your new garment. The Fabric Weight Table on the previous page and the Thread and Needle Table below are practical guides to needle and thread selection. Refer to them before starting a sewing project. Be sure to use the same size and type of thread in both needle and bobbin.
Next refer to the Fabric. Thread and Needle Table. Find the fabric you are using in Type of Fabric column at left (silk, rayon, etc.). Then locate theFabric weight column (filmy, sheer, etc.) for your Fabric at top of table. Read across from Type of Fabric' column to correct weight of Fabric column. There, the correct thread and needle choice for your Fabric will be found. IMPORTANT: Your sewing machine has been designed to obtain best results with SINGER* needles.
ТаЫеау pour tissu, fil et aigullie appropriés Le choix de raî9 uille et du fii qui conviennent au tissu en usage est dlmportance prirnorclale, car U affectera ra|ustenient et Гаррагепсе du vêtement Le tableau de « Tissus, selon répaisseur >», à la page précédente, ainsi que le tableau pour « Tissu, fil et aiguille appropriés » ci-dessous, servirontdeguides pratiques afin de choisir raiguille et le fit Consultez-les avant d’amorcer tout proîet de couture.
Repérez le tissu en usage dans la colonne « Genre de tissu ^ à gauche (soie, rayonne, etc.). Procédez ensuite à la colonne d'épaisseur décrivant votre tissu (diaphane, ajouré, etc.). À la même ligne que le genre de votre tissu, lisez l'inscription dans la colonne décrivant son épaisseur et vous y trouverez le fil et raiguille qui lui conviennent Exemple : Si votre tissu consiste en une laine d’épaisseur moyenne, repérez tout d'abord le mot « Laine » dans la colonne « Genre de tissu ».
Tabla de tejidos, hilos y agujas La selección de la aguja y el hilo correcto para su tejido es de una primordial importancia. Una selección correcta será la diferencia en la duración y la apariencia de su vestido. La tabla de peso de los tejidos de la página anterior, y la tabla de tejidos, hilos y agujas que sigue, son guias prácticas en la selección de las agujas y el hilo. Refiérase a ellas antes de que comience un proyecto de costura.
Busque el tejido que va a usar en la columna del Tipo de tejido a la izquierda (seda, rayón, etc,). Después localice la columna de los pesos de los tejidos (poco tupiúo o fino, sutil, etc.) de su tejido en la parte superior de la Tabla. Lea de la columna del Tipo de material hasta la columna del peso correcto del tejido Allí encontrará Usted la elección correcta de hilo y aguja para su tejido. IMI^ORTANTE: Su máquina de coser ha sido diseñada para obtener los mejores resultados con las agujas SlNGSR’^.
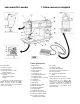
Operating the Machine Connecting the Machine » Before pluggmg in your machine, be sure the electrical information on the side of the machine A, below the hand wheel, agrees with the range marked on your electrical meter. - Machines for Great Britain and some other countries having similar wiring standards are shipped from the factory without a plug for connection to the mains.
The Bobbin La canette Winding the Bobbin Bobinage de la canette Devanado de la bobina Preparation Steps Étapes de préparation Pasos de preparación 1. Raise the presser foot and turn hand wheel toward you until needle is in highest position. 1. Relevez le pied presseur et tournez le volant 1. Levante el prénsatelas y gire ei volante hacia Usted hasta que la aguja ocupe su vers vous jusqu'à ce que l'aiguille se trouve posición más alta. dans la plus haute position. 2.
Bemovlng the Bobbin Case When you prepare to sew, wind the bobbin first then thread the machine. To Remove the Bobbin Case and Bobbin. « Turn hand wheel toward you to raise take-up lever to its highest position. 3015 ♦ Open hook cover A, as illustrated. 3005 • Open slide plate by drawing it toward you, « Grasp bobbin case latch B and withdraw bobbin case. « Release latch and bobbin will drop out of case.
Replacing the Bobbin Case 1. HolQ bobbin case by iatch, with about 7.5 cm (3 inches) of threa6 ¡eading off top of case. 2. Align protruding finger A with slot B and slide case on the stud C. ® Release the latch and push case until it dicks into place. Allow 7.5 cm {3 inches) of thread to hang free from bobbin case. « Close hook cover or slide plate. Be sure thread does not get caught when hook cover is dosed.
Threading the Machine Enfilage de la machine Enhebrado de la máquina Preparation » Place spool oithread on spoof pin, with thread retaining sfit A on top, Préparattls o Placez le rouleau de fil sur le porterouleau, avec la rainure à fil A au sommet. Preparación « Coloque el carrete de hilo sobre el porta-carrete, con la ranura de reten ción del hilo A arriba.
Raising the Bobbin Thread Comment faire remonter le fil de canette Cómo sacar e! hilo de la bobina 1. Hold needle thread lightly with left hand and turn hand wheel slowly toward you until the needle enters plate. 1, Retenez le fil de raiguilfe légèrement de la main gauche et tournez le volant à main lentement vers ¡'avant jusqu’à ce que l’aiguîlle entre dans la plaque.
3. straight Stitching 3. Le point droit 3. Pynto recto Adjusting Machine Stitch Ajuster le point à votre to Suit your Fabric tissu Cómo ajustar el punto según su tela Before you move the sesectors to set your machine for straight stitching, turn the hand wheel toward you until the needle is above the needle plate. Avant de mouvoir les sélecteurs pour ajuster votre machine pour points droits, tournez le volant vers vous jusqu’à ce que raiguille se trouve au-dessus de la plaque à aiguille.
Reverse Lever Levier de couture en arrière Palanca de costura hacia atrás For reverse stitching, depress reverse lever located to the right of the stitch pattern selector, hold down until reverse stitching is completed. Once lever is released, the machine will sew in forward direction. Pour la couture en arrière, pressez sur le levier de couture en arrière situé à droite du cadran de points et gardez le doigt sur celui-ci jusqu'à ce que la couture en arrière soit terminée.
® Pattern Selector: 1 « Stitch Width: 0 « Stitch Length: To suit fabric « General Purpose Needle Plate « General Purpose Foot 1. Raise presser foot. Pull thread back under presser foot leaylng at least 10 cm {4 Inches) of Xhrea6. 2. Position needle approximately 1,3 cm (1/2 inch) from fabric edge. Then lower presser foot and backstitch almost to the edge of the fabric for reinforce ment by stitching in reverse direction. For additional information on reverse stitching refer to page 29.
Applications Applications Zipper insertion Conimerit poser les feniietyres à glissière How the zipper is inserted vM depend on the type of garment and the location of the zipper. With the adjustabie zipper foot, you mil find it easy to sew an even Hne of stitching cióse to the zipper. The zipper foot can be used either to the ieft or right of the needle, depend ing on where the buik of the garment is piaced.
« Pattern Selector: 1 ^ Sélecteur de motif: 1 ♦ Stitch Length: 0 » Longueur du point: Q « General Purpose Needle Plate « Plaque à aiguille tout usage. « General Purpose Foot « Pied presseur tout usage, ♦ Snap-in feed cover » Tapa del sistema de alimentación ♦ Attach snap-in feed cover over feed as Instructed on page 8 . « Select straight stitch.
4. Basic Zig-Zag Stitching 4. Les éiéments du point zig-zag vvvvvvvvvvVvVvyvvvA,v 4. Pespunte bàsIco en zig-zag Adjusting Machine Stitch to Suit Your Fabric Réglage du point à votre tissu Ajuste del punto de la máquina a su tela You can do functional as weìi as decora tive zig-zag stitching with your sewing machine. Il vous est possible de réaliser des points zig-zag fonctionnels et de fantaisie à t’aide de votre machine à coudre. Con SU máquina.
Adjosting Needle-Thread Réglage de la tension du fli Tension de l’aiguille Ajuste de la tensión del hilo de la aguja Zig-zag stitching requires iess neediethread tension than straight stitching. La couture à points zig-zag exige moins de tension du fil de Taiguille que la cou ture à points droits. Los puntos en zig-zag requieren menos tensión del hilo de la aguja que en el caso de los puntos rectos.
Applications Applications Aplicaciones Lirigerie Seams Coutyres dans la lingerie Cosfyra de lerìceria To make a nngene seam durable and flexible, use the plain zig-zag stitch at a narrow Width setting. This seam treat ment is particularly suitabie for bias seams. When seaming nylon tricot, Insert a Style 2045 needle in the machine. Afin que les coutures de sous-vêtements pour dames soient durables et flexibles, utilisez le point zig-zag ordinaire à un ré glage étroit.
Appliqué Les appliques Apliqués The stitch most commonly used in appliqué is a plain zig-zag, closely spaced to form a satin stitch. The width of this stitch can be varied to accommo date fabrics of different weaves and textures. Other stitch patterns can also be used. Pour poser les appliques, on utilise le plus communémíent le point zig-zag ordinaire. étroitement rapproché afin de former un point de bourdon.
Embroidery Broderie Bordado Free-motion Stitctiing Couture à mouvement libre Costura de libre movimiento In free-motion stitching, you sew without a presser foot and instead control fabric movement {and hence stitch length) yourself, by means of an embroidery hoop. Either a straight or a zig-zag stitch setting can be used.
Pattern Selector: 1 Stitch Width Selector: 2 Stitch Length: 0-1 Snap-in Feed Cover Presser Foot: None ^ Cadran de points: 1 » Caóran de largeur de point 2-5 « Longueur du point 0-1 « Couvre-entraînemient » Pied presseur: aucun « Selefctor del punto: 1 • Selector del ancho del punto: 2-5 ^ Largo del punto: 0-1 » Tapa del sístem*a de alimentación » Prénsatelas: ninguno if you wish to embroider a whole name — on a child’s dress or shirt, for exam ple— you can do so by free-motion stitching.
5. Machine Stitch Patterns Points de la machirie 5. Modelos de puntos de la máquina 5. i 1 —1 • i^ i ' . > i - ¡ /V i 1i 1 í ! li Î11 1> > i í 1 1 Î > ' : > ' ^ — A - = ? i 1 1 " i ^ ÿ wU»::—i 1_____ iz____ \ 8 AC B Setting Selectors Sélecteurs de réglage Selectores de ajuste In addition to straight stitch and zig zag stitch, your machine can produce a variety of stitch patterns.
Selecting a Pattern Sélection d’un point Selección de modeio Before moving stitch pattern selector, make sure needie is above fabric. Avant de tourner le cadran des points assurez-vous que raiguille se situe audessus du tissu. Antes de mover el selector de puntos asegúrese de que la aguja esté fuera de la tela. Cuando üd gira el botón, el selector de motivos tamiblén gira y uno de 11 motivos le será disponible. Gire el selector del ancho del punto a 0.
Adjusting Stitches for Stretch Fabrics Comment régler les points Ajuste de puntadas para en fonction des telas elásticas tissus extensibles and Supporting Fabric Most fabrics of stretch or knit construc tion need only to be guided in front of the pressar foot when you use one of the stretch stitches. Some fabrics— nylon tricot and eiasticized fabrics, for example—do require support while being stitched.
stitch Pait&n Chart / Tableau des points / Tabla de modelos de puntos straight Stitch: Used for general sewing, searriing and topstitching. purpose Shell-Tuck Stitch: Used for shell-îuck and hem finishes. Le point droit: Pour couture générale, pour faire les coutures et surpiqûres. Point coquille: Utilisé pour réaliser des plis coquilles et des finitions. Punto recto: Se usa para la costura para fines generales, pespuntes y puntadas en paralelo. Punto de concha: Se utiliza para acabados de dobladillo.
r■ . aa"'A/“"AA' ------- ' ■ "V---------------VA ■ ' ■ ~ A/" < < > > i !! ! Î mmmÊàmÊÊi ^ ¿______________ î í > < í> > ____ .A.____ /V. Blindstitch .--A______ A_____ .A_____/\ ._A\___yA_______ Av. Point Invisible < Punto ciego Blindstitching provides a durable hem Le point invisible produit une finition Blindstitching finish thaï is almost invisible d’ourlet durable et presqu‘invisible. El punto ciego asegura un acabado de dobladillo durable casi invisible.
AAA A, A A mum-smch Zlg-Zag Zig-zag muiti-points Zlg>zag de puntos múltiples The muiti-stitch zig-zag is an extremely versatile stitch. Use it to mend, join, or reinforce without bulk. With this stitch you may attach elastic and stretch lace, construct lingerie and swimsuits, and finish seams. There are many other use ful applications for the multi-stitch zig-zag. Le zig-zag multi-points présente toute une gamme d usages, il sert à raccom moder, assembler et renforcersansépaisseur excessive.
Honeycomb Stitch Le point nid d’abeilfes Punto de panai de abejas The honeycomb stitch is ideal for smocking and it is useful for mending, overcasting and attaching lingerie elastic, stretch lace and blanket binding. Use this versatile stitch to create decorative designs on fabrics that stretx^h. Le nid d’abeilles est idéal pour les smocks et il s’avère pratique pour raccommoder, surjeter, poser les élastiques dans la lingerie, poser de la dentelle extensible et coudre les bordures de couvertures.
> .................... ; " T”' ........... ..................... "'T*: '"ïT" .............. :N ■> :................ ................................................. ......................... Overedge Stretch Stitch Point cJe surjet extensible Punto de sobreorilla elástico Although the overedge stretch stitch may be used creatively, it *$ primarily applied in finishing seams, hems, and facing edges.
IVIock Overedge This finish is appropriate for buiky knits. fine tricots and fabrics that curl or fray. Method 2 « Make a test sample. • Baste the garment together on the seam line and fit in the usual way. ♦ After making any necessary adjust ments, suggested in Method 1 , place seam under presser foot. Stitch so that the stitches on the left side of the pattern penetrate the basted seam line. ^ Press after stitching and trim away excess fabric to produce a narrow seam edge.
Monograms Monogrammes Many of the machine stitch patterns can Un grand nombre points motifs à la be used for monograms or motifs — for machine peuvent être utilisés pour ré adding a personal touch to a biouse aliser des monogrammes ou motifs — colian for example, or for initialing pour ajouter une touche personnelle à un household lines. You can buy designs — col de blouse, par exemple, ou pour or create them yourself. mettre les initiales sur les articles de la maison.
Shefl-Tyek Stitch Le point coquiiie EI punto concha Used for shelNuck and hem finishes, as well as for sewing and overcasting. Ce point s’utilise pour les finitions d’ourlets et coquilles ainsi que pour les coutures et les surjets. Este punto se usa para acabados de dobladillo y concha tanto corno para costuras y sobrehilado.
Decorative stitching Les points décoratifs Your sewing machine has several stitches which are pureiy decorative. These versatile stitches allow you to add imagination and creativity to your sewing projects. With these decorative stitches, you can apply to clothes and household items: interesting details, youthful and feminine accents, and personalized ef fects.
Smocking Les smocks Smocking is a youthful decorative detail that is particularly charming when used for a yoke, insert or band on baby clothes, little girls’ dresses, or lingerie. Utilisés pour les empiècements, ou en bandes incrustées pour agrémenter des robes ou de la lingerie, les smocks sont très décoratifs. When worked by hand, smocking is a time-consuming process.
6. Buttonholes 6. Boutonnières 6. Ojales Buttonholes Les boutonnières Ojales Your new machine comes complete with a built-in four-step buttonhole system. Before sewing on your garment, always make a test buttonhole duplicating the number of thicknesses of fabric and interfacing, if appropriate. Votre nouvelle machine Incorpore un système pour réaliser des boutonnières en quatre étapes.
2. Mark a position guideHne for each buttonhole^ Horizontal buttonholes A are placed to extend 3 mm (1/8 inch) beyond the centre line B of the garment, as shown, so that the buttons will be in the centre of the figure when the garment is fastened. Horizontal buttonhole guidelines should follow a crosswise fabric thread. • Mark the horizontal buttonhole guide line for each buttonhole. It should be longer than the finished ler^gth of the buttonhole.
Four-Step Buttonholing • Pattern Selector: As iHustrated » Stitch Width: S-5 to suit fabric « Stitch Length: F to 3 » General Purpose Needle Rate « Buttonhole Foot Boutonnières en quatre étapes Sélecteur de point: comme Illustré ^ Largeur du point: 3-5 selon le tissu « Longueur du point: F à 3 « Plaque à aiguille tout usage » Pied pour boutonnières Preparation ♦ Attach buttonhole foot to the machine. Refer to page 7 for additional infor mation on changing presser feet. 1 . Raise presser foot lifter.
Four-Step Buttonholing Procedure Boutonnières en quatre étapes step A: Bar Tack Turn pattern selector to AC, With button hole foot properly positioned, as described on the previous page, position needle in fabric at point 1 . Take at least four stitches ending at point 2 . Étape A: Bride d*arrêt Tournez le cadran de points sur AC. Avec le pied pour boutonnières convenablement positionné, tel que décrit sur la page précédente, situez raiguille dans le tissu à Vendrolt 1.
7. Twin-Needle Stitching ::::r:.::::::::.:::.::::::xJ, ^3 COUtUfe à aîgUlIfeS jUìtieléeS Z.::::.:::::.:.:::::::::::::::::::::::::::::.:::::::::::: J , COStUfa COn agUjaS O agUjaS geiîielaS The twin-needle simultaneously pro duces two parallel, closely spaced lines of decorative stitching. You can stitch with either one or two colours of thread. A twin-needle, No. 2024, is supplied with your sewing machine accessories. Extra twin-needles may be purchaed separately at your local Sewing Centre.
8. Free-Arm Sewing Fabric hardening, when sewing tubular and hard to reach garment areas, is simplified when you convert your sewing machine to free-arm sewing. Some of the sewing jobs for which you will find the tree-arm particularly useful are shown below. You will discover many more for yourself. Preparation • To convert machine to free-arm sewing, simply lift the extension bed up and slide the extension bed off the machine, as illustrated.
9. Performance Checklist 9. Solution des pannes communes 9. Lista de comprobación del funcionamiento W^tenever sewjng difficulty í$ encountered, review the sections of the instruction hook that explain the operator! you are performing to make sure you are using the machine correctly. If the proOiem still exists, the following checklist may help you to correct 5Í. If you still have difficulties, call your nearest Sewing Centre. What To Do It NeecSe Breaks Make sure,..
10. Caring for Your Machine 10. Cleaning Machine and Oiling Yoor CAUTION: Before cleaning your machine, disconnect power line plug from your socket outlet Periodically, depending on usage, clean and Oil your machine as follows, using one drop of oil on areas indicated. • Top Irslerior Areas To clean and oil top of machine, remove top cover. Using a large screwdriver, remove screws A and B. Periodically, apply a drop of oil only to areas indicated, after cleaning.
Removing the Bobbin Case Commerît retirer ia boîte Cómo sacar la caja de ia bobina CAUTION: Before removirrg bobbin case, disconryect the power-fine plug from the socket outlet à canette PRECAUCION: Antes de sacar fa caja de ia AVERTISSEMENT: Avant de retirer la boîte bobma, desconecte ef enchufe de fa linea à canette, débranchez la fiche de la prise de eléctrica de tomacorr/ente, courant • Sujetador caja de bobina ♦ Bobbin Case Holder « Couvre-bolîe à canette Para limpiar y lubricar el sujetador To c
CAUTION: Before cleaning your machine, disconnect power line plug from your socket outlet. Iriterior Feed Area — 3015 To clean and oil Inside feed area, remove coven Using a large screwdriver, remove screws A and B. Periodically apply a drop of oil only to areas indicated after clean ing. Interior Feed Area — 3005 To clean and oil feed area, tilt machine on its side, and periodically apply a drop of oil only to indicated areas.
Changing the Light Bulb CAUTION: Before changing light bufò make sure you have disconnected pov/er-line plug from socket outlet This machine is designed to use a 15watt maximum bufò only. for U.S. and Canada— Commeni changer rampoule éléctrique ÂVERTISSEIWIENT: Avant de remplacer iampoule éléctrique, assurez-vous que la fiche soit débranchée de la prise de courant ex térieure. Cette machine ne s'adapte qu'à une am poule 15 watts seulement » Remove face plate (see page 59).
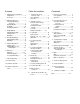
Index Index Indice Accessories ........................................ 6 Appliqué ............................................. 36 Backtacking ........................................29 Blindstitch Hems ................................43 Bobbin ..................................... 6, 23. 24 Raising Thread ............................... 27 Removing the Bobbin Case ............24 Replacing the Bobbin Case . . . . . . 25 Tension .......................................... 26 Threading the Bobbin Case.....
Parts Number 119636-001 (191081-011) 84 Printed in Taiwan