ti
CONTENTS Page Glossary of Sewing Terms Glossary of Sewing Machine Features Machine Identification Accessories Detaching Extension Table Connecting Foot Control Changing Presser Foot Changing Needle Bobbin Winding Inserting Bobbin Adjusting Lower Tension Upper Threading Drawing Up Lower Thread Adjusting Pressure on Fabric Adjusting Upper & Lower Tensions Fabric, Needle & Thread Table Setting the Stitch Length Presser Foot Lifter Cloth Guide Basting Staystitching Zigzag Stitching Edge Finishing Interfacing Da
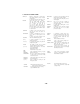
1. GLOSSARY OF SEWING TERMS APPLIQUE Applying * material with a specific design onto another material by using a straight or zig zag stitch. BASTING To sew with a tennporary stitch that can be removed with easa. Tt» is possiblt using the lot^Mt straight stitch, setting your «3P ter«k»t on "0" and sevwr^ a line of stitches. The stitch vM be loose and the bottom stitch tight; ih« allows you to be able to remove the lower thread by puIBng.
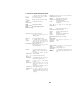
2. GLOSSARY OF SEWING MACHINE FEATURES BOX/TRAY storaga of extra feet, neecfl«». bobbins and acoK»ortes. Also uutd as extension of »tn fo” a lai^ woHt surface. lower ten Baiances uppw and lower teiosion threads- accessory sion SPRING REVERSE for changing from forward to reverse SEWING BUTTON dlrectiiHt, button must be i»eid In for ^ comincMto raverM sawing. SOCKET To adKis* teruucm of bobt^ csee. BOBBIN TENSION SCREW Located under the face cowu to change toe IHjht bulb.
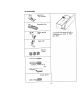
jot Machíne identification 77 /<5 1. Spool pin 2. Bobbin winder 3. Bobbin winder stop 4. Stop motion knob 5. Hand wheel 6. Stitch length knob 7. Reverse stitch button 8. Connector 9. Stitch pattern knob 10. Base plate 11. Thread guide 12. Thread take-up 13. Thread guide 14. Top tension 15. Bed cover 16. Extension plate guide 17. Handle 18. Faceplate 19. Set screw for face plate 20. Presser foot lifter 21. Needle plate 22. Feed dogs 23. Needle clamp 24. Needle 25. Presser foot holder screw 26.
ACCESSORIES
BEFORE SEWING Machine is stored in flat-bed style which makes your work easier in ordinary sewing. Detaching Extension Table Pick up and slide it off and the machine is used as a free-arm model. Free-arm is convenient to sew or embroider ; trousers, sleeves, cuffs of T-shirts, blouses, etc. Do vice-versa of above steps to attach extension table. To open lid of accesory box, lift it open, as illustrated.
Connecting Foot Controller and Power Cord Connect foot power cord ® controller and Before plugging in your machine, be sure that voltage is same as that of your machine, (written on a plate at back of machine) ^ Specifications vary from country to country. Always unplug machine when not in use. The more you press foot controller, the faster the machine runs. WARNING; THE FOOT CONTROLLER, FOR WHICH ATTACHED ON THE SEWING MACHINE MODEL 221N, IS DESIGNATED FOR SEWING MACHINE MODEL 221N ONLY.
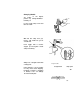
Changing Foot . Raise presser foot lifter ©. Set needle in the highest position by turning handwheel towards you (2). Remove foot by loosening screw with screwdriver. Replace new foot and tighten screw.
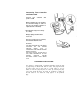
Changing Needle Set needle in the highest position by turning handwheel towards you. Loosen needle clamp screw and take out needle. With flat face away from you, insert a new needle into groove of needle bar. Push needle until it reaches stopper (D and tighten needle clamp screw firmly. Always use a straight needle with a sharp point. Using defective or worn needles not only causes stitch skipping, breakage of needles or snapping of thread; it also can damage hook and needle plate.
Bobbin Winding Set needle in ths position by turning towards you. i highest handwheel Open shuttle cover. Open latch of bobbin case and take it out. .. . Close latch of bobbin case and bobbin comes out easily.
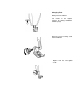
Push back to fold handle. Pull out spoolpin. Put a spool on spoolpin. Draw thread from spoolpin through pretension device, following numbers © ® Wind thread clockwise around bobbin several times. Push bobbin on to spindle. Holding handwheel with your left hand disengage handwheel by unscrewing stop motion knob.
Push bobbin to right and press down foot controller. Machine stops automatically when winding is full. Push bobbin to left. Take off bobbin from spindle and cut thread. Retighten stop motion knob. trouble m If bobbin is wound unevenly as shown, remove top cover and loosen set-screw of the guide for bobbin winding, by using screw driver and adjust height.
Inserting Bobbin Place bobbin in its case with thread running in direction o arrow. Guide thread into slot ® bobbin case. Pulling thread to left.
Adjusting Lower Tension To test bobbin tension, hsng and shake bobbin case as shewn. At proper tension bobbin case will gradually drop a small amount. To adjust tension, turn adjusting screw with small screwdriver. Raise needle in the highest position. Leave end of thread of about 10 cm (4") from bobbin case. Take hold of latch and push bobbin case into hook.
1. Turn the hand wheel toward ; you to raise the take-up lever UPPER THREADING to its highest position. 2. Place a spool of thread on the spool pin. 3. Lead the thread through the top thread guides. . 4. Down and between the tension discs, from right to left. 5. Draw the thread up through the chedc-spring and with a slig t tug into the hook. 6. Up and through the eye of takeup level from right to left. 7 Lead thread down through the ■ thread guide at the bottom of the threading tlot.
Drawing Up Lower Thread Hold end of upper thread with left hand. Turn handwheel slowly towards you until needle moves down and up again. Pull upper thread slowly and lower thread will be brought up in a loop. Pull out both threads to about 15 cm {6”) and place them together under presser foot on left.
adjusting pressure on fabric • GENERAL SEWING Usually for normal sewing, except for sewing on very heavy and bulky fabrics and very stretchy knit fabrics of medium and very light weight, the center pin !B) of the pressure control be at its lower position. For exceptional fabrics, refer to below table. To redura half the pressure, press the outer ring (A) of the pressure control, then press the center pin (B) down again to halfway short.
CONTROLS: ADJUSTING THREAD TENSIONS STRAIGHT STITCH: GREEN AREA Always adjust the upper thread tension with the presser foot down, as the tension is released when it is raised. To increase the tension on the upper thread, turn tension control to the right. To decrease, turn to the left. Before adjusting the tension be sure that the machine is threaded properly.
Fabric,Thread and Needle Table fJEEDLE 1 1 THREAD FABRIC Cotton Cotton Cotton Covered Polyester, Silk, Nylon 70 60 50-70 60 European Mercerized VERY SHEER; Lace, Voile, Chiffon, Net ¡SHEER; Blouse Crepe, Lawn, Organdy, Taffeta LIGHT-WEIGHT; Crepe, Wool, Brocade, Velvet 30 1 50 I MEDIUM; Wool, Silk, Linen, Velvetten, Pique, ¡Faille, Terrycloth 30 50 HEAVY; Denim. Duck, I Sailcloth 30 EXTRA HEAVY; I Upholstery, Canvas, 30 ¡ Heavy ¡ Duty ¡ Heavy ¡ Duty European L.S.
STRAIGHT STITCH: The normal stitch length for most fabrics is between 2-4 but the length chosen should depend on the fabric and area of usage. Usually, heavier fabrics require longer stitches, and lighter weight fabrics require shorter stitches. For curved seams and bias cut areas use a shorter stitch length. Be sure to set the stitch width control at "o" line. SETTING THE STITCH LENGTH The length of the stitch is regulated by the stitch length control dial.
Place fabric under foot about 1 cm (0.4") inside the edge. Lower presser foot lifter. Presser Foot Lifter In order to obtain wider gap when using very thick materials, firmly push presser foot lifter up as far as it will go. To reinforce seam, sew back wards to the edge of fabric by pushing down reverse sewing button. Release button -and commence forward sewing guiding fabric by hand as it is fed. Never pull material.
Cloth Guide Use cloth guide when sewing a long seam of regular distance from edge of material. Set guide in hole on arm, at right of needle plate, and adjust distance. Run machine with edge of fabric touching guide. . Position cloth ^uide at an angle to sew a curved seam. Sew. reverse stitches for rein forcement at end of seam. Draw fabric to left when sewing is finished. Cut threads with thread cutter, behind presser bar.
Basting Machine basting is very useful for joining seams for trial fittings, mark ing construction guide lines, and basting pleats and hems. Use tangest stitch possible, setting stitch length at S. Loosen tension on upper thread. Choose thread color to contrast with your fabric so it can be easily seen. Basting stitches can be removed easily by clipping upper thread, then pulling out lower thread.
ZIG-ZAG STITCHING Machine Setting Foot Pattern Dial Tension Stitch Length ------ S. c 0 Be sure to use zig-zag foot. You can make any number of combi nations by adjusting stitch width and stitch length. Both knobs can be turned while machine is running. However, if machine is not running, raise needle to its highest position before adjusting stitch width knob. Tension on upper thread usually needs to be loosened. The wider the zig-zag, the tooser the tension.
Edp Finishing Use to finish hem edges and facing edges to prevent ravelir^and to elimi nate bulk of turned-in edges. For firm fabrics, stitch along edge of hem or facing. For loosely woven or soft fabrics, stitch about ’/4" from edge, then trim fabric close to stitching. Interfacing Darts Use to reduce bulk when stitching a dart In interfacing fabrics. Cut down center of dart to point; owriap cut edges matching dart lines. Zig-zag along dart line from wide end of dart through point.
STRETCH STITCHING . When sewing knitted or st seam to stretch along otrh fabrics use a stretch stitch which allows the • breaking the thread. Select ^^g/^hread which has an extra amount of ,r ^ especially on lightweight knits. STRETCH STRAIGHT STITCH ni strength. Use for stitching regular seams in knits and stretch fabrics. In woven fabrics, use for stitchirig seams that receive a lot of strain when worn such as side seams, aotch seams, and armholes in sportswear and in children's clothes.
RICKRACK STRETCH STITCH Machine Setting É sible, looking the same on both the right and wrong sides. It can be used as a heavy-duty all purpose stretch stitch. Each zig-zag stitch œnsists of three threads or stitches, giving strength and perma nence. Width of the zig-zag can be adjusted from narrow to wide. Use to overcast edges of seams, facings and hems to prevent raveling and to keep light weight knits from rolling. Also suitable for overcasting heavy fabrics such as woolens anci terrycloth.
decorative stitching A 9-“, variety of d^r« "»lt“te-top etching, i^rderr 3„d trims, monograms, app.iooes ami smbroidery. TOP STITCHING You can accent lines of a garment with one or more rows of topstitching, along collars, lapels, yokes, facing edges, pockets, cuffs, seams and hems. . • Use straight stitch for a more tailored look, sewing with button hole twist for added emphasis.
Seaming Knits The narrow zigzag can be used in seams of firm knits for added strength. After sewing, open seam and press flat. Tinyzigzag stitches can hardly be seen and the seam will give when stretched. G athering Over Cord Ordinary gathering with a basting stitch often breaks while pulling in fullness. A small zigzag across a cord such as crochet thread or carpet thread, gives a much stronger cord for gathering fullness into fabrics.
MAKING BUTTONHOLES Determine Length marking Measure diameter and thickness of button and add 0.3cm (1/8 ) for bar tacks. Mark buttonhole size on material. Determine Width Determine width according to diameter of button, its thickness, and kind of material. Attach buttonhole foot. Completely push back sliding part @ of buttonhole foot. Place material under foot so that marking of buttonhole passes through center of foot and arrow (g) of foot indicates beginning line of marking.
MAKING BUTTONHOLES First, mark the beginning and end of the buttonhole on fabric with a basting line or tailor's chalk. Make one on scrap fabric (following directions below) to be sure machine adjustments are correct 1. Replace presser foot with buttonhole foot which is grooved to prevent piling up of thread. Push sliding buttonhole foot guide to the rear. 2. Set stitch width at 2 and stitch length knob near 0. 3. Lower needle carefully into the mark on fabric indicating the beginning of buttonhole.
Cutting Buttonholes Stick a needle through bar tacks fo prevent over-cutting. Cut buttonhole along centre with buttonhole cutter. s ' .1 Corded Buttonholes F„, switch febdcs such « knfe a corded buttonhole is effecti keep hP'kbed buttoPhPle Hook filler cord on top spur and teed ends of cord under foot PU^ ,aot. and nook them to bottom notches as shown. Proceed with stitching as for regular buttonholes.
SEWING ON BUTTONS Set stitch length at "0" Position a button and material under foot. When needle comes to left side of stitch, lower foot. Raise needle and adjust zigzag width so that needle comes to right hole of button. Run machine at medium speed and sew 5-6 zigzag stitches. Stop machine when needle is in upper position. @ Set zigzag width control to 0 and sew 3-4 stitches to prevent unstitching. OR O Draw out work and cut off threads. Draw thread ends through to wrong side and tie a knot.
STEP 1 BLIND НЕМ STITCH The blind hem stitch provides a durable iiem finish that is almost invisible on garments drapes, and curtains. It is done easily with straight or slightly curved hems. With a little practice it will be a very quick and easy hem application and the hem will never need re pairing. Procedure * (1) Prepare raw edge of hem in desired manner, such as overcast, 1/4 inch stitched under pinked, hem tape, or just plain. IStep 1) 12) Fold hem up desired length.
ZIPPER SEWING By using special zipper foot with sliding adjuster, zipper sewing can be easily done without turning fabric. Loosen screw @ and set foot so that needle comes into position (S). Tighten screw. Sew right side of zipper guiding fabric carefully so that right side teeth of zipper are parallel with left edge of foot. Re-set foot so that needle comes into position ©. Sew left side of zipper in the same way.
MENDING i^lWvvvvvw:^' Patching c “iC Place the patch over the worn > -> - > Sew along the edge of the patch on the right side. Trim away the worn part close to the seam on »-> >'> back side. V Mending a Rip Set machine in the same way as for patching. Sew the edges of tear together Then sew two more seams on either side. A piece of gauze can be placed underneath to reinforce the rip. -34- V V V V V V V V V .
Darning Set stitch length at "O' Stretch fabric over the hoop ® or sew with free arm® according to the part you are going to darn. Sew over the worn-out part with closely spaced, stiches guiding material back and forth by h.^nd.
LAPPED SEAM SEWING place one piece of fabric over another according to the width of stitch size. (a) For non-fray fabrics. (g) For easy to fray fabrics. Sew over folded area from right side.
APPLIQUE WORK Draw design on material to be used as an applique and cut it out. Place cut-out on base material and baste it. Sew around outline with zigzag stitch adjusting stitch length and width according to shape and size of cut-out and type of base material. To change direction at corners, or to sew very small circles, stop machine, positioning needle just away from edge of cut-out, lift presser foot and turn material. Lower presser foot and continue sewing.
EMBROIDERY Needle Thread No. 9 120-100 No. 1 1 100-80 No, 14 60-50 Set stitch length at "0” Remove foot, and holder screw. To avoid lower thread being pulled up, reduce upper thread tension. For good embroidery, it is important to use correct needles and thread. Use thin embroidery silk for upper thread and a thinner silk of same kind and color for lower thread. Trace your design on material and center it in embroidery hoop. Make sure material is taut.
MAINTENANCE Your machine requires regular cleaning and oiling for satis factory sewing performance. A machine which is used for a few hours a day needs to be cleaned and oiled once a month. Cleaning Remove foot and needle. Remove needle plate. Brush off all dust and lint on feed dog with cleaning brush. Turn latches outwards. Remove hook race cover. Remove hook. Clean hook race with a cleaning brush and a soft cloth.
Oiling Use oil manufactured specially for sewing machine use. Other oils will eventually cause mechanism to jam. Apply one drop of oil to part of hook where friction occurs. Open face cover and apply oil in the same way. Be careful not to apply too much oil or it may stain your material and cause some sewing difficulty. After oiling, run machine for 1-2 minutes to allow oil to penetrate to every part. Remove top cover by loosening screws @ and ® with large screwdriver.
TROUBLE CHART PROBABLE CAUSE PROBLEM Breaking lower thread Thread not wound evenly on the bobbin or not drawn up correctly Lower thread tension too tight Lint stuck in the bobbin case and inside the tension spring Skipping stitches Irregular stitches The material not fed correctly CORRECTION P.10, P.9 P.12 Remove lint and fluff with a cleaning brush Needle not fully inserted P. 7 Needle bent P. 7 Size or type of needle and thread not suitable for the material P.
Oiling Use oil manufactured specially for sewing machine use. Other oils will eventually cause mechanism to jam. Apply one drop of oil to part of hook where friction occurs. Open face cover and apply oil m the same way. Be careful not to apply too much oil or it may stain your material and cause some sewing difficulty. After oiling, run machine for 1-2 minutes to allow oil to penetrate to every part. Remove top cover by loosening screws ® and ® with large screwdriver.