
Operation Manual


7
DURING USE
• Always keep the cord away from moving parts of the tool;
direct the cord to the rear, away from the tool
• Operate the tool at a walking pace only (do not run)
• Keep proper footing on slopes
• Always ensure that the ventilation openings are kept clear
of debris
• Take a secure stance when working (do not overreach,
especially when using steps or a ladder)
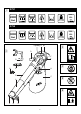
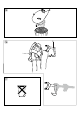
EXPLANATIONOFSYMBOLSONTOOL
3Readtheinstructionmanualbeforeuse
4Wearprotectiveglassesandhearingprotection
5Donotexposetooltorain
6Payattentiontotheriskofinjurycausedbyflying
debris (keep bystanders a safe distance away from work
area)
7 Switch o and disconnect plug before cleaning/
maintenance or if (extension) cord is damaged or
entangled
8 Double insulation (no earth wire required)
WHEN CONNECTING NEW 3-PIN PLUG (U.K. ONLY):
• Do not connect the blue (= neutral) or brown (= live) wire
in the cord of this tool to the earth terminal of the plug
• If for any reason the old plug is cut o the cord of this tool,
it must be disposed of safely and not left unattended
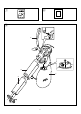
USE
• Assembly instructions 9
- ensure that tubes A and B, collection bag C and guide
handle D are assembled correctly and that shoulder
strap E is adjusted correctly before operating the tool
! firmlytightenallscrews,boltsandnuts
• Cord restraint 0
- hook the loop in the extension cord over restraint F as
illustrated
- pull tight to secure the extension cord
• On/o !
- switch on tool by pressing trigger switch G
- switch o tool by releasing trigger switch G
! beforeswitchingonthetool,ensurethatitisnot
incontactwithanyobject
! afterswitchingoffthetoolthemotorcontinuesto
runforafewseconds
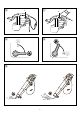
• Blowing @
- select blowing mode with switch H as illustrated (only
whentoolisswitchedoff)
- with wheel J the maximum speed can be adjusted
from low to high (1-7) (0795)
• Vacuuming/shredding #
- ensure that collection bag C 2 is attached to the tool
(for mounting see 2)
- select vacuuming mode with switch H as illustrated
(onlywhentoolisswitchedoff)
- with wheel J the maximum speed can be adjusted
from low to high (1-7) (0795)
! donotvacuumsolidobjectssuchasstones,
brokenglass,piecesofmetal
- do not vacuum liquids
- do not vacuum large volumes of leaf material at one
time thus avoiding clogging of the vacuuming opening
and blocking of the shredder impeller
- the shredding intensity depends on the size of the leaf
material and its residual moisture
! whenthetoolsuddenlystops,immediatelyswitch
itoff,disconnectplugfrompowersource,and
removeanyjammedmaterialbetweenshredder
impellerandhousing
- regularly empty collection bag C 2 (the vacuum
capacity decreases considerably when the collection
bag is full)
• Holding and guiding the tool $
! whileworking,alwaysholdthetoolatthe
grey-colouredgriparea(s)
- use supporting wheels K for easy guiding the tube
along the ground
- for optimal results keep a 5 - 10 cm distance to the
ground
• Emptying of collection bag %
! switchoffthetoolanddisconnecttheplug
- wait until the impeller comes to a standstill before
removing the collection bag from the tool
- open the zipper of the collection bag and empty it
completely
- compostic material does not belong with domestic
waste
MAINTENANCE / SERVICE
• This tool is not intended for professional use
• Always keep tool and cord clean (especially ventilation
slots L 2)
- clean the tool aftereachuse with a soft brush or a
cloth (do not use cleaning agents or solvents)
- remove the collection bag aftereachuse, turn it
inside out and brush it thoroughly
- after removing the collection bag, ensure that possible
dirt residues are removed from the released air outlet
area
• Storage ^
- securely mount storage rail R on the wall with 4 screws
(notsupplied) and horizontally leveled
- store the tool indoors in a dry and locked-up place,
out of reach of children
- do not cover the tool with plastic (plastic may cause
moisture with rust/corrosion as a result)
• If the tool should fail despite the care taken in
manufacturing and testing procedures, repair should be
carried out by an after-sales service centre for SKIL
power tools
- send the tool undismantled together with proof of
purchase to your dealer or the nearest SKIL service
station (addresses as well as the service diagram of
the tool are listed on www.skil.com)
TROUBLESHOOTING
• The following listing shows problem symptoms, possible
causes and corrective actions (if these do not identify
and correct the problem, contact your dealer or service
station)
! switchoffthetoolanddisconnecttheplugbefore
investigatingtheproblem
★ Tool does not operate
- no power supply -> check power supply (power cable,
circuit breakers, fuses)
- plug not connected -> connect plug