260W D260 BALANCE CHARGER / DISCHARGER / POWER SUPPLY Instruction Manual [Version 1.
Table of Contents Introduction 01 Special Features 03 Warning and Safety Notes 05 Program Flow Chart 08 Explanation of Buttons 09 Power and Battery Connection 10 Operating Program 12 Lithium Battery Program (LiPo/LiFe/LiIon/LiHV) 14 NiMH/NiCd Battery Program 17 Pb Lead-acid Battery Program 21 DC Power Supply 24 Battery Memory Set and Call Out 25 System Setting 27 Battery Voltage Meter 29 Battery Resistance Meter 30 Warning and Error Message 31 The Set Contains 32 Specificat
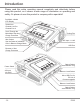
Introduction Congratulations on your choice of SKYRC D260 AC/DC Dual Balance Charger/ Discharger/Power Supply. This unit is simple to use, but the operation of a sophisticated automatic charger such as SKYRC D260 does require some knowledge on the part of the user. These operating instructions are designed to ensure that you quickly become familiar with its functions.
Introduction Please read this entire operating manual completely and attentively before using this product, as it covers a wide range of information on operating and safety.
Special Features Twin-channel Charger SKYRC D260 allows you to plug 2 batteries into one charger simultaneously, and it will intelligently and automatically charge 2 battries at once to their maximum capacity. To top of it, the batteries being charged do not even need to have the same configuration. You can connect different chemistry (LiPo/LiFe/Lilon/LiHV/NiMH/NiCd/Pb) batteries into any of the charging ports. NiMH LiPo Dual Input The input of the charger is AC 100-240V and DC 11-18V.
Special Features Balancing Individual Cells Battery During Discharging During the process of discharging, SKYRC D260 can monitor and balance each cell of the battery individually. Error message will be indicated and the process will be ended automatically if the voltage of any single one cell is abnormal. Fast Charge and Storage Mode of Lithium Battery Function of the two modes differs from each other.
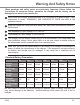
Warning And Safety Notes These warnings and safety notes are particularly important. Please follow the instructions for maximum safety; otherwise the charger and the battery can be damaged or at worst it can cause a fire. Never leave the charger unattended when it is connected to its power supply. If any malfunction is found, TERMINATE THE PROCESS AT ONCE and refer to the operation manual. Keep the charger well away from dust, damp, rain, heat, direct sunshine and vibration. Never drop it.
Warning And Safety Notes Never attempt to charge or discharge the following types of batteries. A battery pack which consists of different types of cells (including different manufacturers) A battery that is already fully charged or just slightly discharged. Non-rechargeable batteries (Explosion hazard). Batteries that require a different charge technique from NiCd, NiMH, LiPo or Gel cell (Pb, Lead acid). A faulty or damaged battery. A battery fitted with an integral charge circuit or a protection circuit.
Warning And Safety Notes Attention should be paid to the connection of lithium battery especially. Do not attempt to disassemble the battery pack arbitrarily. Please get highlighted that lithium battery packs can be wired in parallel and in series. In the parallel connection, the battery’s capacity is calculated by multiplying single battery capacity by the number of cells with total voltage stay the same. The voltages imbalance may cause fire or explosion .
Program Flow Chart Note: The flow chart is taking one channel for example as the flow chart for the two channels (Channel A and Channel B) are identical. INC DEC START LiPo BALANCE INC LiPo CHARGE INC LiPo FAST CHG INC LiPo STORAGE INC LiPo DISCHARGE BATT/PROGRAM 7.4V (2S) DEC 2.0A 7.4V (2S) DEC 2.0A 7.4V (2S) DEC 2.0A 7.4V (2S) 7.4V (2S) DEC 2.0A LiPo BATT ENTER 2.0A INC DEC START LiFe BALANCE BATT/PROGRAM 6.6V (2S) LiFe BATT ENTER 2.0A INC LiFe CHARGE INC DEC 2.0A DEC 2.0A 6.
Explanation of Buttons CH A/CH B: It is used to switch from Channel A to B or vice versa. BATT PROG / STOP Button: It is used to stop the progress or go back to previous step/screen DEC Button: It is used to go through the menus and decrease the parameter value INC Button: It is used to go through the menus and increase the parameter value ENTER / START Button: It is used to enter parameter, store parameter on screen and start the program.
Power and Battery Connection 1. Connecting to power source There are two kinds of inputs for SKYRC D260, DC 11-18V and AC 100-240V. AC 100-240V power source connection. XT60 12V DC Battery / DC power supply connection.
Power and Battery Connection Note: We will explain the operating procedure of one channel as the procedure for channel A and B is identical. 2. Connecting the battery TO AVOID SHORT CIRCUITS, ALWAYS CONNECT THE CHARGE LEADS TO THE CHARGER FIRST, AND THEN TO THE BATTERY. REVERSE THE WARNING! SEQUENCE WHEN DISCONNECTING THE PACK.
Operating Program Here is the detailed procedure to make the charger work. All the screens and operations will take Li-Po BALANCE CHARGE program for example, Note: We will explain the operating procedure of one channel as the procedure for channel A and B is identical.. 1. Connection 1). Connecting to power source There are two kinds of inputs for SKYRC D260, DC 11-18V and AC 100-240V. A. Operating in AC mode SKYRC D260 comes with built-in switching power supply.
Operating Program 3). Balance Socket The balance wire attached to the battery must be connected to the charger with the black wire aligned with the negative marking. Take care to maintain correct polarity! (See the wiring diagram below.) This diagram shows the correct way to connect your battery to the SKYRC D260 while charging. LiPo WARNING: To avoid short circuit between the charge lead always connect the charge cable to the charger first, then connect the battery.
Lithium Battery Program (LiPo/LiFe/Lilon/LiHV) (1) A memory profile is available for setting and storing pertinent information for up to 20 different program sets; each channel can store 10 program. Once a battery program is stored into memory, it will be retained until changed again manually. Recalling a program memory number makes the charger instantly ready to go! (2) If you do not wish to use the battery program memories, this charger can be manually set before each use.
Lithium Battery Program(LiPo/LiFe/Lilon/LiHV) BATTERY CHECK The charger is detecting the battery cell. WAIT... R shows the number of cells detected by the charger and S is the number of cells set by you on the previous screen. If the two numbers are not identical, press STOP to go back to the previous screen to recheck the number of cells of the battery pack that you set before going ahead.
Lithium Battery Program (LiPo/LiFe/Lilon/LiHV) VARIOUS INFORMATION DURING THE PROCESS Press INC or DEC during the charging or discharging process to view further pertinent information on the LCD screen. LP3S 1.5A 12.14V BAL 000:50 00022 Real-time status: battery type, battery cell count, charge current, battery pack total voltage,working mode, elapsed time and charged capacity. INC 4.07 4.06 4.11 V 0.00 0.00 0.00 V Voltage of each cell in the battery pack when the battery is connected with balance lead.
NiMH/NiCd Battery Program NiMH/NiCd: This program is only suitable for charging/discharging NiMH/NiCd batteries. The D260 offers the following NiMH/NiCd charge modes: Charge, Auto Charge, Discharge, Re-Peak and Cycle. Selecting the Battery Type: After powering on the D260, press the INC or DEC button repeatedly until you reach the appropriate program for the battery type you wish to charge. For this example we have chosen the “NiMH BATT“ or “NiCd BATT” program.
NiMH/NiCd Battery Program NiMH Auto CHARGE CURRENT 1.3A START/ENTER After selecting the correct battery type, use the INC or DEC button to change the charge mode to the “Auto CHARGE” setting. Press the START button and the amp rate value will begin flashing. Use the INC or DEC button to adjust the value to the desired rate. Follow the instructions provided on your battery when setting the upper charge amperage rate. Press and hold the START button for 3 seconds to start charging. NiMH 1.3A 5.
NiMH/NiCd Battery Program [ TIME: 00:04:04 ] 9.6V 00640mAh When discharging is complete, the screen will read “END: CUTOFF-VOL” and the charger will emit a ringing sound. The charger will display the elapsed time, end voltage and the discharged capacity in mAh. You can press the STOP button at any time during the discharging process to stop the discharge process.
NiMH/NiCd Battery Program NiMH/NiCd Cycle Mode: The D260 makes cycling of NiMH/NiCd batteries easy. The process of discharging and recharging (cycling) can be performed automatically with one simple step and will improve the performance of NiMH/NiCd batteries. We strongly recommend cycling any battery that has been discharged and stored for a period of time. This will increase the remaining usable battery life and also improve the battery performance.
Pb Lead-Acid Battery Program Additional NiMH/NiCd Process Information: During the NiMH/NiCd battery charging/discharging process the D260 can display a variety of information. Using the INC or DEC buttons, you can also view the following information: NIMH SENSITIVITY D.PEAK 4MV/CELL Int. Temp 37 C SAFETY TIMER ON 200MIN Delta peak voltage Sensitivity setting IN POWER VOLTAGE 12.
Pb Lead-Acid Battery Program Pb NORMAL CHG 1.5A 12.0V(6P) P-6 1.5A 13.56V CHG 002:22 00106 Press the START button again and the nominal battery pack voltage will begin flashing. Use the INC or DEC button to set the voltage and the number of cells. Press and hold the START button for 3 seconds to start charging. Once charging has commenced, the charger will display the following real-time information: battery type, charging current, battery voltage, working mode, elapsed time and charged capacity.
Pb Lead-Acid Battery Program P-6 1.5A 13.56V CHG 002:22 00106 Once charging has commenced, the charger will display the following real-time information: battery type, charging current, battery voltage, working mode, elapsed time and charged capacity. When charging is complete, the screen will read “FINISHED” and the charger will emit a ringing sound. Pb Discharge Mode: After selecting the correct battery type, use the INC or DEC buttons to change it to the “DISCHARGE“ mode.
DC Power Supply To use D260 as a power supply, it is optional for the user to connect it to either AC power source or DC power source. Once the D260 is connected to power source, switch the button to turn on, then the user is free to use the power supply. Output voltage and current are selectable, with voltage at 5.0-25.0V and current at 0.1-14.0A. The user can set appropriate voltage and current based on actual practice.
Battery Memory Set and Call Out The charger can store up to 20 different charge/discharge profiles(each channel 10 sets) for your convenience, and the stored profiles can be recalled quickly without having to go through the setup process. When you are willing to alter the parameter value in the program, press START/ENTER to make it blink then change the value with INC or DEC. The value will be stored by pressing START/ENTER once. Note: All following screen are taking 6S(22.2V) LiPo battery for example. 1.
Battery Memory Set and Call Out SAVE PROGRAM SAVE . [ BATT MEMORY 1 ] L i P o 2 2 . 2 V ( 6 S ) Indicate the battery type and battery cell of the saved profile. 2. Battery Memory Call Out [ BATT MEMORY 1 ] C:5.0A D:2.0A Press the DEC/INC to select memory number. DEC INC [ BATT MEMORY 1 ] C:5.0A D:2.0A e.g. Select memory 1 Press and hold the START/ENTER for 2 seconds to call out the memory. START/ENTER >2 Seconds LiPo BALANCE CHG 5.0A 22.
System Setting It will be operated with the default value of the essential user settings when it is powered on for the first time.The screen displays the following information in sequence and the user can change the value of parameter on each screen. When you are willing to alter the parameter value in the program, press START/ENTER to make it blink then change the value with INC or DEC. The value will be stored by pressing START/ENTER once. ITEM POWER SET U=0.0V I=0.
System Setting SELECTION ITEM REST TIME CHG>DCHG 10MIN 1-60Min A rest time allowing the battery to cool down between charging/discharging cycle. Default: 4mV/Cell 3-15mV/Cell This program is for NiMH/NiCd battery only. When the charger detects the delta peak value reaches the value you set, the charger will say the battery is fully charged. OFF/ON The beep sounds at every time touching the buttons to confirm your action.
Battery Voltage Meter The user can check battery's total voltage, the highest voltage, the lowest voltage and each cell's voltage. Please connect the battery to the charger main battery lead to battery socket and balance wires to balance socket. This diagram shows the correct way to connect your battery to check the voltage. BATT/PROGRAM BATT METER A 4.16 4.15 4.17V 4.15 4.16 4.15V B 4.16 4.15 4.17V 4.15 4.16 4.15V Press the START/ENTER to enter the Lithium Battery Meter program. START ENTER 4.
Battery Resistance Meter The user can check battery's total resistance, the highest resistance, the lowest resistance and each cell's resistance. Please connect the battery to the charger main battery lead to battery socket and balance wires to balance socket. This diagram shows the correct way to connect your battery to check the resistance.
Warning and Error Message In case of an error the screen will display the cause of error and emit an audible sound. Incorrect polarity connected. The battery is interrupted. CONNECT ERROR CHECK MAIN PORT The battery connection is wrong. DC IN TOO LOW Input voltage less than 11V. DC IN TOO HIGH Input voltage higher than 18V. CELL ERROR LOW VOLTAGE Voltage of one cell in the battery pack is too low. CELL ERROR HIGH VOLTAGE Voltage of one cell in the battery pack is too high.
The Set Contains 1. SKYRC D260 Charger 2. Charging Cable X 2 3. Power Cord 4. Instruction Manual 1 260W D260 BALANCE CHARGER / DISCHARGER /POWER SUPPLY Instruction Manual [Version 1.
Specification DC Input Voltage : 11-18V AC Input Voltage: 100-240V Display Type: 128x64 LCD Display Backlight: Cool White Case Material: Metal & Plastic Controls: Five Buttons Case Size: 160x150x71mm Weight: 896g DC Power Supply Output: 130W Per Channel PC Communications: USB Port for Firmware Upgrade External Port: 2-6S Balance Socket-XH, Micro USB Port for Firmware Upgrade, Battery Socket, AC/DC Input, DC Output, 5V-2.1A USB Output.
Regulatory Information SkyRC D260 complies with all relevant and mandatory EC directives and FCC Part 15 Subpart B.
Regulatory Information FCC Note: This device complies with Part 15 of the FCC rules. Operation is subject to the following two conditions: (1) this device may not cause harmful interference, and (2) this device must accept any interference received, including interference that may cause undesired operation. The manufacturer is not responsible for any radio or TV interference caused by unauthorized modifications or change to this equipment.
Commonly Used Terms Commonly used terms Final charge voltage: the voltage at which the battery's charge limit (capacity limit) is reached. The charge process switches from a high current to a low maintenance rate (trickle charge) at this point. From this point on further high current charging would cause overheating and eventual terminal damage to the pack. Final discharge voltage: the voltage at which the battery's discharge limit is reached.
Warranty And Service Liability exclusion This charger is designed and approved exclusively for use with the types of battery stated in this Instruction Manual. SkyRC accepts no liability of any kind if the charger is used for any purpose other than that stated. We are unable to ensure that you follow the instructions supplied with the charger, and we have no control over the methods you employ for using, operating and maintaining the device.
This content is subject to change. Latest version can be downloaded from www.skyrc.com If you have any question about this document, please contact SkyRC by sending a message to info@skyrc.cn All Rights Reserved. RoHS All specifications and figures are subject to change without notice. Printed in China 2019.