
Installation Manual

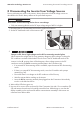

8 Disconnecting the Inverter from Voltage Sources
Prior to performing any work on the inverter, always disconnect it from all voltage sources as
described in this section. Always adhere to the prescribed sequence.
Destruction of the measuring device due to overvoltage
• Only use measuring devices with a DC input voltage range of 600V or higher.
1. Disconnect the AC circuit breaker and secure it against reconnection.
2. Set the DC load-break switch of the inverter to O
.
3.
Danger to life due to high voltages on the DC-in connecting terminal plate
When exposed to sunlight, the PV array generates dangerous direct voltage. Touching the
DC conductors can lead to lethal electric shocks. Even if the DC load-break switch of the
inverter is in the O, position, there will be dangerous direct voltage present in the DC
conductors and on the DC-in connecting terminal plate in the Connection Unit.
• If an external DC disconnecting switch is available, open the external DC disconnecting
switch.
• If there is no external DC disconnecting switch, cover the PV modules with opaque
material (e.g. foil).
• Ensure that there is no voltage on the DC conductors of the PV array.
• Wait five minutes before working on the inverter.
• Leave the DC-in connecting terminal plate plugged into the Connection Unit and only
touch it on the black enclosure.
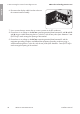
4. Wait until the LEDs have gone out.
5. Unscrew all six screws of the enclosure lid of the Connection Unit with a Torx screwdriver (TX
25) and remove the enclosure lid carefully toward the front. While doing so, note that the
display assembly on the enclosure lid and the communication assembly in the inverter are
connected via a ribbon cable.
8 Disconnecting the Inverter from Voltage Sources
SMA Solar Technology America LLC
Installation manual 57SB5.0-6.0-1SP-US-40-IA-xx-10
ENGLISH