
Installation Guide

existing vinyl oors, as they may contain asbestos.
INSTALLATION TOOLS
For all installation methods:
Tape measure Pencil Chalk Line Crosscut Power Saw 3M Scotch Blue™ 2080 Tape
¼” Spacers Hammer Tapping Block Pull Bar
Acceptable suboor types:
CDX Underlayment Grade Plywood (at least ½” thick) Underlayment Grade Particleboard
OSB (at least ¾” thick) Concrete Slab Existing Wood or Laminate Floor
Ceramic Tile Resilient Tile Sheet Vinyl
STARTING YOUR INSTALLATION
Because houses and buildings, as well as adjacent hardwood or laminate oors, expand and contract, Natural Floors
recommends leaving a ¼” expansion gap between the perimeter walls and any adjacent hardwood oor.
Work from several open boxes of ooring and “dry lay” the oor before permanently laying the oor. This will allow
you to select varying textures, colors, and sheens, and to arrange them in a harmonious pattern. Remember, it is the
installers’ responsibility to determine the expectations of what the nished oor will look like with the end user rst and
then to cull out pieces that do not meet those expectations.
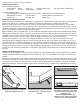
Begin installation next to an outside wall. This is usually the straightest and best reference for establishing a straight
working line. Establish this line by measuring an equal distance from the wall at both ends and snapping a chalk line.
The distance you measure from the wall should be the width of a plank or tile. You may need to scribe cut the rst row
of planks or tiles to match the wall in order to make a straight working line if the wall is out of straight.
You may want to position a few rows before starting installation to conrm your layout decision and working line.
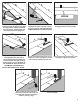
When laying ooring, stagger end joints from row to row by at least 8” (20 cm) for planks, and equal to 12” (51 cm or
a half piece) for tiles. For plank installations, you can use the cut-off end to begin the next row when cutting the last
plank in a row to t. If cut-off end is less than 8”, discard it and instead cut a new plank at a random length (at least 8”
in length) and use it to start the next row. For tile installations, always begin a row with either a full tile or a half tile so
that the joints are consistently staggered in a “brick work” type pattern. Always begin each row from the same side of
the room.
INSTALLATION INSTRUCTIONS
Inspection: Prior to installation, inspect material in daylight for visible faults/damage. Check if suboor/site conditions
comply with the specications described in these instructions. If you are not satised, do not install, and contact your
supplier.
Before laying: Measure the room at right angle to the direction of the ooring. For the best visual effect, planks or tiles
in the nal row should be at least at least 1/3 the width of the plank or tile. For this purpose, planks or tiles in the rst
row can be cut to smaller size. Shufe boards in order to obtain a pleasant blend of shades. Lay boards, preferably
following the direction of the main source of light. We recommend laying on wooden oors crossways to the existing
oorboards.
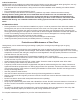
Step 1: Begin installation working from
left to right. Insert spacers at ends and
edges where planks meet wall.
Step 2: Lock short end of plank by
inserting tongue into groove at an angle
and drop in place. Continue to end of
rst row.
Step 3: Use leftover plank from rst row
as starter for second row. There must
be at least 8” between plank end joints
on adjacent rows.
FOR TILE INSTALLATIONS: The
distance between end joints should be
equal to 12” for proper appearance.
2