
Installation Instructions
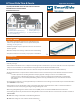


TRIM & FASCIA 190, 440, 540 & 2000 SERIES
INSTALLATION
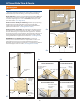
• Trim must extend beyond the face of the siding. Trim may be
installed directly to the sheathing, or directly over the siding.
Horizontal trim: properly integrate ashing with siding, WRB and
vertical trim. At corners, allow the end of the trim to overlap the
end of the adjoining trim. Leave a 3/16 inch (5 mm) space and
seal with sealant. (See diagram 6a)
Vertical corners directly to sheathing: allow for proper spacing
between the trim edge and siding. Corner trim edge may
lightly touch adjacent trim edge. Follow siding manufacturer’s
application instructions. (See diagrams 6b and 6c)
Vertical corners over siding: the width of the trim must overlap
the siding by a minimum of 2 inches (51 mm). Sealant between
the trim and siding is not required for this application. Allow for
proper spacing at the corner between perpendicular siding pieces.
Corner trim edge may lightly touch adjacent trim edge. Follow
siding manufacturer’s application instructions. (See diagram 6d)
OPTIONAL Pre-assembled vertical corners: cut vertical
corner pieces to size with clearance requirements in mind. Set
perpendicular corner pieces and pre-drill fastening holes a
minimum of every 24 inches (610 mm) o.c. Fasten into pre-drilled
holes with proper nails or screws. (See diagrams 6e and 6f)
GENERAL REQUIREMENTS (CONTINUED)
6a
6b
6f
3/16” with
sealant
Nail into
framing
Min. 3/16” gap
Trim must extend
beyond face
of siding
PREFERRED
INSIDE CORNER DETAIL
Corners
WRB ap or
ashing tape
Z-ashing with
3/8” space
Sheathing
Framing
WRB
Nail into
pre-drilled
holes
Sheathing
Framing
WRB
Remaining
nails into
framing
Pre-Assembled
Vertical Corners
Fasteners in
pre-drilled
holes
24 “ max.
Pre-drilled
holes
6e
Min. 3/16” gap
Min. 2”
overlap
ALTERNATE
INSIDE CORNER DETAIL
Min. 3/16” gap
Trim must extend
beyond face
of siding
PREFERRED
OUTSIDE CORNER DETAIL
Space siding
3/16” from
corner of wall
Min. 2”
overlap
ALTERNATE
OUTSIDE CORNER DETAIL
6c 6d
LP SmartSide Trim & Fascia
6