
Installation Instructions


TRIM & FASCIA 190, 440, 540 & 2000 SERIES
INSTALLATION
• Trim may be installed as fascia, without sub-fascia, if it is 440
Series or larger and the following specications are met:
- Trim and Fascia must be greater than 5 inches
(127 mm) wide.
- Maximum roof truss or rafter spacing of 24 inches
(610 mm) o.c.
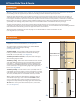
• If trim is installed directly to outlookers on an overhanging rake,
the outlookers must be installed edgewise and must be spaced
no wider than 24 inches (610 mm) o.c. (See diagram 9d)
• 190 Series trim and fascia products MUST BE supported with
solid wood sub-fascia.
• Trim and Fascia are not designed for structural applications and
cannot be used in the structural design of a roof assembly.
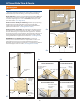
• Exposed ying or suspended barge, rake or fascia tails are not
covered under the LP SmartSide trim limited warranty if trim
is extended beyond the protection of the roof system. If LP
SmartSide trim is extended beyond the protection of the roof
system, cap the top of the trim with a metal coping that is
integrated with the roong system. (See diagram 9a)
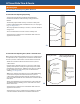
• Install drip-edge to prevent water buildup behind fascia and
trim. (See diagrams 2c and 9b)
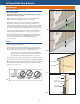
AT CORNERS: (See diagram 9c)
• All joints must be supported by framing.
• Do not nail from the face of one trim member into the edge of
another.
• Do not miter cut the corner joint.
GENERAL REQUIREMENTS (CONTINUED)
9a
9b
3/16” space
with sealant
Fascia and Rake Boards
Sot
Drip-edge
9c
Metal
Coping
1” Gutter
Clearance
9d
Fascia
Trim
Trim Board
Trim Board
2 x 6
Blocking
Rafter
3/16” space
with sealant
Barge Rafter
Ridge
First Common
Rafter
End or
Verge Rafter
2x or 4x Outlookers
Fascia
A ladder of outlookers
the same dimension as
rafters at 24” o.c. max.
First Common
Rafter
Barge Rafter
LP SmartSide Trim & Fascia
9