
Installation Instructions

2
• Climb cut the surface of siding such that rotation of the blade
cuts downward on the primed or prefinished siding surface.
• Seal all exposed surfaces, including all drip edges or where
water will hang.
• Apply finish coat of paint as soon as possible, and within
180 days of application.
• Follow the coating manufacturer’s application and
maintenance instructions.
• For best results use a high-quality 100% acrylic exterior paint,
specially formulated for use on wood and engineered wood
substrates; oil paint is acceptable.
- DO NOT USE: stain
- DO NOT USE: vinyl-based paint
(like vinyl acetate or PVA)
SMOOTH FINISH Panel Siding:
• Either flat, satin or semi-gloss coatings can be applied to
smooth finish panel siding.
-
Each offers different appearance & maintenance benefits.
- See Technical Bulletin #049 for additional information.
CEDAR TEXTURE Panel Siding:
• For best results use semi-gloss finish.
-
See Technical Bulletin #049 for additional information.
F I
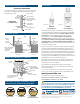
LP Siding
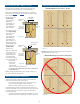
Min. 1" (25 mm)
clearance between
siding and roofi n g ,
or trim and roofi ng
• Trim should be thick enough so the siding does not extend
beyond the face of the trim.
• Trim and fascia must be applied in a manner that will not allow
moisture intrusion or water buildup.
• LP® SmartSide® siding is not designed and/or manufactured to
be used as trim.
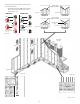
T
Do not run trim or siding
inside the kick- out fl ashing
•
I
nstall kick-out fl ashing at roof eave-to-wall intersections to
direct the water into the gutter.
• Install step fl ashing at roof-to-wall intersections with a
minimum 4 inch (102 mm) upper leg.
• Properly integrate fl ashing with the water-resistive barrier. Use
housewrap, fl ashing tape, Z-fl ashing, or other items as needed
to maintain the counterfl ashing principle.
•
DO NOT extend the siding or trim into kick-out fl ashing or gutter.
• Maintain a minimum 1 inch (25 mm) clearance between the end
of the gutter and the adjoining wall to allow for proper
maintenance of the siding.
K-O F
• All openings must be properly sealed or fl ashed in a manner
that prevents moisture intrusion or buildup. Several examples
that accomplish this objective are shown on the following pages.
F, W, D O
G S
• Seal all gaps with a high-quality, non-hardening, paintable
exterior sealant meeting ASTM C920, minimum Class 25.
Follow the sealant manufacturer’s instructions for application.
• A properly installed WRB is required behind siding. Consult
your local building code for details.
• The LP SmartSide panel siding limited warranty does not
expressly or implicitly cover water penetration.
- LP does not assume responsibility for any water penetration.
• Sheds and other accessory structures where the interior
wall cavities will remain permanently exposed may use LP
SmartSide panel siding with SilverTech or SmartFinish and
do not require a WRB, if exempt by local building code.
W-R B (WRB)
P P S
• Handle prefinished panel siding with extreme care during
storage and application.
- Do not remove slipsheet while handling or carrying siding
on job site as doing so may damage the coating.
- Touch-up any damage to prefinished siding that may
occur during application per the instruction below or the
Prefinishers specifications.
- Touch-up paint should be used sparingly.
- Carefully apply touch-up paint only to the areas with
missing paint. Doing so will allow the touched-up areas
to better blend in with the factory applied coating.
- Apply touch-up paint to cover scratches less than 1 inch
in length and less than 1/16 inch wide, exposed nail heads
or small nicks.
-
Do not apply touch-up paint to spots greater than 3/4 inch
in diameter.
- Apply touch-up paint only when air, siding and paint
temperature are above 50°F and will remain above 50°F
for at least 24 hours after application.
- Shake touch-up paint for 90 seconds before every use.
- Do not use touch-up if you suspect the paint has frozen.
- Do not apply touch-up paint to wet siding.
- Avoid using touch-up when condensation is likely to form.
- Avoid using touch-up when precipitation is possible.
- Store touch-up paint between 40°F and 100°F.
• Touch-up paint is air dried, while factory applied paint is
generally cured using ovens. For this reason, the touch-up
paint will have some minor differences initially and after time.
Minimizing the use of touch-up paint is the best approach to
ensure these minor differences are less noticeable.
• Use the appropriate applicator provided in the LP® SmartSide®
ExpertFinish® Touch-Up Kit.
- Nail Head Paint Applicator.
(Figure 5H)
- Cut End Paint Applicator. (Figure 5J)