
Installation Instructions

3
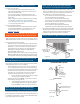
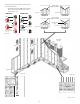
• DO NOT installing panel siding with brushstroke running in
di erent directions.
(Figure 3D)
N I - D S
• Penetrate structural framing or wood structural panels and
structural framing a minimum of 1-1/2 inches (38 mm).
• A reduction in allowable racking shear capacity is required in
Table 1 of both
PR-N124 and ESR-1301 when using panel siding
with a shiplap edge.
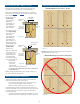
• For 38 Series panel
double nailing
procedure meets
wall bracing
requirements for
5/16 CATEGORY
shear wall design
value in Table 1.
• For 76 and 190 Series
panel single nailing
procedure meets
wall bracing
requirements for
5/16 CATEGORY
shear wall design
value in Table 1. To
meet the equivalent
3/8 CATEGORY shear
wall design value,
double nailing
must be used.
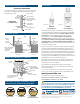
• Align the overlap edge
of the panel to the
outside edge of the
alignment bead on
the underlap edge
of the adjacent panel
as shown in Figure 3B.
- Doing so will
maintain the
1/8" (3 mm)
expansion gap
Figure 3D
1/8"
(3 mm)
gap
Figure 3C
SMOOTH FINISH Brushstroke Texture - NOT Parallel
SMOOTH FINISH Brushstroke Texture - Parallel
Brushstroke direction
Brushstroke direction
Brushstroke direction
Brushstroke direction
Brushstroke direction
Brushstroke direction
Brushstroke
direction
Brushstroke
direction
SMOOTH FINISH P O
(CONT.)
Single row of nails
3/8" (10 mm)
from edge
Double row of nails
1" (25 mm)
from edge
1/8"
(3 mm)
gap
Alignment
bead
Alignment
bead
min. 1-1/2"
(38 mm)
embedment
min. 1-1/2"
(38 mm)
embedment
on the back side of the panel seam.
- DO NOT INSTALL OVERLAP EDGE ON TOP OF UNDERLAP
ALIGNMENT BEAD.
•
Where siding butts window trim, door casings and masonry,
etc. leave a 3/16 inch gap and seal.
• Smooth fi nish square edge panel siding may be installed in
either the horizontal or vertical orientation.
- For a consistent fi nish appearance, maintain the same
panel orientation throughout the installation.
(Either all panels installed vertical or horizontal.)
• Smooth fi nish panels have a subtle brushstroke texture, this
texture runs parallel to the long panel direction and can be used
to identify the panel orientation even after the panels have
been reduced in size.
- See photos with directional arrows to familiarize yourself
with this feature before beginning installation.
(Figure 3C)
SMOOTH FINISH P O
Figure 3A
Figure 3B