
Installation Instructions


TRIM & FASCIA 190, 440, 540 & 2000 SERIES
PREPARATION
• Moisture control and moisture vapor control are critical elements of proper housing design and construction. Check your
local building codes for application procedures for handling moisture and water vapor in your area.
• Follow all applicable building code specications relating to prevention of moisture intrusion into the wall assembly. LP
SmartSide trim and fascia are wood products, and, as with all wood products, must be kept free from excessive moisture.
Lack of proper ventilation; exposure to constant or repetitive sources of water such as sprinklers, condensation, inadequate
ashing; improper sealing; or failure to follow common building practices that prevent moisture intrusion into the wall
system may cause damage, and products subject to such treatment will be excluded from warranty coverage.
• As with all wood products, do not apply engineered wood trim and fascia to a structure having excessive moisture
conditions such as drying concrete, plaster, or wet blown cellulose insulation. If such conditions exist, the building should be
well ventilated to allow it to dry prior to the application of the trim and fascia.
• Gutters with kick-out ashing and eave drip edge are recommended for control of roof water run o.
(See diagram 3b, 3a, 2c and 9b)
GENERAL REQUIREMENTS (CONTINUED)
• Apply nails to meet the specications in the General Application
Equipment section in this document. (See diagram 3c)
• For edge-nailing, all nail holes must be pre-drilled. Do not
attempt to edge nail without pre-drilling.
(See diagrams 6e and 6f)
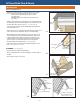
• Fastener length: Long enough to fully penetrate structural
framing or wood structural panels and structural framing a
minimum of 1 inch (25 mm). (See diagram 4a)
• Fastener placement: 3/8 inch (10 mm) from ends and edges,
when framing support allows.
• Fastener spacing: Trim must be fastened with two nails at both
ends, with additional fasteners spaced a maximum of 24 inches
(610 mm) o.c. along the length of the board, or with two nails
at both ends, with additional fasteners spaced a maximum of 12
inches (305 mm) o.c. along alternating edges the length of the
board. (See diagram 4b)
• Fastener quantity: For trim under 7 inches (178 mm) wide use
a minimum of 2 nails per width. For trim 7 (178 mm) to 12 inches
(305 mm) wide use a minimum of 3 nails per width. For trim over
12 inches (305 mm) wide use a minimum of 4 nails per width.
• Where edges of trim meet siding material, windows, doors or
other nished openings, leave a minimum 3/16 inch (5 mm)
space to allow for proper sealing. Provide increased spacing
along the trim if specied by the siding application instructions.
• Do not miter corner joints of band boards, fascia, corner trim,
etc. (See diagram 2e)
4a
CUTTING
4b
Moisture Control
Fastening Instructions
Caulked Butt Joint
Gap 3/16” and seal
1”
INSTALLATION
24” max.
or
12” max.
12” max.
LP SmartSide Trim & Fascia
4