
Installation Instructions


TRIM & FASCIA 190, 440, 540 & 2000 SERIES
PREPARATION
• Properly installed ashing materials will help direct water away
from common water collecting areas.
• All ashing material shall be metal or another durable material
that under normal outdoor environmental conditions will last for
a period of not less than 50 years.
• All ashing materials must have a minimum 4 inch (102 mm)
upper leg. Add a 4 inch (102 mm) wide adhesive ashing to
ashing legs less than 4 inches (102 mm).
• Properly integrate ashing with the secondary WRB. Use
housewrap, ashing tape, kick-out ashing, step ashing,
Z-ashing, drip edge, gutters or other items as needed to
maintain the counter-ashing principle.
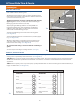
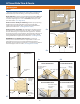
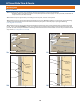
• Install kick-out ashing to direct the water into the gutter.
(See diagram 3a)
• Install step ashing that has a minimum 4 inch (102 mm) upper
leg. (See diagram 3a)
• Maintain a minimum 1 inch (25 mm) clearance between the
end of the gutter and the adjoining wall to allow for proper
maintenance of the siding. (See diagram 3b)
• Do not extend the siding or trim into the kick-out ashing or
gutter.
• Seal ALL exposed cut edges of siding and trim. (See age 1)
GENERAL REQUIREMENTS (CONTINUED)
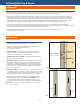
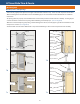
• FASTENERS: Minimum 8d (0.113 inch diameter shank), hot-dipped galvanized or stainless steel nail. Apply and treat
nailing errors as specied by these instructions. (See diagram 3c)
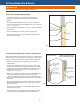
• SEALANT: Use an exterior-quality, non-hardening, paintable sealant. Use Class 25 or higher exterior sealant meeting the
ASTM C920 Standard for Specication for Elastomeric Joint Sealants. Follow the sealant manufacturer’s instructions for
application.
• PAINT: Exterior-quality 100% acrylic latex paint, specially formulated for use on wood and engineered wood substrates, is
highly recommended. (See diagram 12)
3a
3b
1” min.
clearance
Water Run-O Control
Fasteners, Sealant and Paint
WRB
Kick-out
Flashing
4” min.
step-ashing
1” min.
clearance
3c
Shank Diameter ≥ 0.113 “
LP SmartSide Trim & Fascia
3
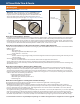
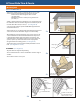
CONDITION
Snug
Flush
Visible Fiber
Countersunk
1/16” - 1/8”
Countersunk
more than 1/8”
CORRECTION
OK
OK
Paint
Apply Sealant
Apply Sealant and
re-nail