
Installation Instructions
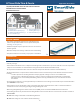


TRIM & FASCIA 190, 440, 540 & 2000 SERIES
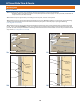
INSTALLATION
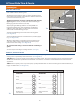
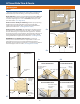
• Trim ends may lightly touch adjacent trim edges around windows and doors only. Seal all cut ends exposed to the weather.
• When installing trim around windows and over window anges, be sure to follow the window manufacturer’s installation
instructions.
• All openings must be properly sealed and ashed in a manner that prevents moisture intrusion or buildup. Flashing may be
sealed to the water-resistive barrier by using adhesive ashing or housewrap tape. (See ALL diagrams)
• When trim is installed adjoining vinyl siding, install Z-ashing with a 4 inch (102 mm) upper leg between horizontal trim and
utility trim or J-channel. (See diagram 8a)
• Horizontal trim or bands shall be ashed with a sloped metal Z-ashing to redirect water away from the wall assembly.
GENERAL REQUIREMENTS (CONTINUED)
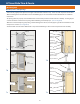
7a
7b
Nails
24” o.c. max.
Windows, Doors and Openings
Z-Flashing
(do not caulk)
Adhesive
Flashing
Shim
window and
door trim so
it is installed
on level wall
plane
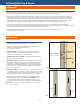
7c
Housewrap
Tape
Window
Flange
Housewrap
Flap
Head Flashing
Jamb Flashing
Sill Flashing
Sealant
3/16” min.
space
Sealant
3/16” min. space
Sealant
3/16” min.
space
Z-Flashing
3/8” min. space
(do not caulk)
WRB
Siding
Z-Flashing
3/8” min. space
(do not caulk)
Shim
Adhesive
Flashing
Top of Window
Trim
Z-Flashing
3/8” min. space
(do not caulk)
WRB
Siding
Shim
Sill Flashing
Bottom of Window
Trim
Sealant
3/16” min. space
Sealant
3/16” min. space
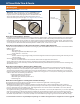
7d
7e
LP SmartSide Trim & Fascia
7