
Installation Guide


TRIM & FASCIA 190, 440, 540 & 2000 SERIES
4a
INSTALLATION
4b
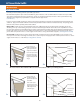
Framing Diagram:
Sot 12 inches Wide
and Less
• Install 2x framing on wall to
fasten perimeter of the sot
• Install intermediate framing to support
and fasten sot seams
Framing Diagram:
Sot Greater than
12 inches Wide
• 24” o.c. intermediate framing
is required
• Install 2x intermediate framing a max.
of every 24” o.c. to fasten sot at seams
4c
4d
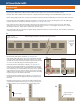
Nailing Diagram:
Sot 12 inches Wide
and Less
• Fasten every 6” o.c.
along perimeter
• Fasten along seams a max. of every 6” o.c.
Space butt joints 3/16” and caulk*
Nailing Diagram:
Sot Greater than
12 inches Wide
• Fasten every 6” o.c.
along perimeter
• Fasten a max. of every 12” o.c.
along intermediate framing
*If joint moulding option is selcted, add the thickness of the web to the gap allowing a net 3/16” space for expansion.
LP SmartSide Sot
4
• Install 2x framing on wall to
fasten perimeter of the sot
• Fasten along seams a max. of every 6” o.c.
Space butt joints 3/16” and caulk*
• 24” o.c. intermediate framing
is NOT required