
Installation Guide


TRIM & FASCIA 190, 440, 540 & 2000 SERIES
INSTALLATION
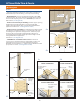
• When attaching trim as batten strips, follow the Fastening Instructions section in this document.
− Exception: When using trim less than 3 inches wide as battens, apply one nail per width, a maximum of every
36 inches vertically.
• When batten strips are applied over panel siding at vertical joints, sealant is not required.
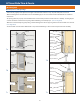
• When batten strips are applied to walls with horizontal panel joints, do not run battens over the panel joint and ashing.
Terminate the trim battens above and below the horizontal panel joint to allow for proper spacing and ashing.
(See diagrams 10a and 10b)
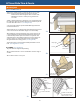
• When batten strips are applied to walls with horizontal band boards be sure to properly ash above and below the band
board. Leave a minimum 3/8 inch space between the ends of the batten strips and the band board. Prime and paint all cut
ends and exposed substrate. Z-ashing installed below the band board must cover the top ends of the batten strips below.
(See diagrams 10c and 10d)
GENERAL REQUIREMENTS (CONTINUED)
10a
10c
Board and Batten
Z-Flashing
WRB
Adhesive Flashing
Panel
Siding
Trim Battens
WRB
Panel
WRB Flap
or Adhesive
Flashing
Batten
Panel
Sloped
Z-Flashing
10b
10d
Z-Flashing
WRB
Adhesive Flashing
Panel
Siding
Trim Battens
Trim Band Board
Panel
WRB Flap
or Adhesive
Flashing
Batten
Panel
Sloped
Z-Flashing
WRB Flap
or Adhesive
Flashing
Sloped
Z-Flashing
Batten
Band Board
LP SmartSide Trim & Fascia
10